ASRock Z170 Extreme 7+ (LGA 1151) Motherboard Review
Rikki Wright / 9 years ago
Introduction, Specifications and Packaging
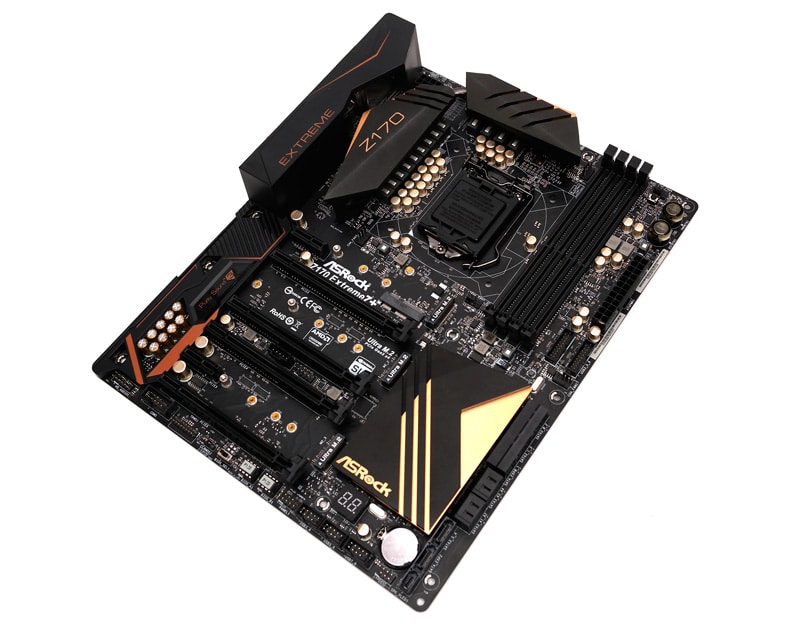
Z170 and Skylake are here, finally! The true successor to Haswell and Haswell Refresh and the first 100% successful 14nm process. Broadwell works, but due to limitations and problems, it was an extremely late release and didn’t really wow us. Skylake is set to change that by bringing back true overclocking with a fully unlocked BLCK to really allow users to fine tune an overclock thanks to the 1MHz increments. Along with this, Z170 also brings huge connectivity through 20 PCIe 3.0 lanes and 10 USB 3.0 lanes; although some manufacturers may not utilise the full amount of lanes.
ASRock is a big player in the motherboard market, producing the renowned Extreme series across both Intel and AMD CPU’s. The Extreme series offers top quality components with great style and functionality. In recent years, the series has taken multiple different colour schemes from blue and white, black and silver and now the best (in my opinion), black and copper. Along with that, the simply huge arrowhead style heat sink covers are gone and replaced with a much more subtle design.
Today we have the top of the line Z170 Extreme 7+, although I would expect an Extreme 9 in the near future. Featuring all of the key features that ASRock motherboards have incorporated for many years such as Ultra M.2 and Purity Sound. Thanks to the new Z170 chipset, ASRock has gone above and beyond with the connectivity. Typically you see one M.2 port, however, ASRock added an extra two. This might not seem amazing, but when you consider the ultra fast Intel NVME SSD drives, adding three in RAID 0 would make for an incredibly fast storage solution; let’s find out how well it performs in today’s review.
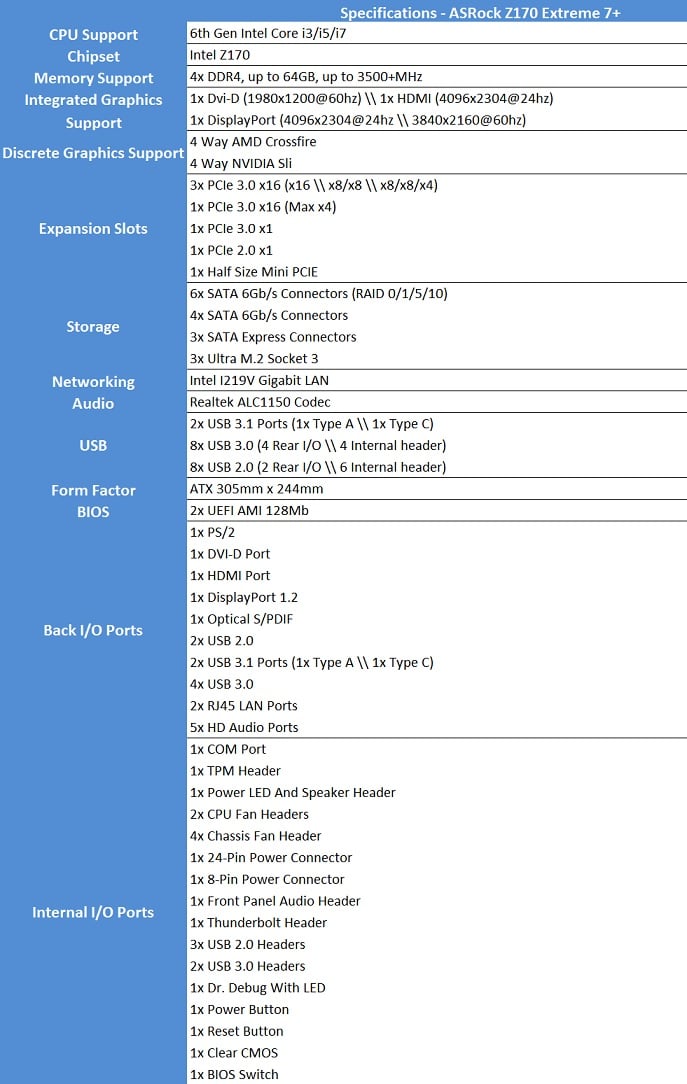
Key Features
Manufacturers nowadays need to find innovative ways to stand out from the crowd, ASRock is no exception and has crammed a huge array of features into this motherboard.
- USB 3.1
- USB Type-C
- Turbo M.2
- Purity Sound 3
- NVIDIA SLI
- AMD Crossfire
- Dual Intel LAN
- USB 3.1 Front Panel
- Digi Power
- Super Alloy
- XXL Aluminium allow heatsink
- Premium 60A Power Choke
- Dual stack MOSFET
- 12k Platinum capactiors
- Premium memory alloy choke
Packaging and Accessories
The box is very similar to the rest of the Extreme range; a strong outer case with a carry handle.
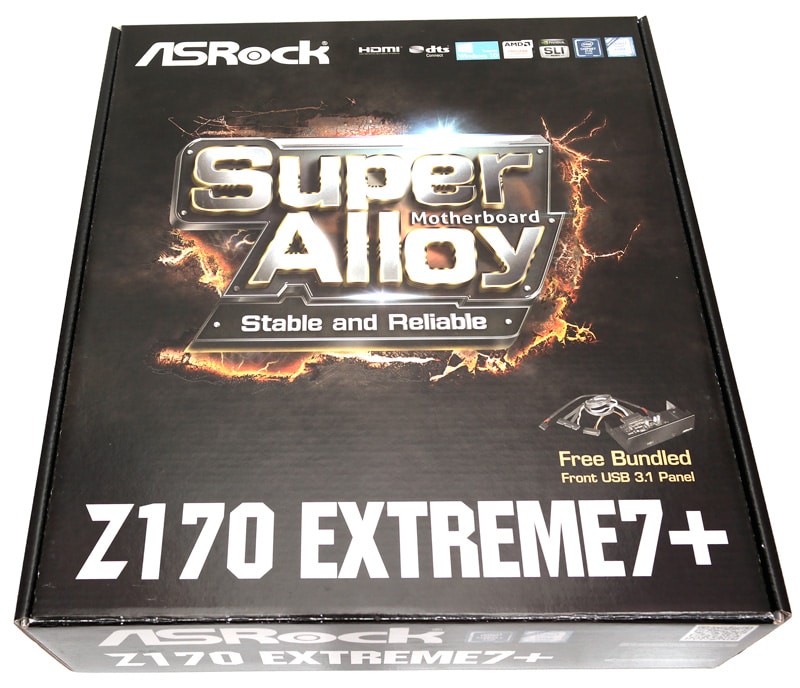
On this particular box, it puts a main focus on the Super Alloy features of the motherboard.
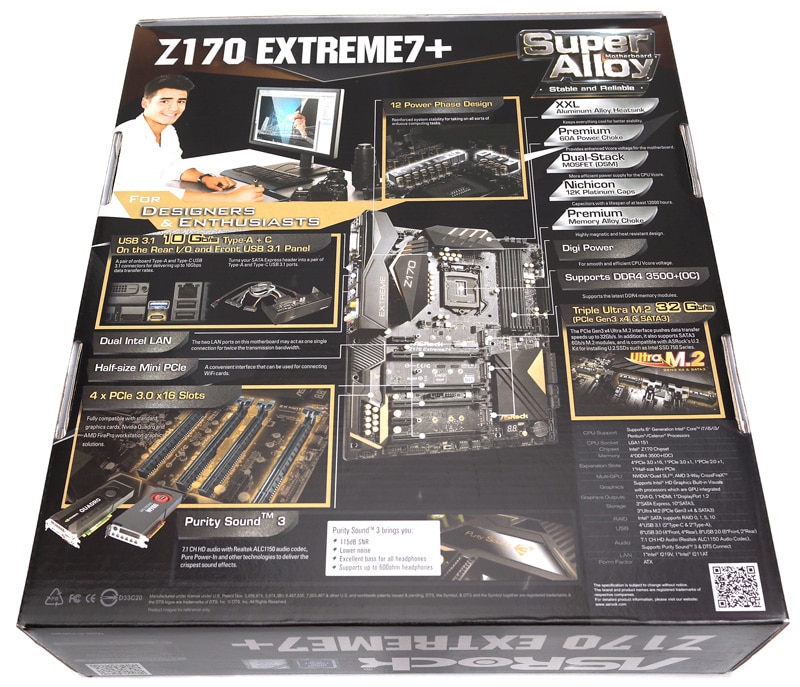
Inside the box is a conservative amount of accessories, driver disk, manual, I/O shield, rigid SLI bridge and 4x SATA 6Gb/s cables.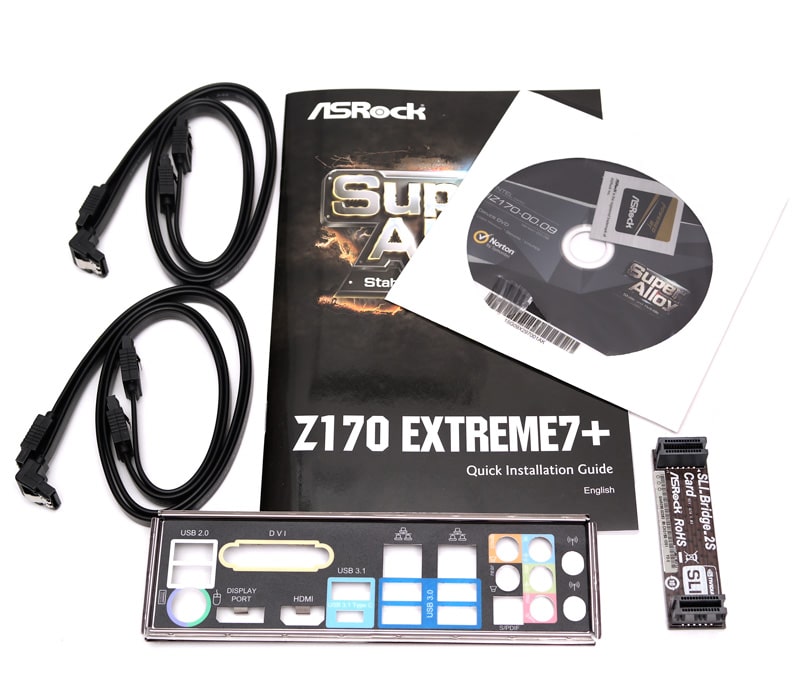
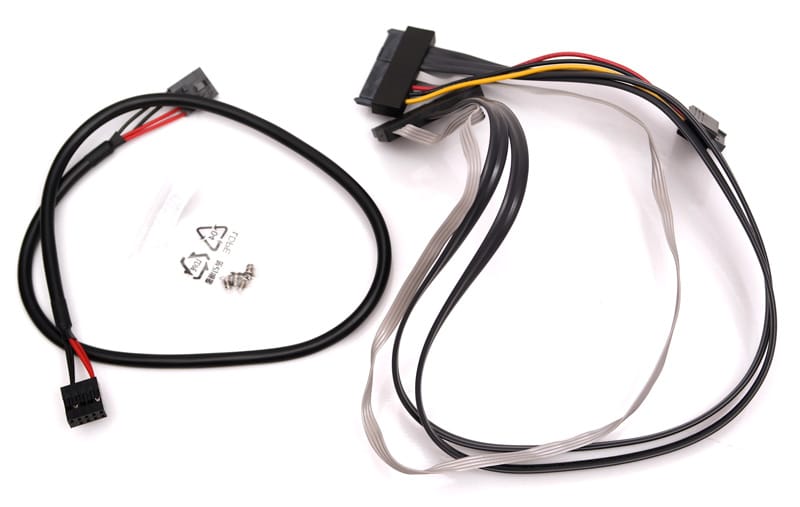
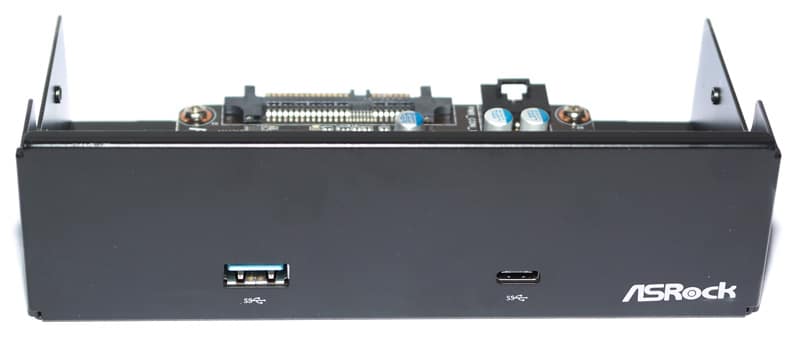
Along with those, ASRock is also bundling in an additional USB front panel connection interface, but not traditional USB 2.0 or even 3.0, but USB 3.1 in Type A and Type C formats. The cables below are what are needed to enable the fastest possible data transfers and plug into the SATA Express ports on the motherboard.
When you look at the front cover, it is relatively plain. Personally I would have mounted two PCBs on top of each other to give 2x of each port or even temperature monitoring LED’s.
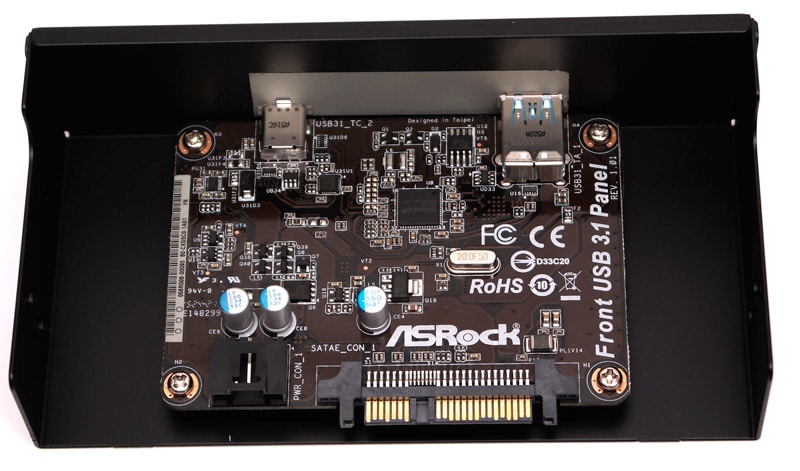
There is so much room behind the panel, maybe you could use it for cable sorting?
A Closer Look & Layout Analysis
This is such a striking motherboard. The Black and copper contrast is easy on the eyes, but also such a great combination.
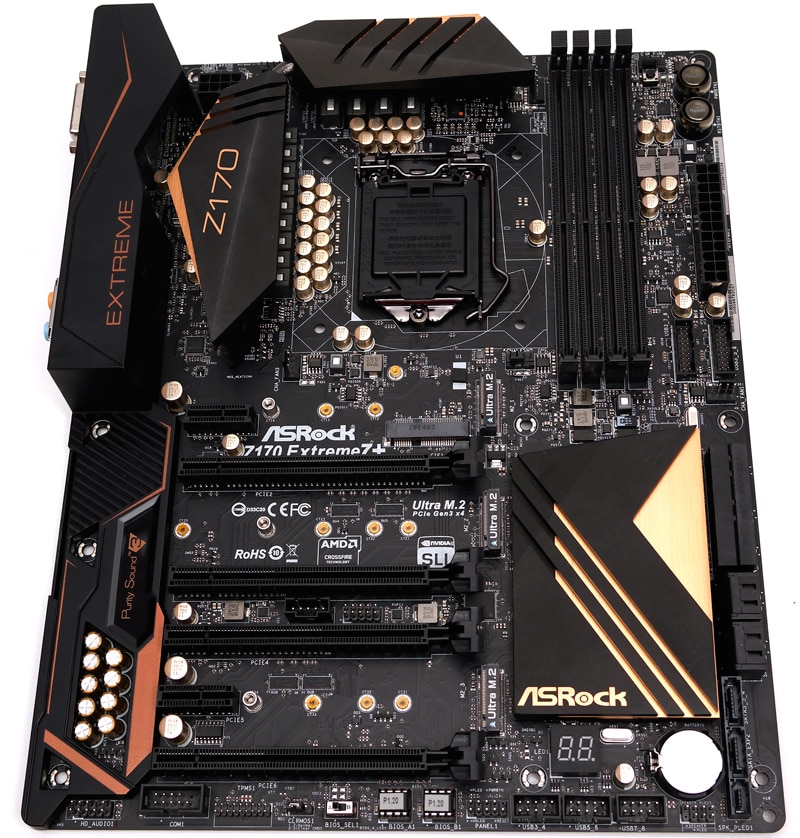
The capacitors have also been given the copper treatment to blend in better with the rest of the board.
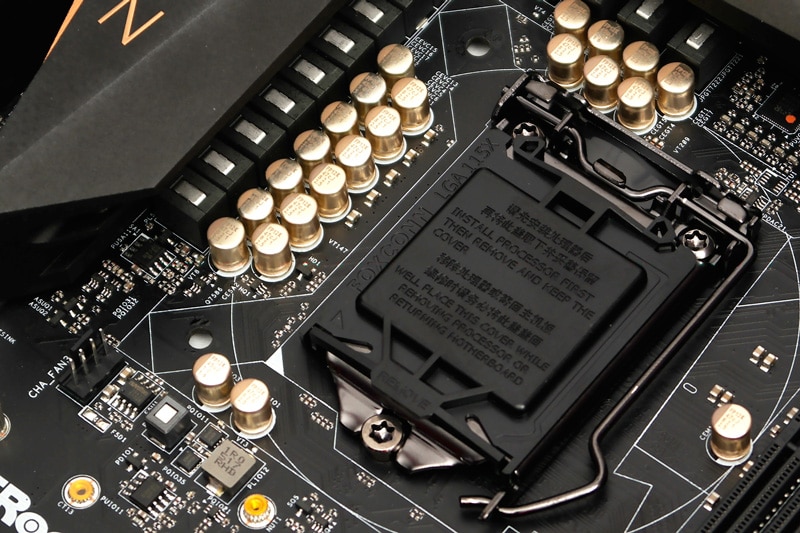
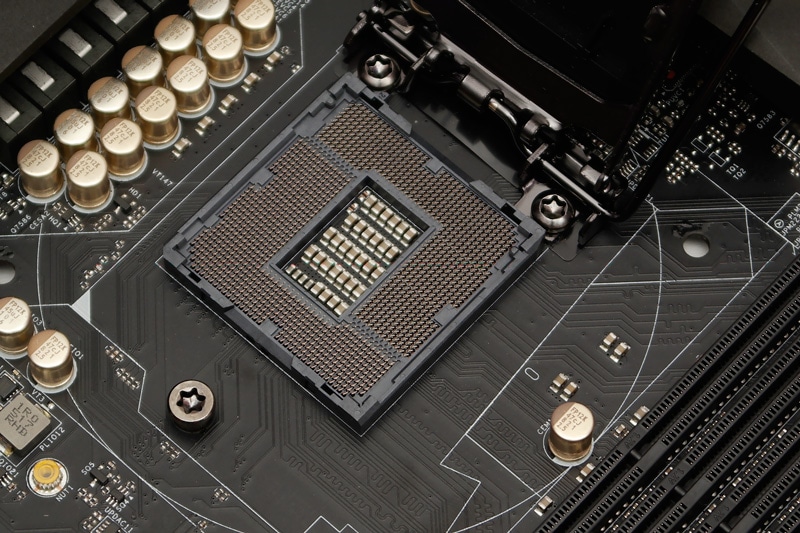
The CPU socket in all it’s glory! Despite the socket featuring 1151 pins, CPU cooling solutions that are compatible with 1150 will also fit.
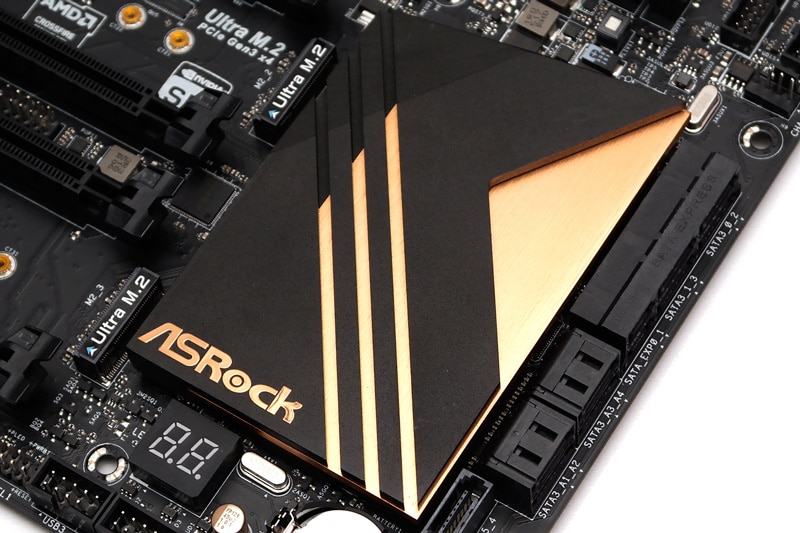
The chipset heat sink is clean-cut and stylish. The basic ASRock logo really shows attention to detail with this motherboard.
Looking towards the I/O options, 2x USB 2.0, 1x PS/2 port, 1x DisplayPort, 1x HDMI, 1x DVI, 2x USB 3.1 (1x Type A, 1x Type C), 4x USB 3.0, 2x Gigabit LAN, 1x S/PDIF output and 5x Audio jacks. To the far right are two ports for WiFi antenna.

ASRock motherboards feature Purity Sound, a high quality audio option; the Z170 sees the introduction of Purity Sound 3.

The shield hugs the components of the motherboard well, but my OCD is screaming at the fact that it’s missing one capacitor in the audio section.
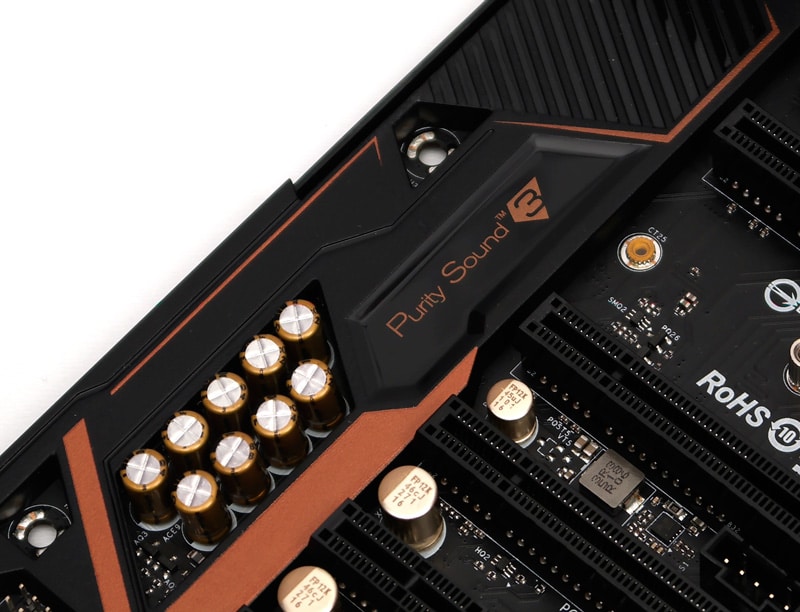
Moving to the bottom of the board, there are the usual connections and functions such as front panel audio, clear CMOS, front panel buttons and dual BIOS with switch.

Moving over, there are 3x USB 2.0 headers, DEBUG LED and front panel LED headers.

Taking a look at the SATA options, there are 3x SATA express ports and 10x SATA 6Gb/s ports.

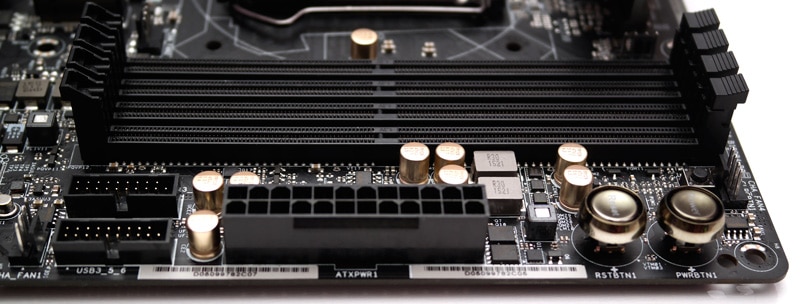
To the top of the board and we have 2x USB 3.0 front panel headers, the 24-pin power connector and onboard Power and Reset buttons. Next to all of this are the 4x DDR4 slots.
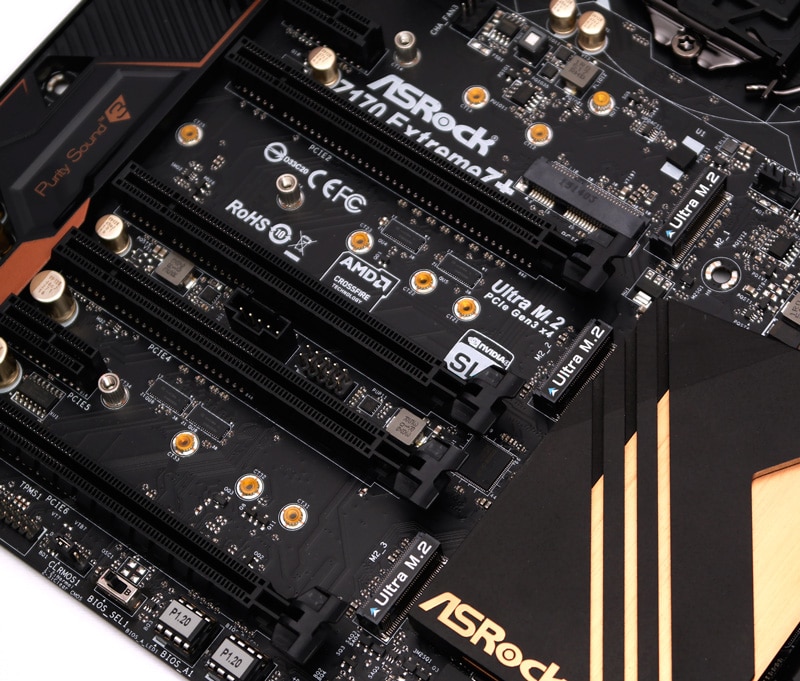
With the Z170 comes an absolutely huge array of PCIe lane options. The ASRock Extreme 7+ features 4x PCIe x16 3.0 slots, 2x PCIe x1 slots, 3x Ultra M.2 slots and a half-size PCIe slot for WiFi or Bluetooth connectivity options.
The Test System and Test Software
Before we delve into any testing we would like to take this opportunity to review our test system.
Test System
- Motherboard varies by review
- CPU: Intel Core i7 6700k
- GPU: NVIDIA GTX 980Ti
- RAM: Crucial Elite 16GB (2x8GB) 2666MHz
- Cooling: Thermaltake Water 3.0 AIO with Gelid GC-Extreme
- Case: Lian Li T80 Test Bench
- Storage Drives: Main storage: Crucial M200 250GB, Test Devices: SanDisk Extreme Pro 240GB SSD, Plextor 256GB M6e M.2 SSD and Patriot SuperSonic Magnum 256GB USB 3.0 Flash Drive
- PSU: be quiet! Dark Power Pro 11 850W
- Operating System: Windows 8.1 64-bit
- Networking: ASUS RT-AC68U router
Test Software
- SiSoft Sandra Engineer – available here
- WPrime – available here
- Cinebench – available here
- 3DMark – available here
- Bioshock Infinite – available here
- Tomb Raider – available here
- AIDA 64 Engineer – available here
- Latencymon – available here
- Rightmark Audio Analyser – available here
- LAN Speed Test Lite – available here
- Passmark – available here
All tests are conducted three times and the average taken to use in our charts.
BIOS and Overclocking
Most motherboard manufacturers nowadays offer multiple BIOS styles for users to enter and tweak the system settings. The latest implementation of the BIOS type is the UEFI (Unified Extensible Firmware Interface) BIOS, which is a simpler version to view and interact with. Each manufacturer has a different style and each motherboard could have a different colour style.
The UEFI style offered by ASRock is very similar to that of previous generation motherboards. A very plain, yet robust design. The main page offers a quick overview of the system.
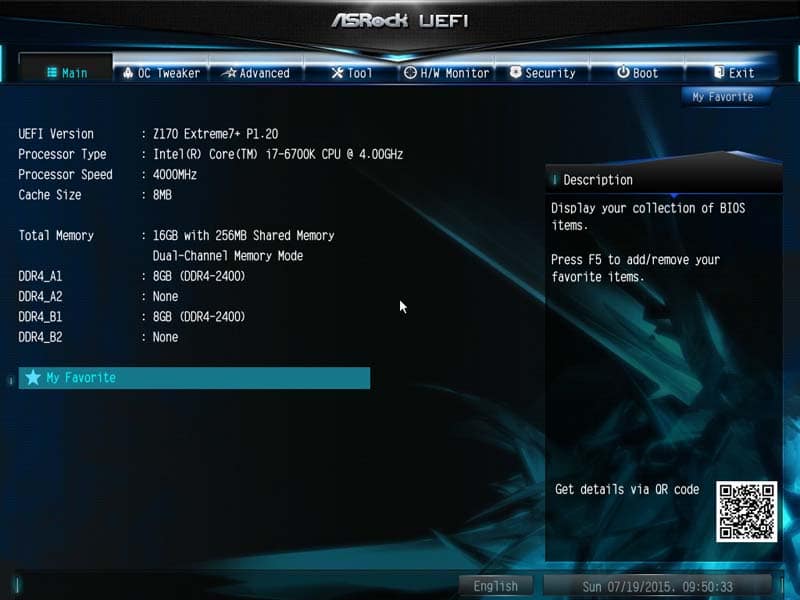
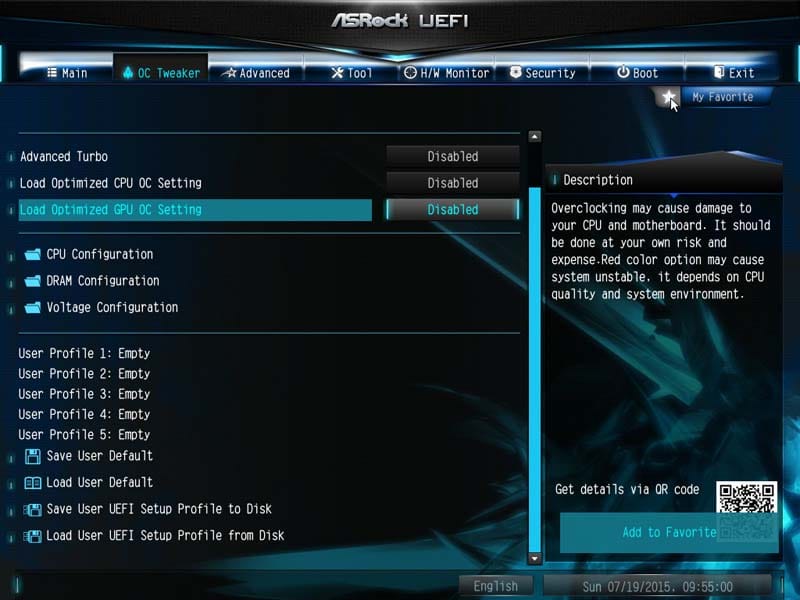
The OC Tweaker page is probably where you are going to spend most of your time. This is a very simple method of optimising the system with preset overclocks and settings for the CPU, RAM and GPU.
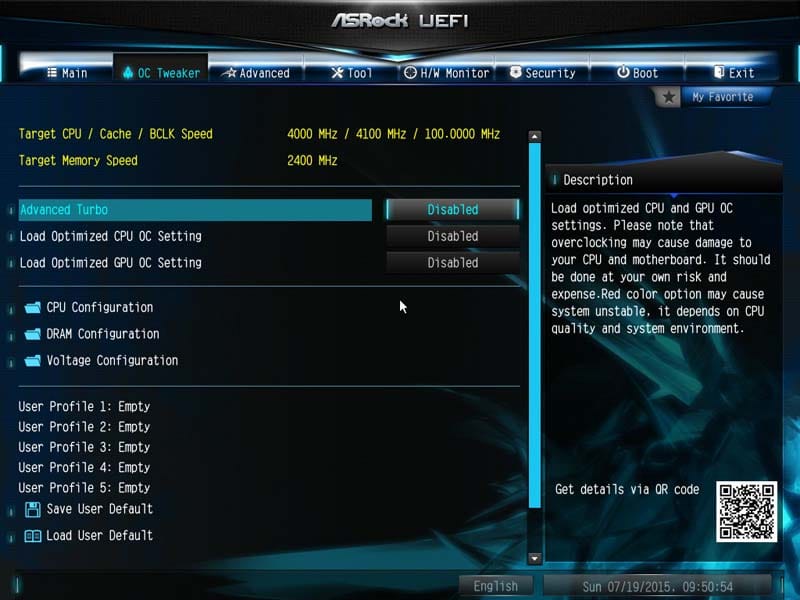
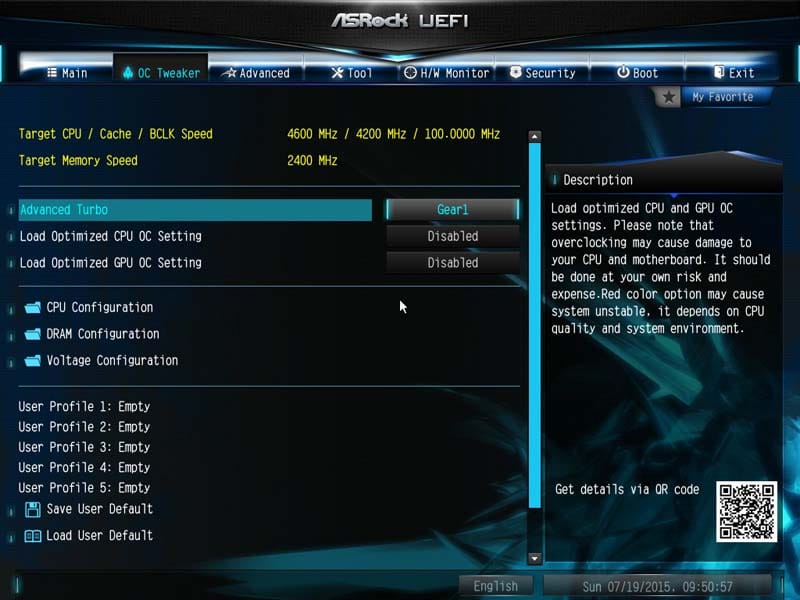
Advanced turbo adjusts the Cache speed slightly, but adds a huge 600MHz onto the Turbo clock speed. It however only comes in 3 settings; Off, Gear 1 and Gear 2, the setting below is Gear 1.
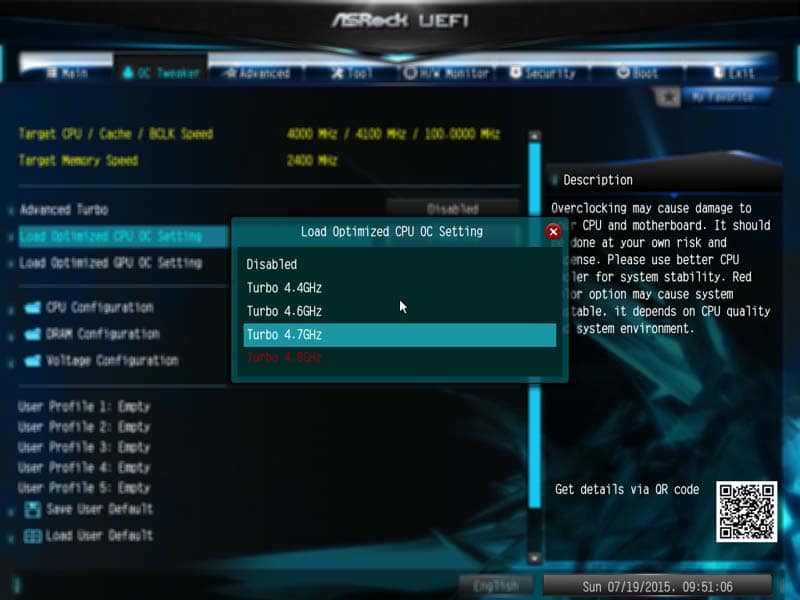
Optimised CPU OC offers a slightly finer tuned overclock choosing from four presets.
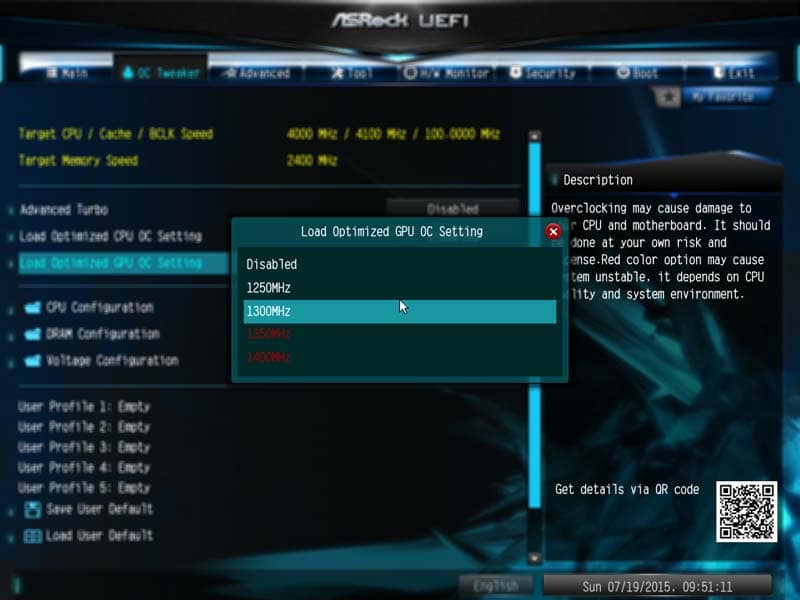
GPU OC applies to the iGPU clock speed of the CPU and not a discrete GPU.
There are then three additional sub-folders which hold all of the settings needed for a fine tuned and custom overclock to your taste. I personally like how the CPU, RAM and voltages are all kept separate.
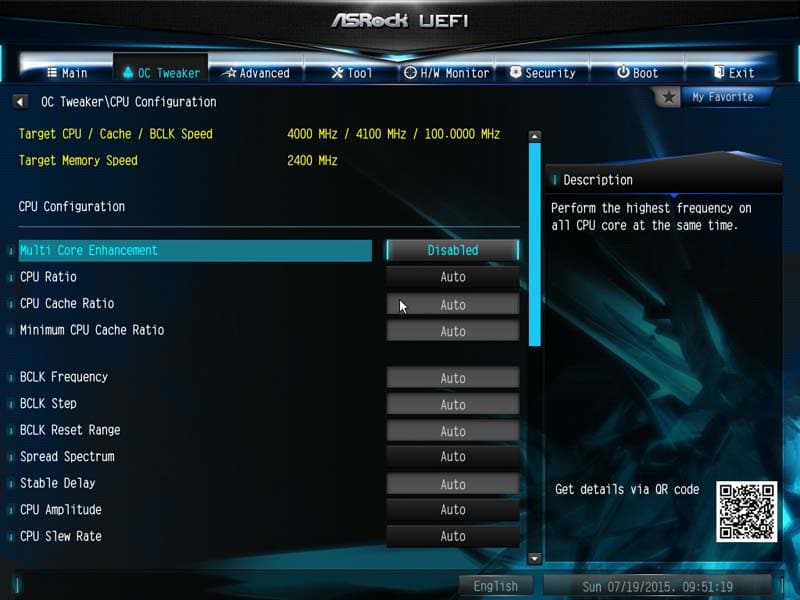
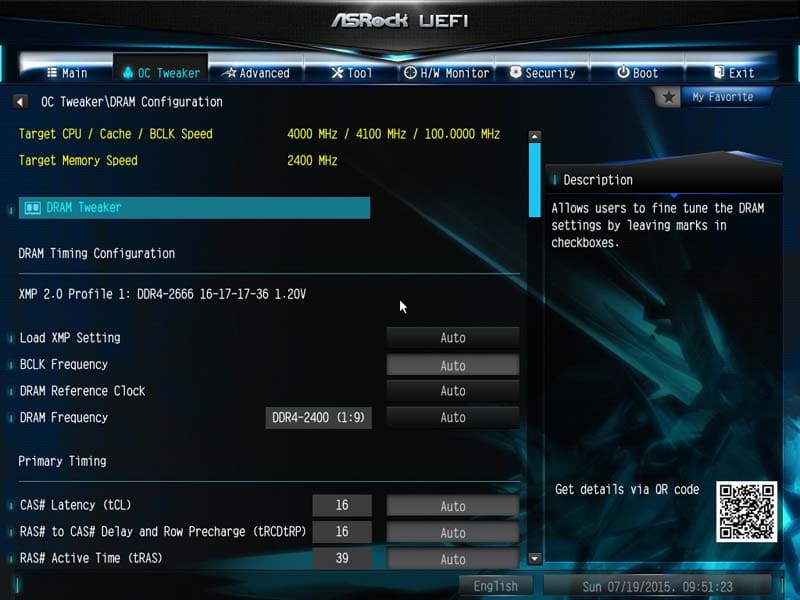
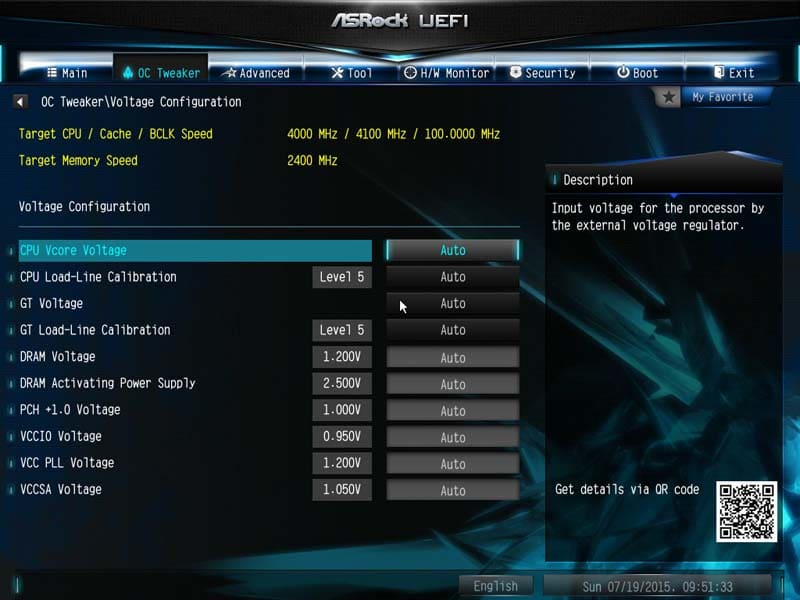
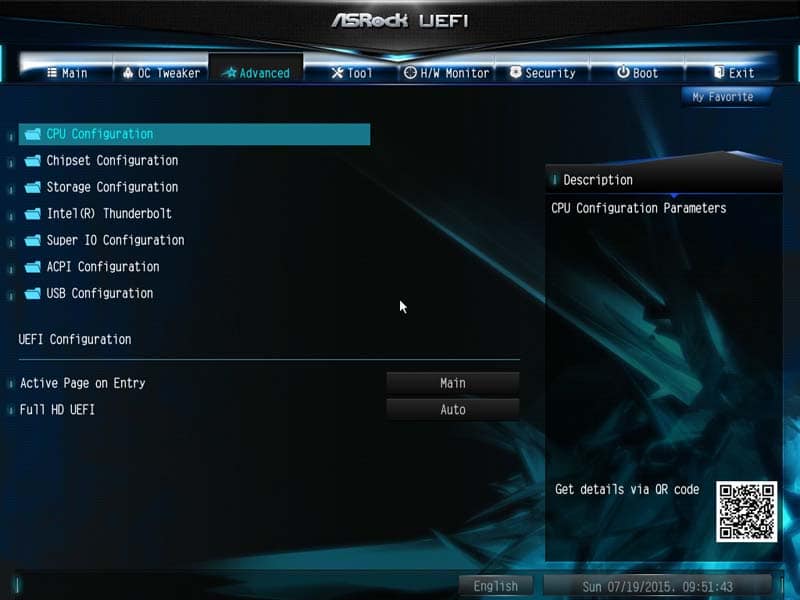
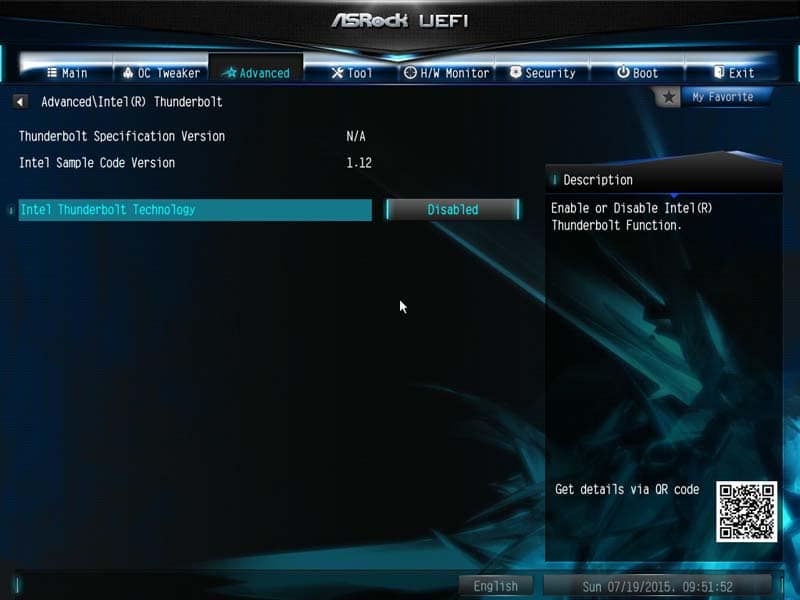
The Advance tab includes the features for the rest of the motherboard such as chipset settings and USB configuration. Most of the Z170 range of motherboards with all feature the new Alpine Ridge Thunderbolt support as standard.
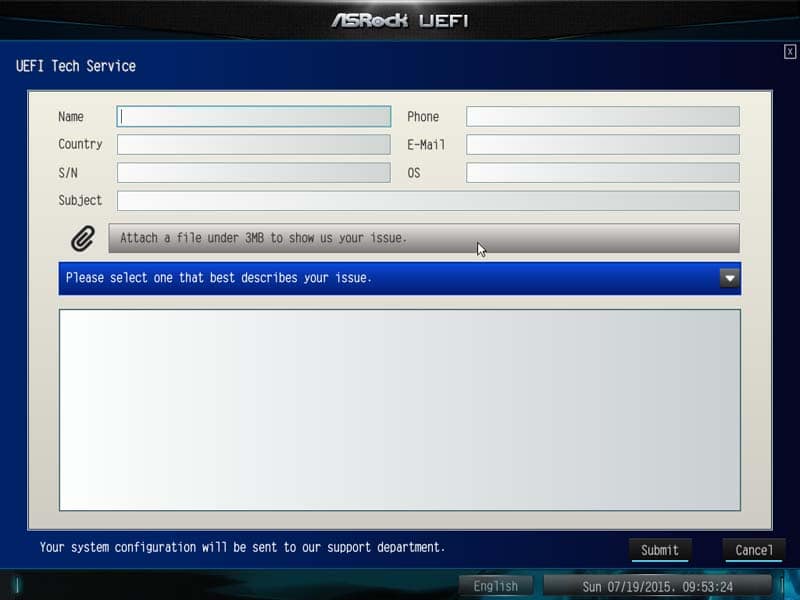
Something I really like about the ASRock BIOS features is the fact that you have many tools to utilise. Some are a little less interesting, but UEFI Tech Service is a great addition. You can send an email from the BIOS to tech support for any problems with your computer that you cannot sort yourself.
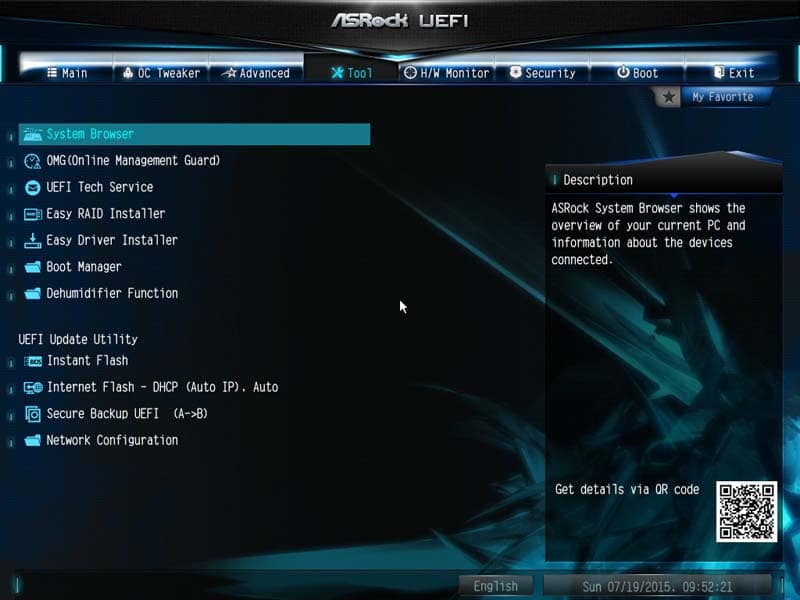
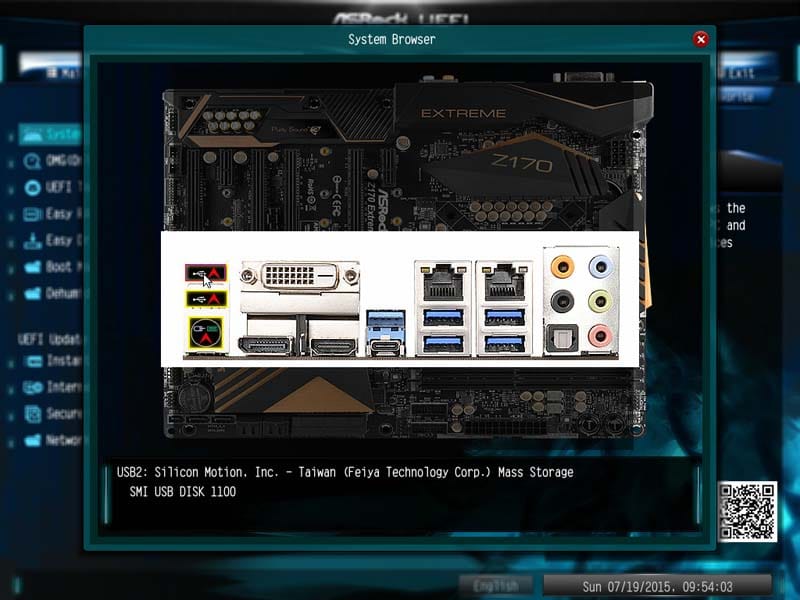
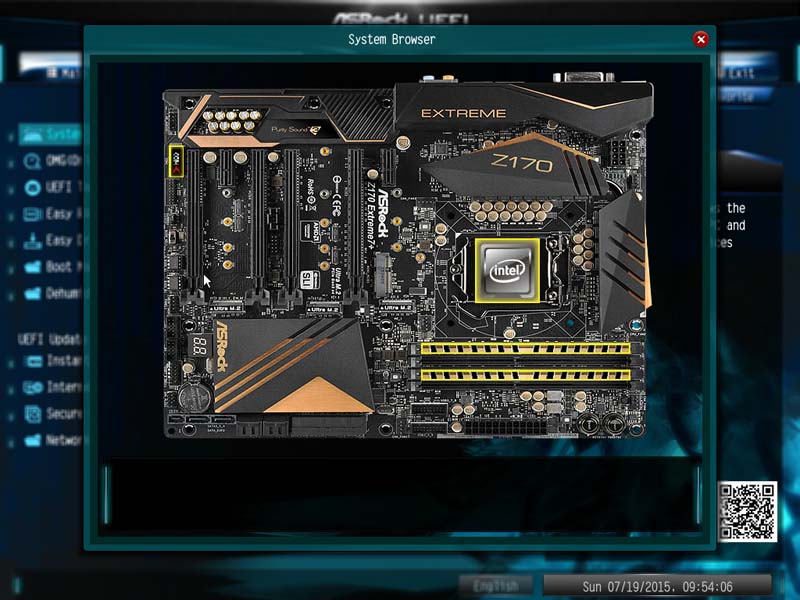
In with the tools page, you have the ‘System Browser’, which allows you to look over the motherboard in real-time and see what is plugged in and at what speed (in the case of CPU/ RAM/ GPU) they are performing at.
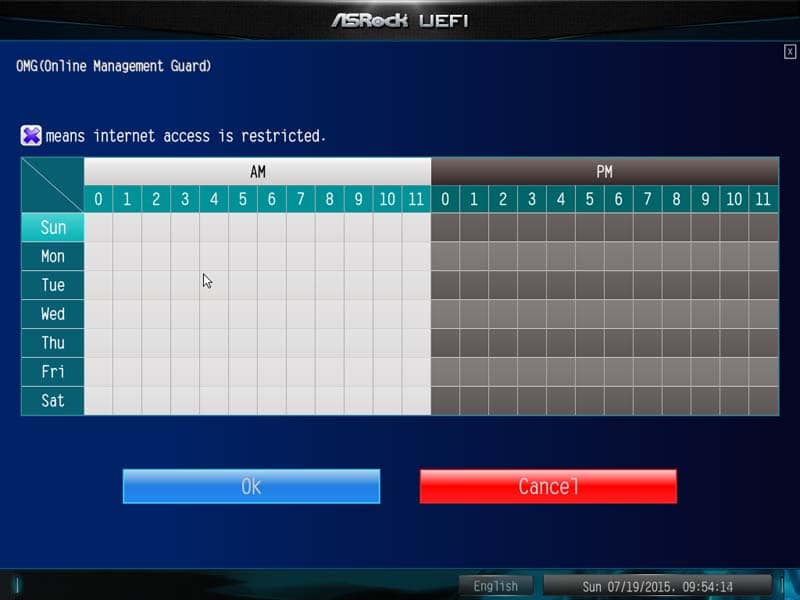
The ASRock OMG (Online Management Guard) can be seen as pretty useless. Most that build their own computers do it for themselves or friends. However, if you do find yourself building for younger users, you can set an internet cut off time to stop them using the computer at night or when there is no supervision.
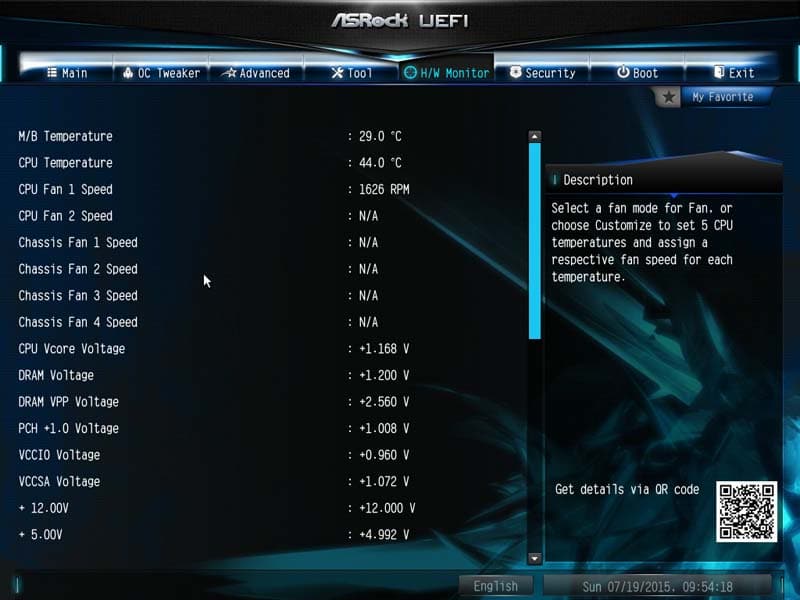
The H/W monitor (hardware monitor) monitors anything and everything about the motherboard, from temperatures to fan speed and voltages.
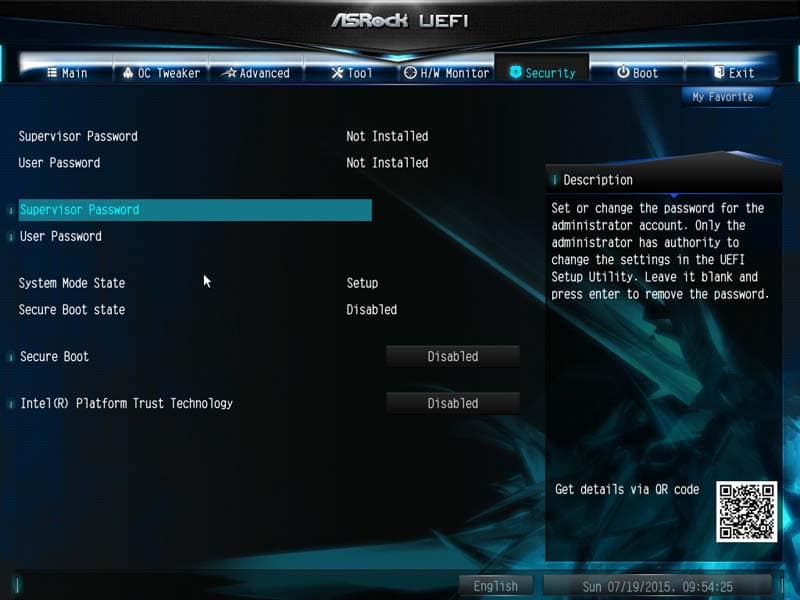
The security tab probably gets used the least. Here you can set system passwords and BIOS security to stop unwanted users accessing and changing the settings. This feature would be really good for schools and colleges under a technician team, but for home users, I personally don’t know anyone that uses this or similar features.
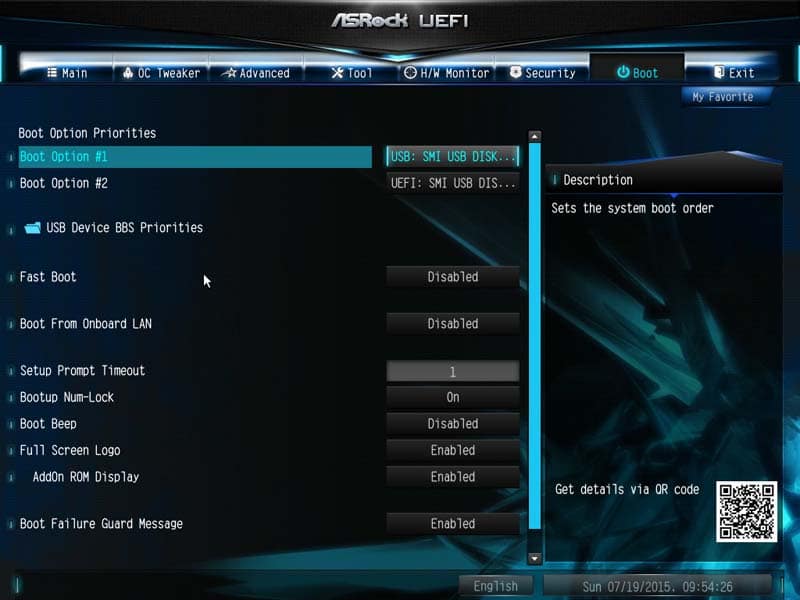
From the Boot tab, you can enable fast boots or booting from LAN and adjust the boot order from here.
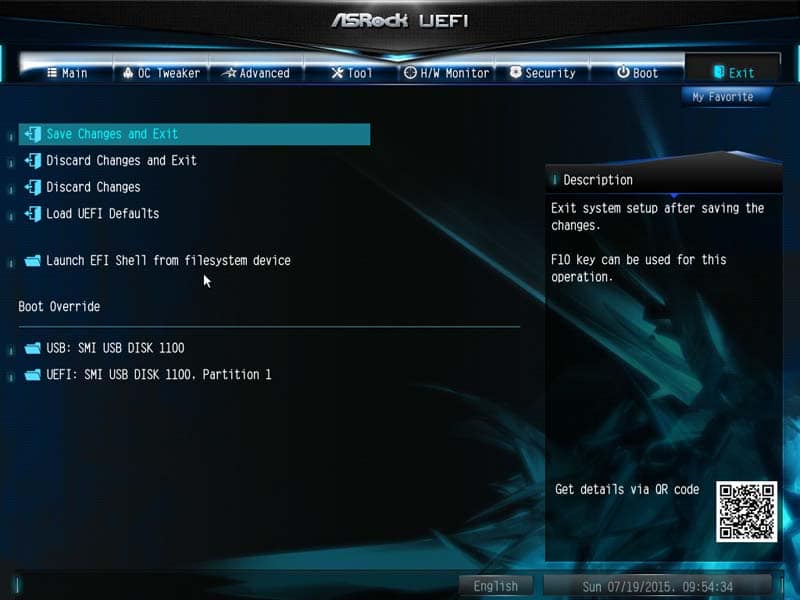
The Exit tab is exactly that, an exit tab. You can override the boot process with n external flash drive for installing Windows or similar and also save or discard settings you have made during your time in the BIOS.
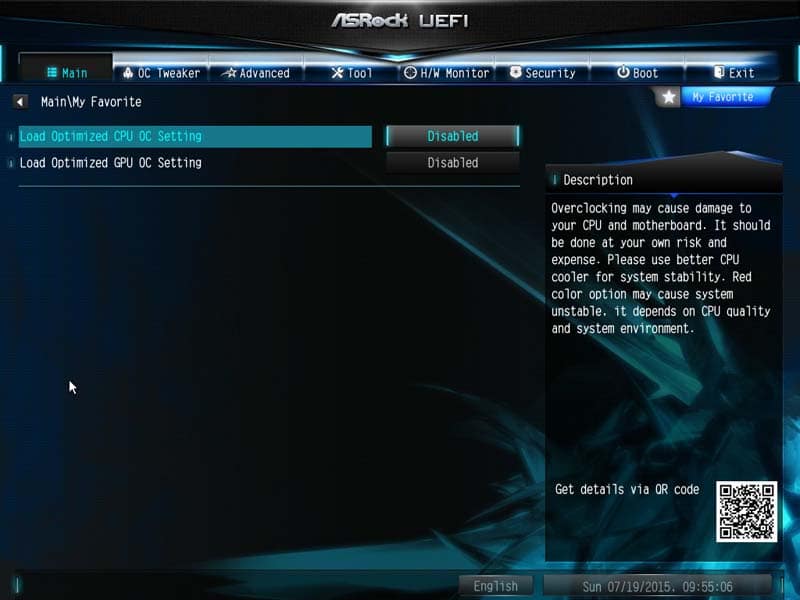
One feature that is slowly getting my interest is the Favorite settings. Here you an add certain settings to a separate screen for easier access instead of having to trawl through the entire BIOS searching. However, ASRock offers such a decluttered BIOS that I can live without it on this particular board.
Overclocking
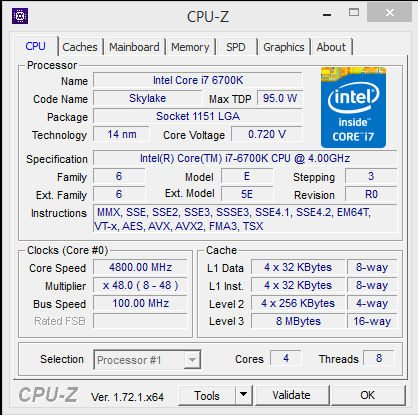
Overclocking this board was a slight pain due to some of the power saving features being enabled. Once Multicore Enhancement was enabled, we managed to reach 4.8GHz. The voltage monitor within CPU-z hasn’t been fully optimised to work with this new platform yet, so there will be some mild discrepancies.
Software Overview
So the manufacturer’s point of difference is not only the components it uses, but also what it can offer the user during day-to-day use. ASRock, like others, offer many different programs for you to choose from once set up which can help to make your life a little easier. Usually these programs are useless, offering bloatware or some pretty pointless programs that you wouldn’t normally download. ASRock used to be the same, but have now changed and have tuned their software to be extremely useful.
The first utility is the App Shop. This is the hub for all of the possible programs you can download which are either produced by or recommended by ASRock. This will search for apps or even new drivers and BIOS updates.
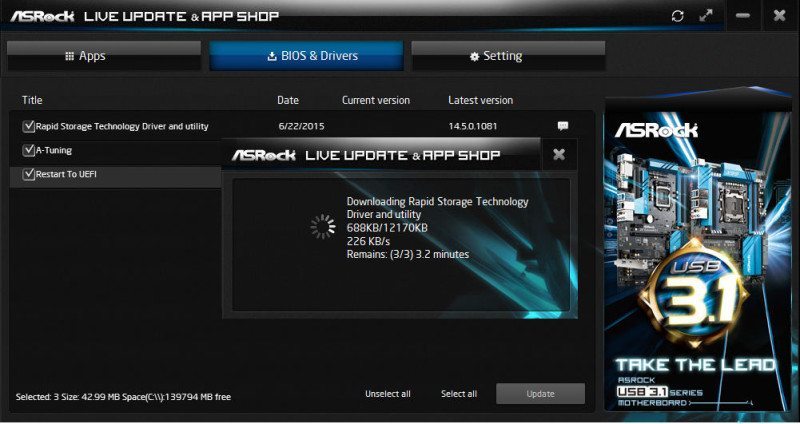
Restart to UEFI might seem like a pointless app, but if you are having issues with your keyboard such as not being recognised until your operating system loads; this could prove valuable.

A-Tuning is ASRock’s tuning software. The features are detailed and everything works well.
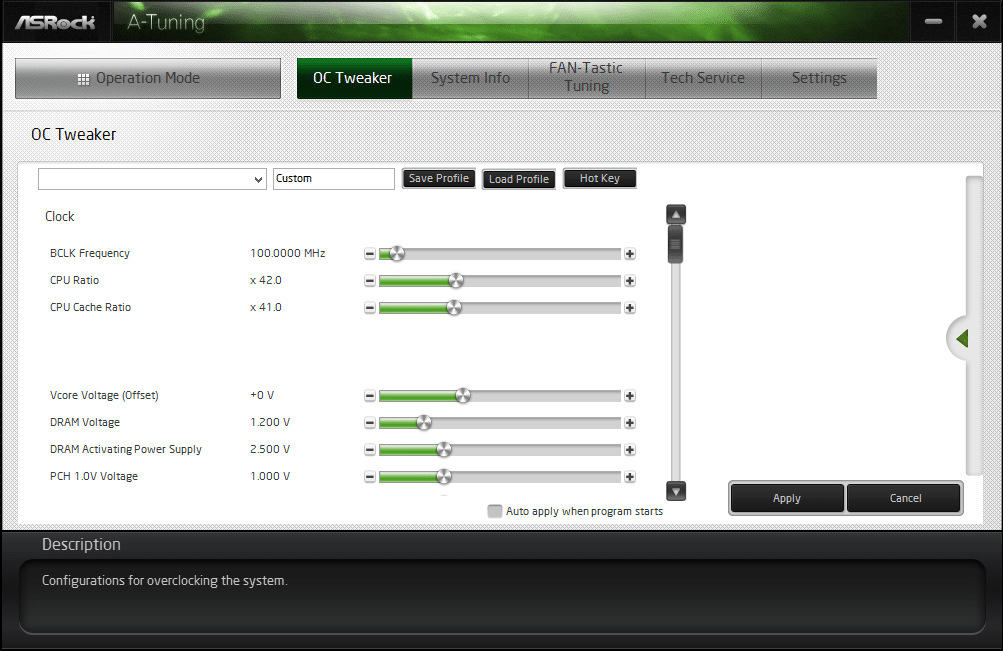
System info does exactly what it says; it monitors the system. This works slightly better than CPU-z due to it being specifically designed for ASRock motherboards.

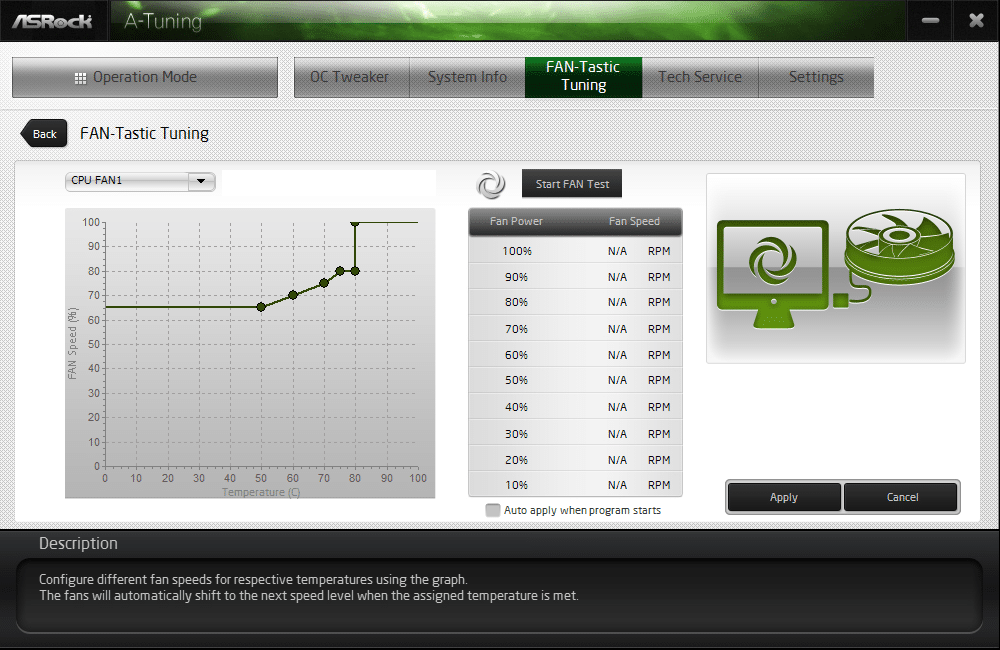
FAN-Tastic Tuning is slightly gimmicky in name, but the application actually works really well; better than some fan utilities I’ve used in the past.
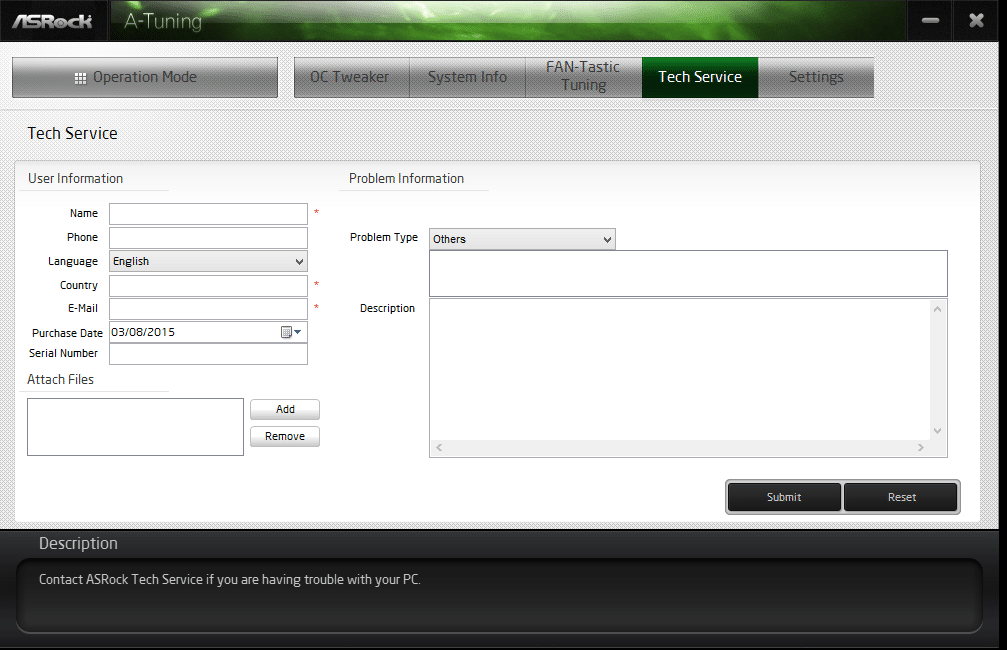
Tech Service is just like in the BIOS; it allows you to contact a member of the ASRock tech support team with any issues you have. You will likely get a faster and better response from using this service due to it going directly to the team instead of being passed through from the website.
CPU Performance
Cinebench
CINEBENCH is a real-world cross-platform test suite that evaluates your computer’s CPU performance. Cinebench R15 is a totally free utility and is available for download here.
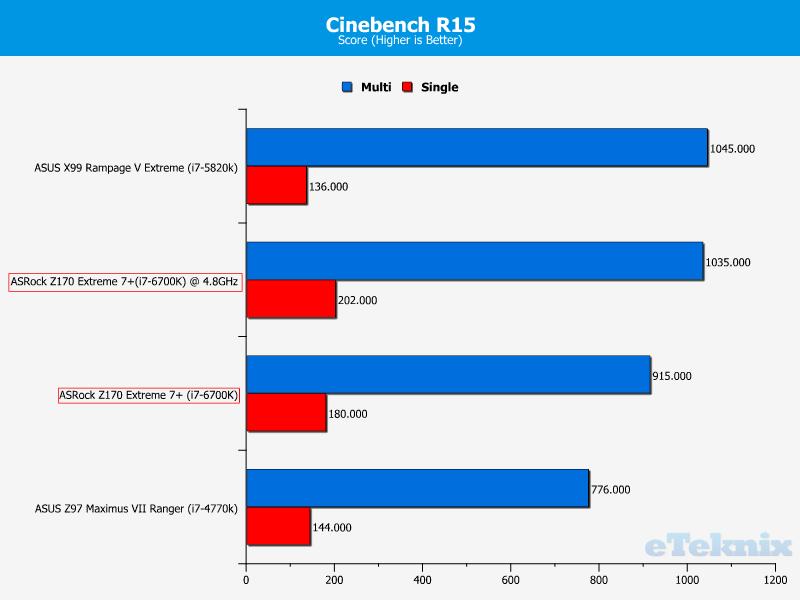
Straight into the first test and the ASRock EX7+ and i7-6700K combo puts up a good fight, almost 15% more performance than the 4770K and only 1% behind the 5820K once overclocked.
WPrime
wPrime is a leading multithreaded benchmark for x86 processors that tests your processor performance by calculating square roots with a recursive call of Newton’s method for estimating functions. wPrime is a free utility that is available for download here.
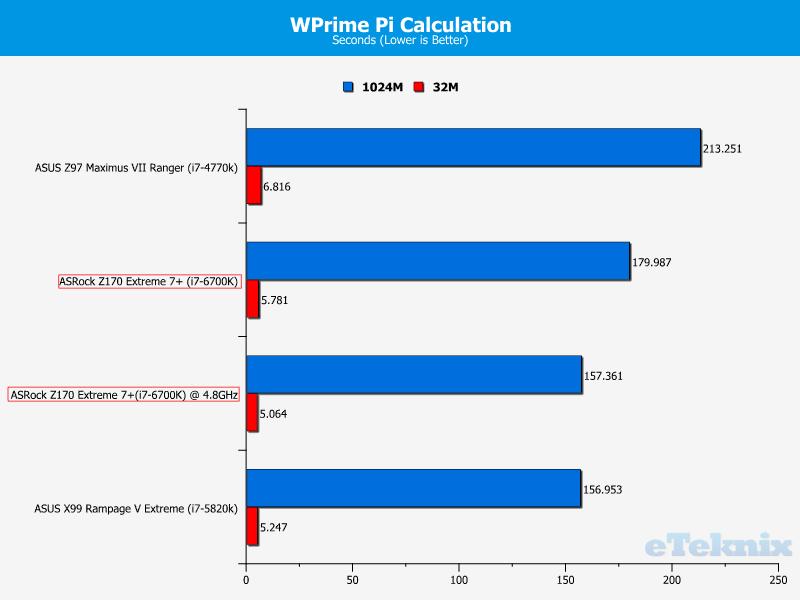
Again, the 6700K securely placing itself just behind the 5820K.
SiSoft Sandra
The SiSoft Sandra Dhrystone and Whetstone benchmarks are widely used measures of compute power and performance for a wide array of real-world usage scenarios. You can find out more details on these tests here or download SiSoft Sandra here.
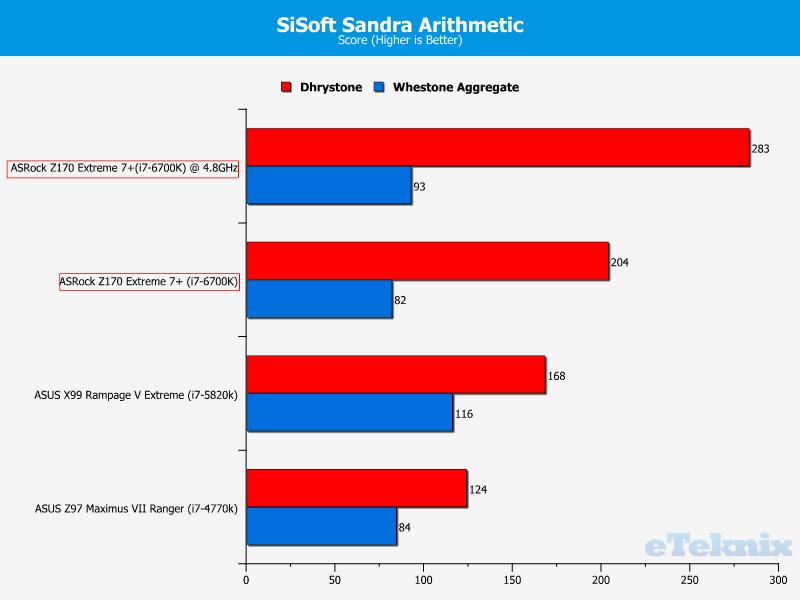
Here the 6700K completely dominates the top of our chart.
GPU Performance
3DMark
3DMark Firestrike is Futuremark’s latest creation for testing the GPU performance of high-end gaming PCs using Direct X 11 graphics. You can download a free basic version of 3DMark here.
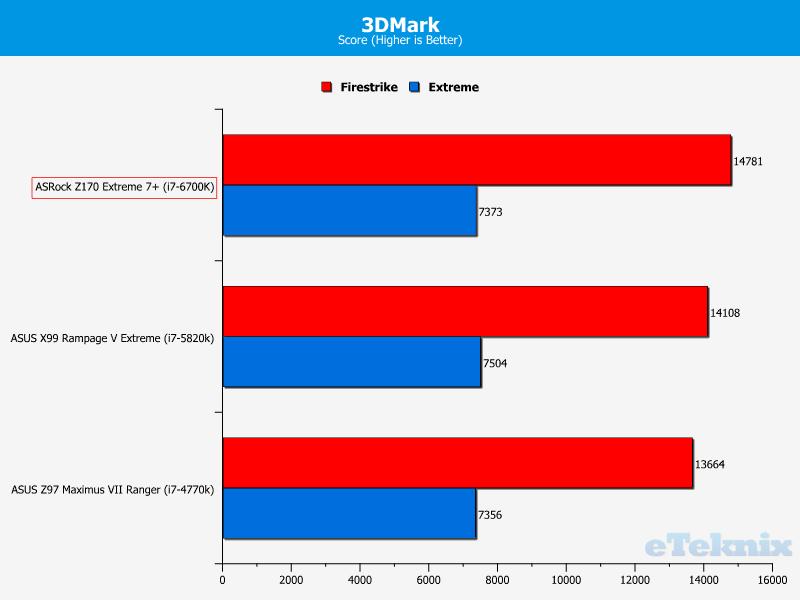
GPU testing isn’t really limited nowadays by the motherboard or CPU, rather just the GPU. However, ASRock has supplied ample bandwidth to allow the GTX 980Ti to stretch its legs.
Tomb Raider
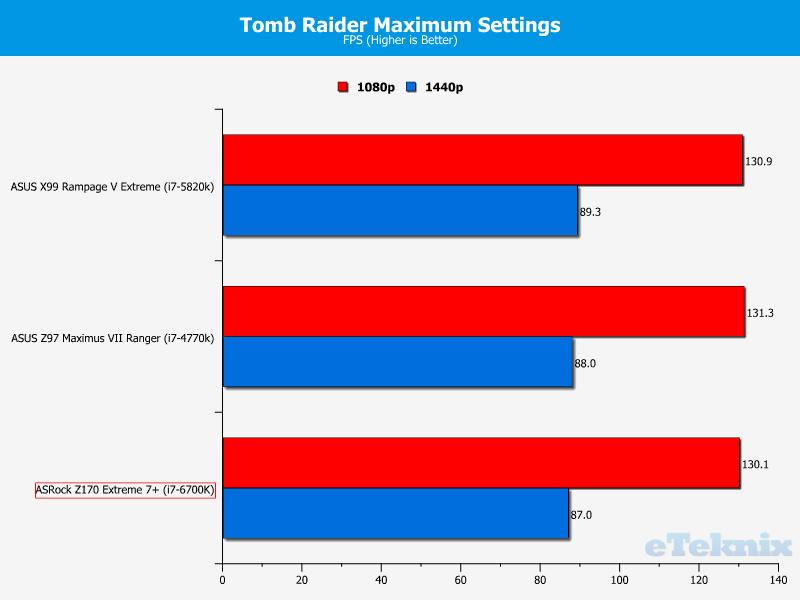
Tomb Raider is a popular action-adventure video game published by Square Enix based on the Tomb Raider franchise. The game was released in 2013 and as of March 2014 had sold 6 million copies.
Bioshock Infinite
Bioshock Infinite is a first person shooter developed by Irrational Games that is the third instalment of the Bioshock series. The game is the last to be produced by Irrational Games before they announced their closure in February 2014. The game has sold over 4 million copies since its 2013 release.
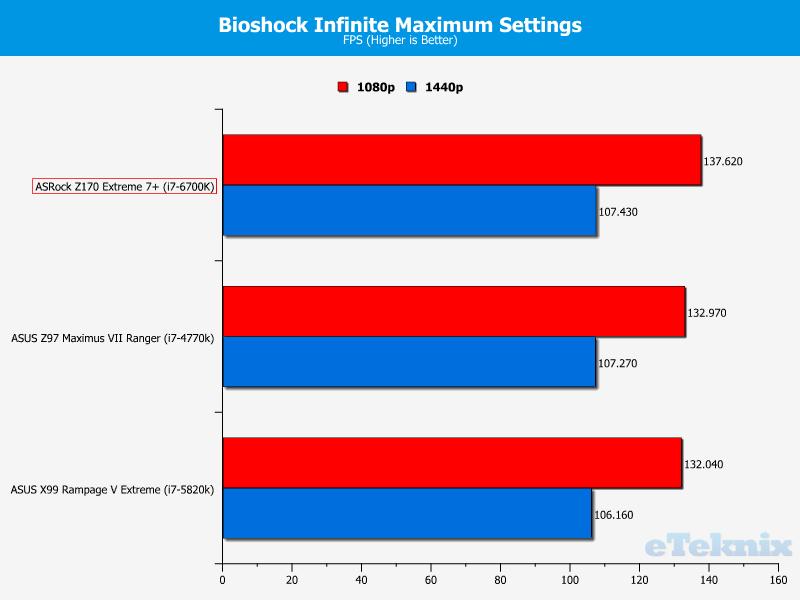
Bottom and then top, all within the tolerance of the graphics card.
Memory Performance
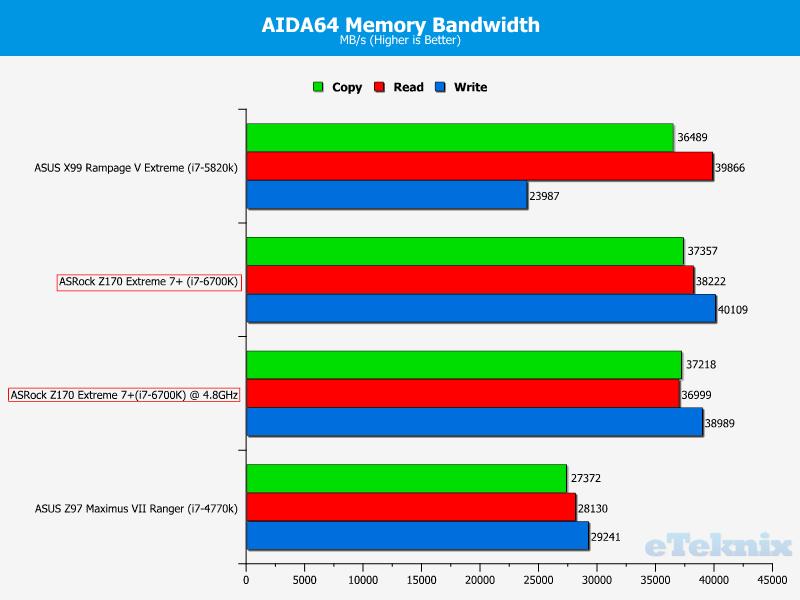
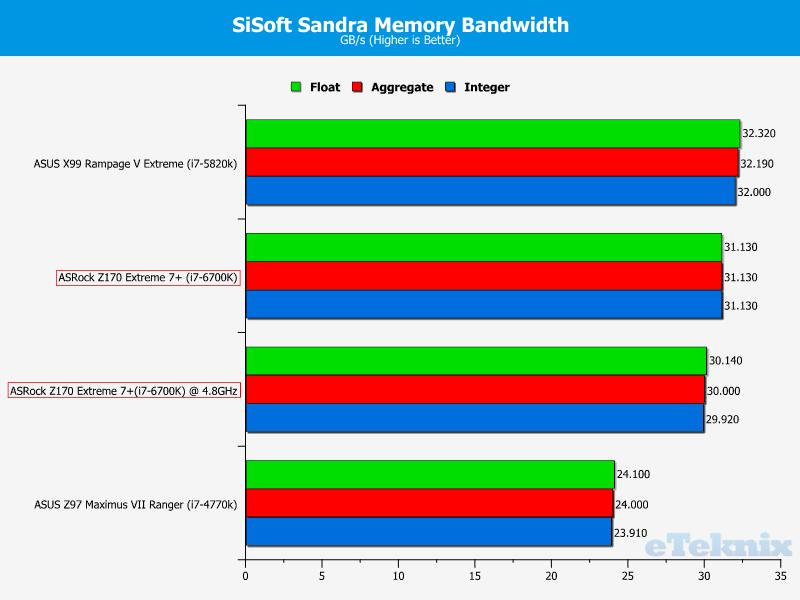
For our memory tests we use the built-in memory benchmarks in AIDA64 Engineer and SiSoft Sandra. For more details on each of the benchmarks please see here and here respectively.
AIDA64 Engineer
SiSoft Sandra
Combined Latency Test
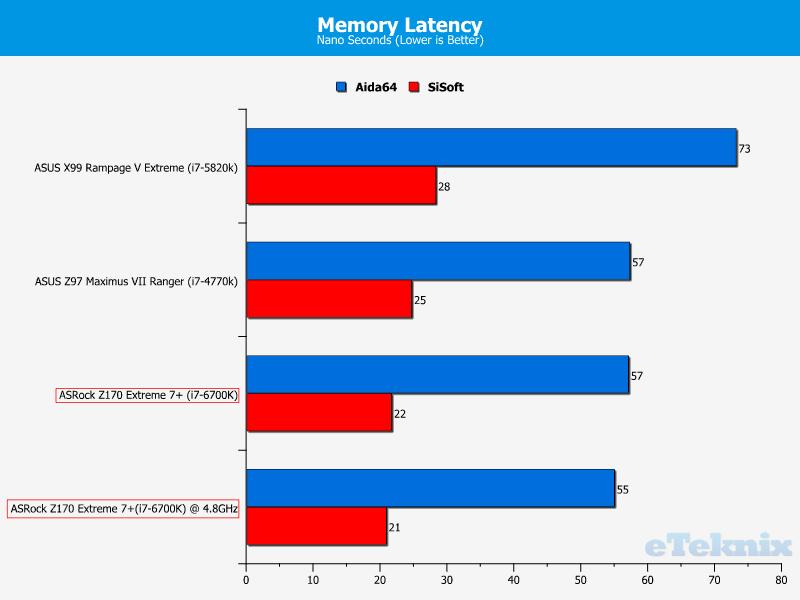
With the introduction of DDR4 memory into mainstream systems sees a nice jump in performance; the i7-6700K also utilises it faster than the 5820K.
SATA, M.2 and USB Performance
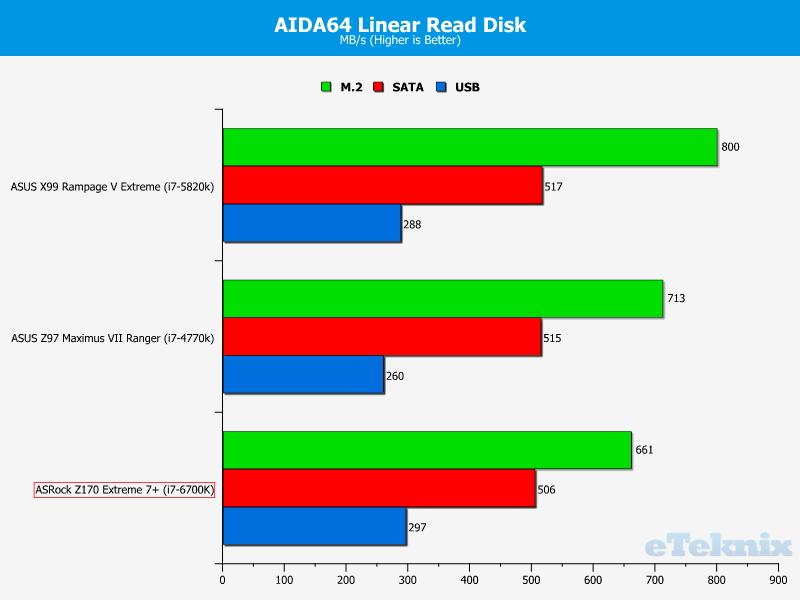
To test the storage performance in our motherboard reviews we use AIDA’s Disk Benchmark utility built into their AIDA64 Engineer Edition software package and run linear read and write tests. We run each of the benchmark tests on a SATA III, USB 3.0 and M.2 device. For SATA III testing we use a SanDisk Extreme Pro 240GB, for USB 3.0 testing we use the Supersonic Magnum 256 GB USB 3.0 flash drive and for M.2 testing we use Plextor’s 256GB M.2 M6e SSD. The drives are always formatted before use.
Linear Read
Linear Write
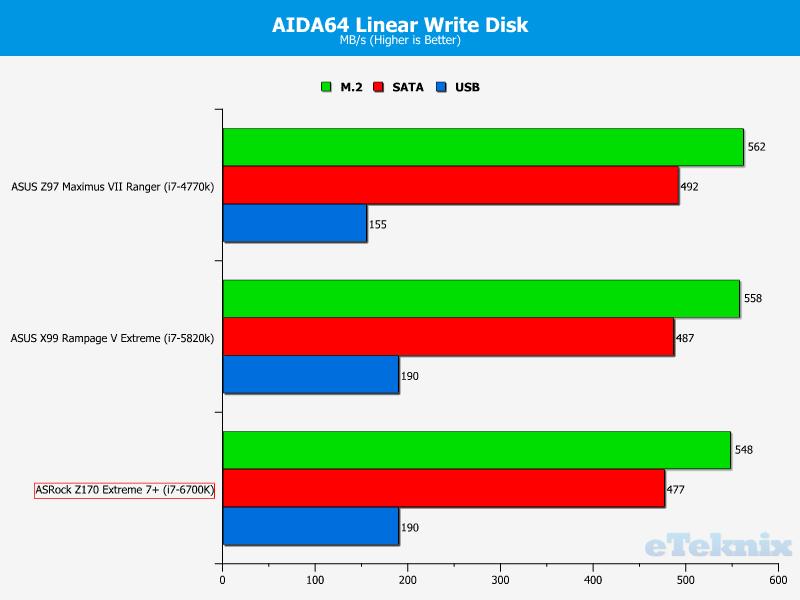
Some slightly lower than expected results, however, this could be due to immature drivers, although the scores are well within the tolerance of the hardware.
Networking Performance
For our networking tests we connect the test system up to our Intel Gigabit-enabled ASUS Rampage IV Extreme X79 motherboard test system through the ASUS RT-AC68U router and run our tests. We opted for this over a direct point-to-point connection because we wanted to simulate real-world performance. For our WiFi tests we do the same except we connect the test system to the ASUS RT-AC68U router via WiFi at a distance of 2 metres from the router.
LAN Speed Test Lite
LAN Speed Test was designed from the ground up to be a simple but powerful tool for measuring file transfer, hard drive, USB Drive, and Local Area Network (LAN) speeds (wired & wireless). It does this by building a file in memory, then transfers it both ways (without effects of windows file caching) while keeping track of the time. Download the free Lan Speed Test Lite utility from here.
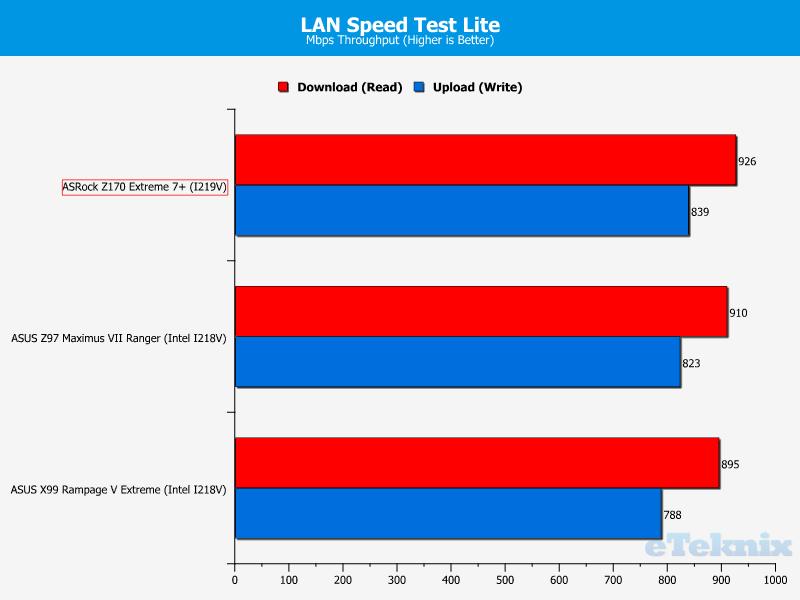
With Z170 sees the introductions of Intel’s newest LAN option, the I219V. Here it just squeezes past its predecessor by a few Mb/s.
Passmark Performance Test 8
The PassMark Advanced Network Test (which is part of PerformanceTest) is designed to test the data transfer rate between two computers both of which must be running PerformanceTest. One of the computers must act as the server and will sit waiting for a connection. The other computer acts as a client. It connects to the server machine and sends data to it for the duration of the test. You can download a trial version of PerformanceTest from here.
Ethernet
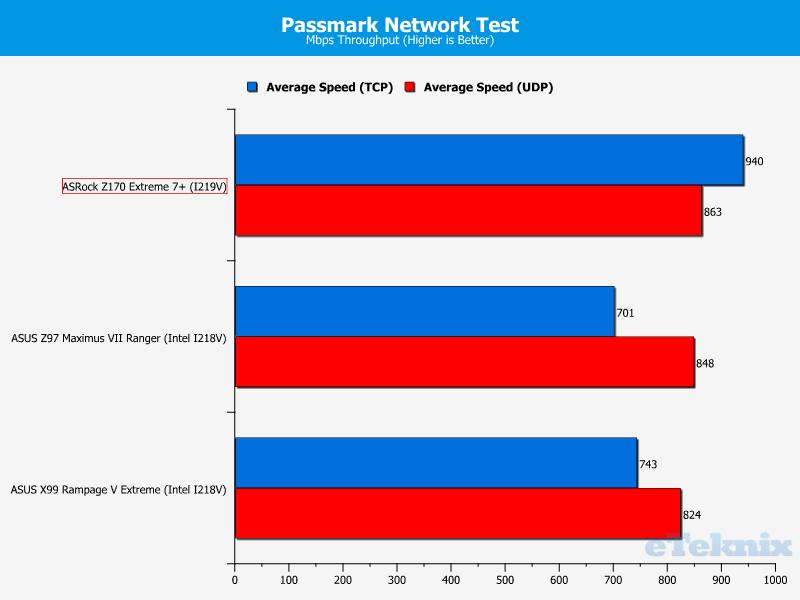
The new I219V really pulling away here in the TCP tests.
Passmark CPU Load
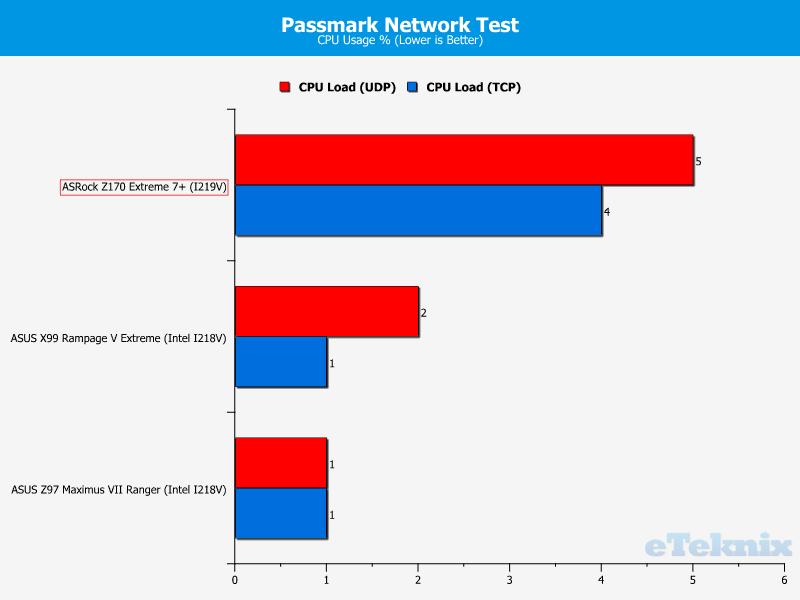
It seems Intel has taken a leaf out of Qualcomm’s book in terms of system power requirements and networking throughput. A shame as Intel were only just behind and had incredibly low load.
Audio Performance
RightMark Audio Analyser (RMAA)
RMAA suite is designed for testing quality of analog and digital paths of any audio device. The results are obtained by playing and recording test signals passed through the tested audio path by means of frequency analysis algorithms. A more common mark is also provided for those unfamiliar with measured technical parameters. Available here. We run the RMAA test using a 3.5mm to 3.5mm cable connecting the line out to the line in to test the quality of the motherboard audio codec not any external audio devices. We run the complete playback and recording test at default settings and then get RMAA to interpret the results giving the below outputs. We sync the playback and recording audio devices to the same setting as the test for accurate results.
16 Bit, 44KHz (DVD Quality)

16 Bit, 96KHz (Studio Quality)

24 Bit, 96KHz (Studio Quality)

Some very good figures here, The results were even better as we move up to higher quality audio.
DPC Audio Latency Analyser
DPC is a Windows tool that analyses the capabilities of a computer system to handle real-time data streams properly. It may help to find the cause for interruptions in real-time audio and video streams, also known as drop-outs.
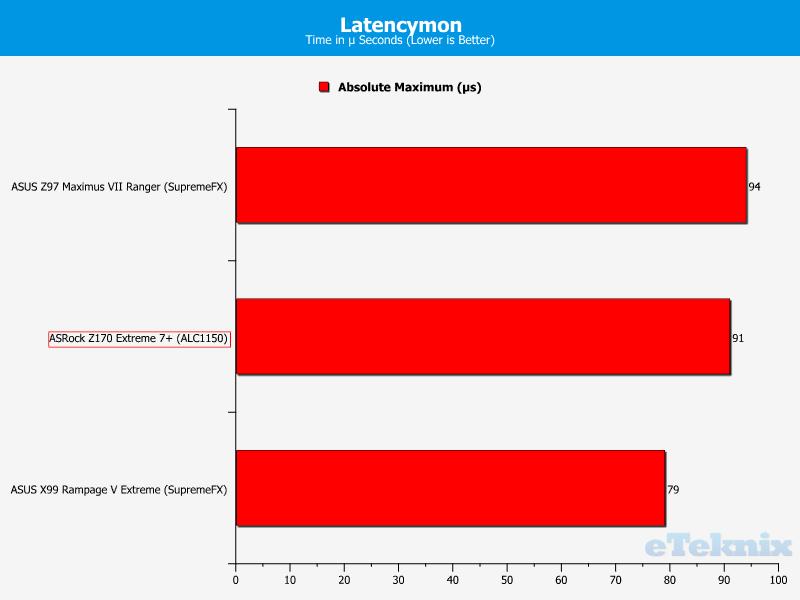
It’s nice to see that Realtek’s trusty ALC1150 codec is performing as good as always.
Power Consumption
Power Consumption
To measure power consumption we, use a “killawatt” meter and measure the total system power draw at the wall. We run three different use-case scenarios for 5 minutes and take the average reading.
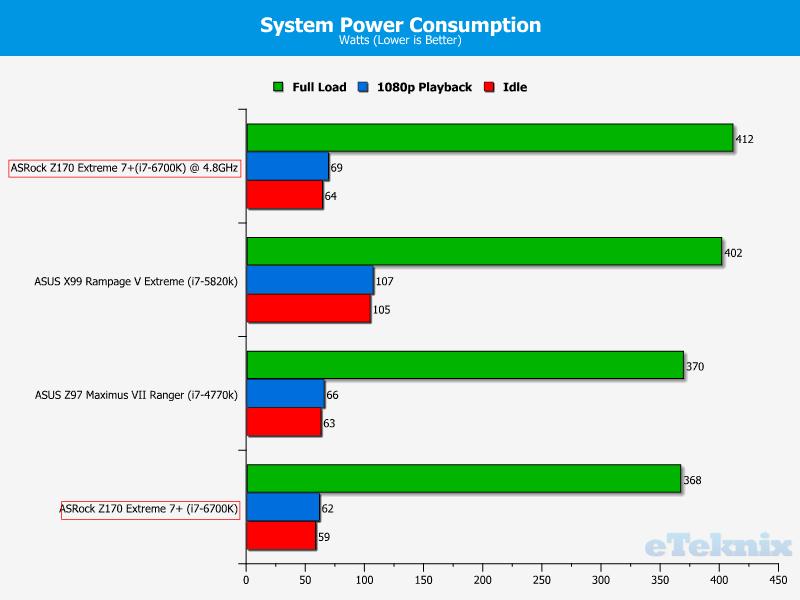
The i7-6700K uses very little power compared to some of the other CPU’s and it only slightly more demanding once overclocked.
Final Thoughts
Pricing
The ASRock Z170 Extreme 7+ is currently available in the UK from Scan.co.uk £211.93. In the US it isn’t currently available from our recommended retailers, but we can estimate the price to be around $260.
Summary
Well, that was it, the most Extreme (excuse my pun) motherboard from ASRock currently for the Z170 range. It also gave us a glimpse into the performance of the i7-6700K and how well it performed compared to the older i7-4770K and i7-5820K. Overall it performed well and it should considering how completely bonkers it is with three M.2 slots and more connections than you could possibly ever want or need.
When I first opened the box to this, I was taken back. It doesn’t scream extreme, well it does, but it also manages to be extremely understated at the same time. The black and copper colour scheme works really well together and just makes you want to hang it from a wall rather than cram it into a case. This board would work really well in builds from clean and pristine to steam punk. It’s nice to see a motherboard manufacturer not fold to the red and black theme, although that will likely be saved for the Fatal1ty range. The layout of the of the board is very well thought out, the three M.2 slots are positioned perfectly between the PCIe lanes and one PCIe x1 slot has been removed to allow for one longer M.2 SSD can be fitted.
Performance was really where we expected it to be. It performed better than the i7-4770K, obviously, but it performed on par with the i7-5820K. When you consider it, the 5820K has 6 physical cores with hyperthreading, creating a huge 12 core CPU. The gaming performance is great thanks to the already high bandwidth PCIe lanes allowing the GTX 980Ti to really stretch its legs. When it comes to the storage speeds, we are now at the limit of the drives themselves rather than the motherboard ports; if you take the new U.2 drivers for example, they can read at around 3000Mb/s compared to an M.2 SSD which can read at around 800Mb/s.
The software bundled with this board is really good. In recent years ASRock software has required a slight refinement here and there, but A Tuning has nailed it. It is clean, clutter free and easy to use; something which you can’t say with other manufacturers software which think “more is better”. Sometimes, stripping back the software to the bare essentials and making it work right is the best way to go. The tech service is also a very good addition; I know it has been incorporated with ASRock motherboards for a few years now, but it’s still a great option to have.
Pros
- Excellent performance
- High quality audio
- Feature packed
- Attention to detail is second to none
- Huge storage options
Cons
- High Price for Z170
- High adopters premium due to DDR4
“The ASRock Z170 Extreme 7+ might be on the pricey side, but you get so much potential and features, some of which put the X99 Extreme series to shame.”

ASRock Z170 Extreme 7+ (LGA 1151) Motherboard Review
Thank you to ASRock for providing us with this sample.


