Drobo 5N 5-Bay NAS Review
Bohs Hansen / 8 years ago
Introduction

I’ve reviewed quite a few NAS devices in my time here at eTeknix and tried a lot more NAS devices before and during that I haven’t written about, but the one I’m taking for a spin in the testing area this time is something different and not like other NAS devices: the Drobo 5N.
The Drobo NAS devices are designed with one purpose in mind: to deliver the ultimate experience in sharing storage and accessing data on your network and that with the least amount of trouble from the moment you plug it in. It doesn’t require much knowledge from the user and it might very well be the easiest device to get starting with for people that haven’t entered the world of network attached storage devices before.

One of the things that sets this device most apart from other devices is the BeyondRAID technology that drives the storage pool. The name is very fitting as it takes the RAID feature and goes beyond the traditional limitations by allowing you mix and match any type of drive and capacity and still get the biggest possible storage space out of it. BeyondRAID supports both single disk and dual disk redundancy, meaning that up to two of the installed drives can fail without you losing any of your precious data. BeyondRAID is also self-healing and has virtual hot-spares. If a drive happens to fail, Drobo will automatically re-layout the data to return to a protected state without disruption.
You can start out with the drive you have and add more when you run out of space on those. Just plug them in and the system will do the rest for you. Should you run out of space again, then you just purchase a bigger drive and replace one of the smaller installed ones. You don’t even need to turn it off or move any files yourself as long as the current setup is in a healthy state. You can fully mix and match drive brands, different drive speeds, and drive capacity as much as you like.
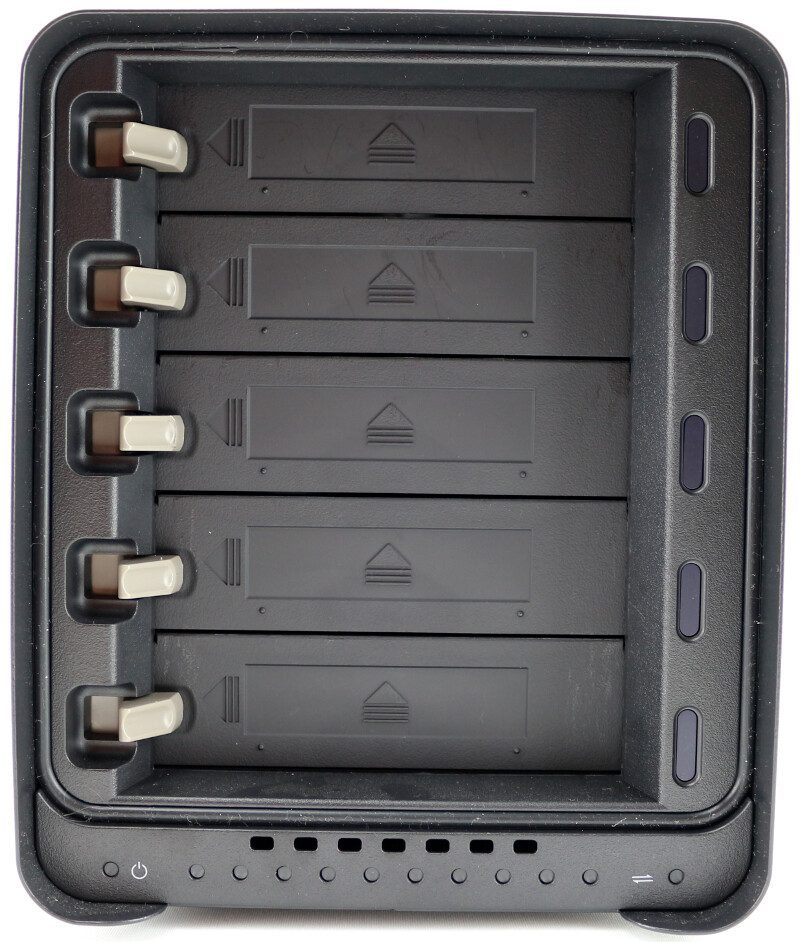
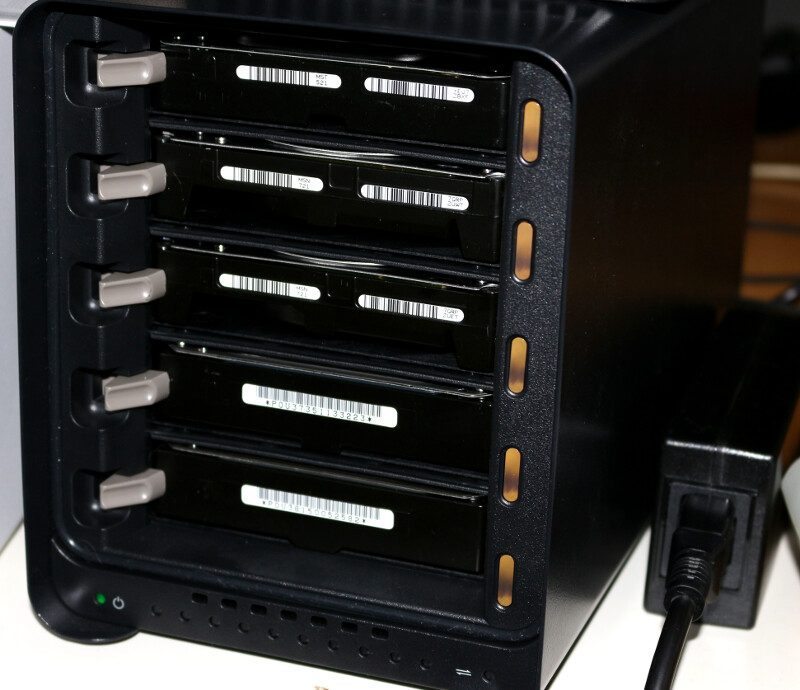
The Drobo 5N features a completely tool-less design for every part. The front is held in place magnetically and the drives don’t require any tools or drive bays to be installed. Just slide them into the NAS and you’re good to go. When you want to unplug them, then you press the button next to the drive and it will automatically eject.
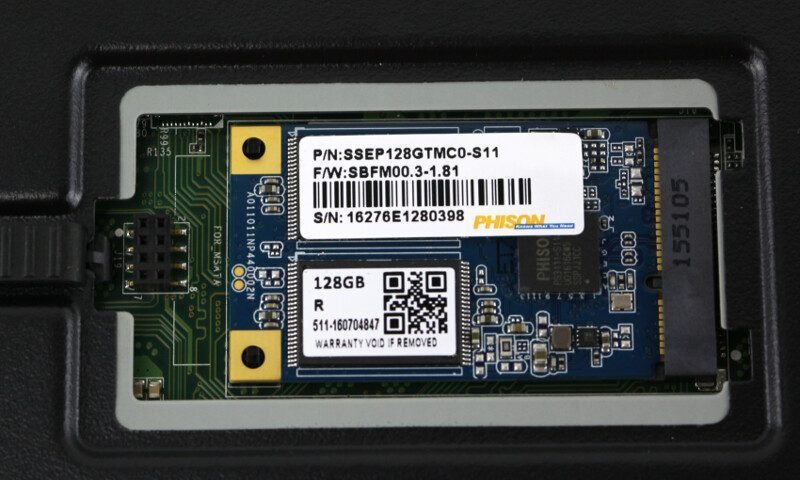
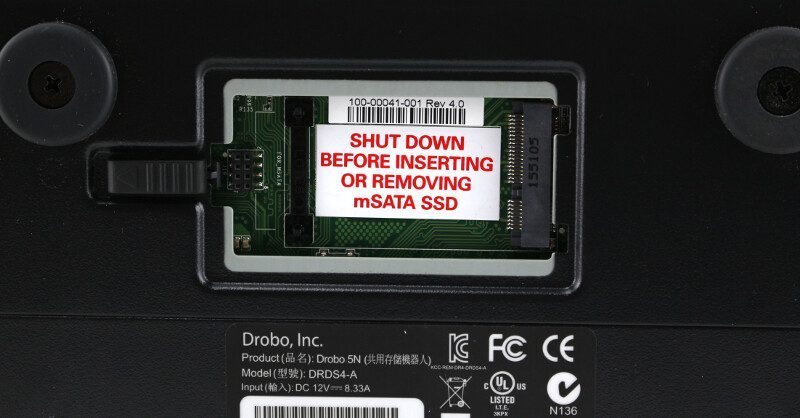
Should normal hard disk speeds not be enough for you, then you can expand the unit with an mSATA cache drive on the bottom of the unit. That part is also completely tool-free in the installation. Slide open the cover, press the drive into the slot and close it up again. This is however one of the few times where you’ll need to power the device off.
Drobo even included an onboard battery inside the NAS, allowing it safely to flush any data from the memory and onto the disks in the event of a power failure. This is a feature that we rarely see built into NAS device, but it’s a very valuable one to have.
Drobo also offers their own DDNS service via mydrobo.com which allows you to connect safely to your Drobo NAS with end-to-end secure access and comes with hundreds of apps to extend its usability. It enables services such as DroboAccess, Koken, and WordPress to be accessed remotely in a secure fashion. DroboPix allows secure and automatic uploads of mobile photos and videos and more. Other Drobo Apps are embedded applications that extend the capabilities of the Drobo 5N ranging from Elephant Drive, BitTorrent Sync, Plex, MiniDLNA, and Couch Potato as well as features such as ProFTPD, WordPress, MySQL, Apache, and a lot more.
Package and Accessories
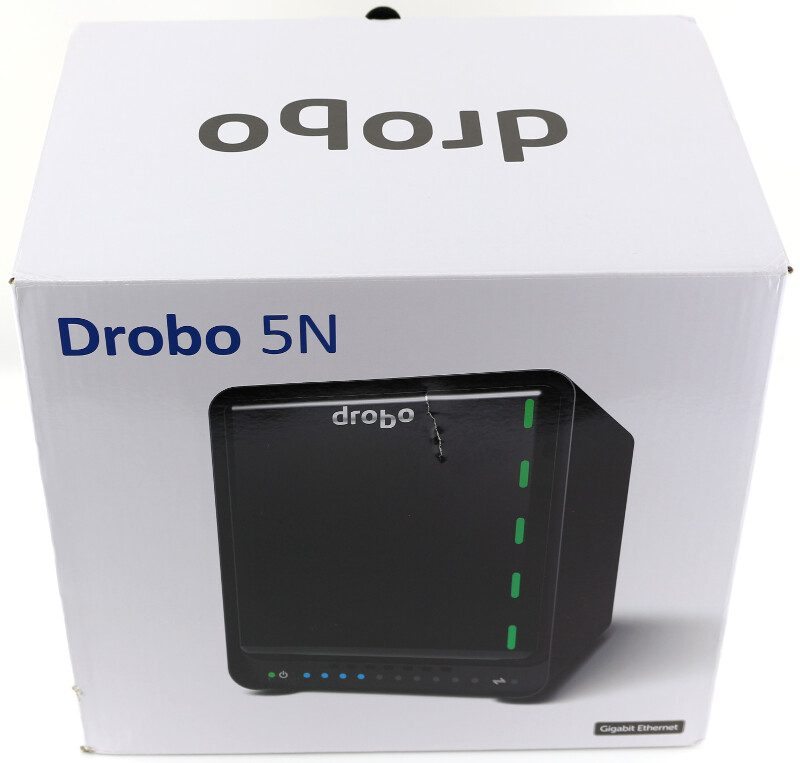
The package is simple but effective. The front and sides display the unit itself from various angles.
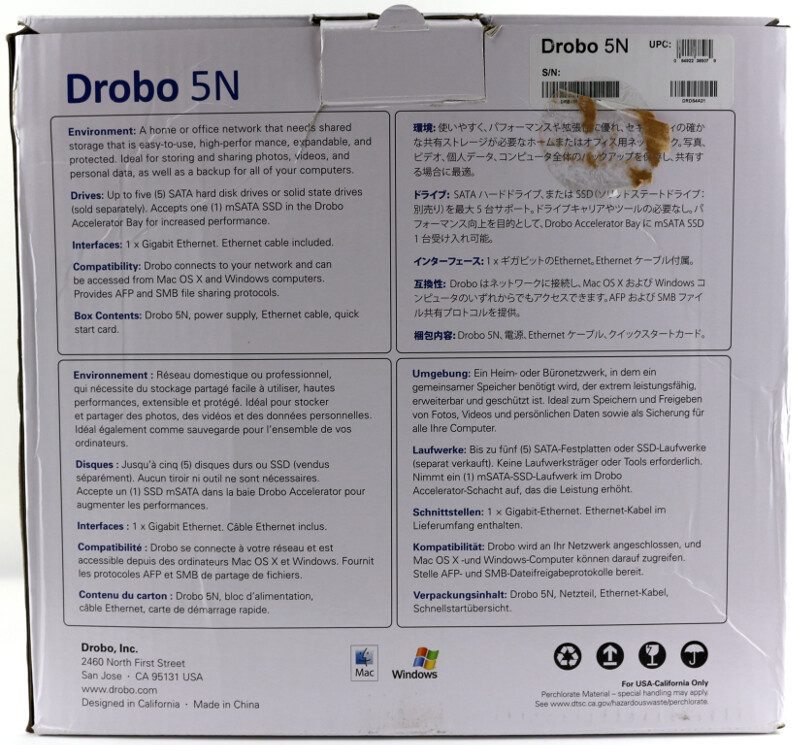
On the rear of the box is a more detailed description of the NAS and its features as well as included parts.
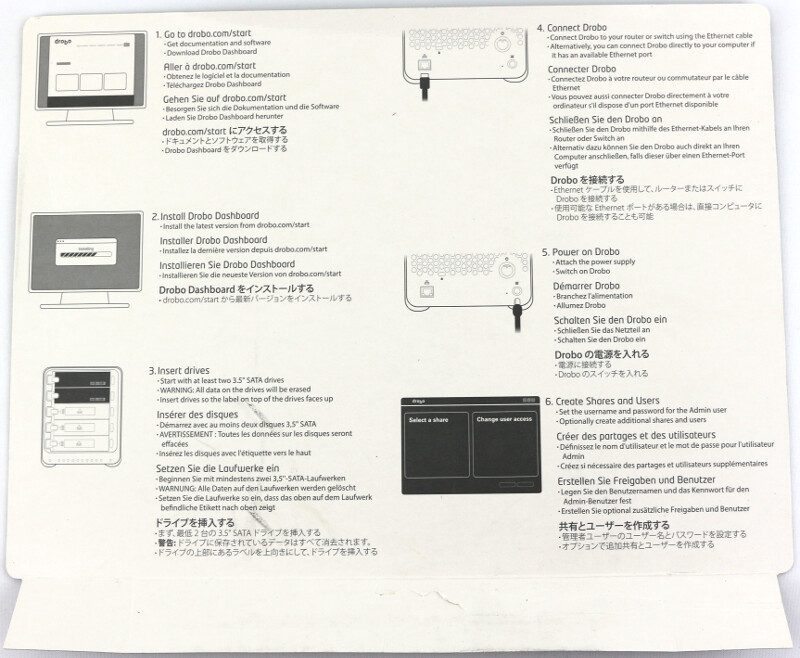
Inside the box is a lid covering everything that also is your quick-start guide for the setup of the unit.
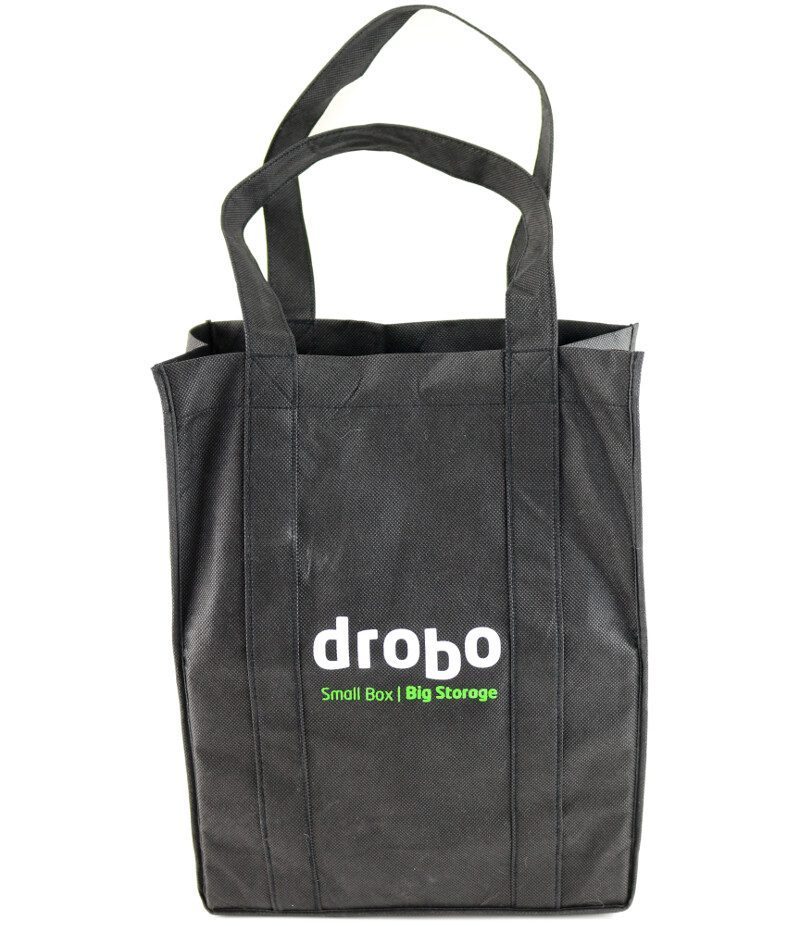
The NAS itself is packed insides a carry bag that you later can use when you go grocery shopping to show your Drobo pride.
You get a power supply with a power cable for the region where you purchased it, in this case it is a US power cable, and a LAN cable for the network connection.

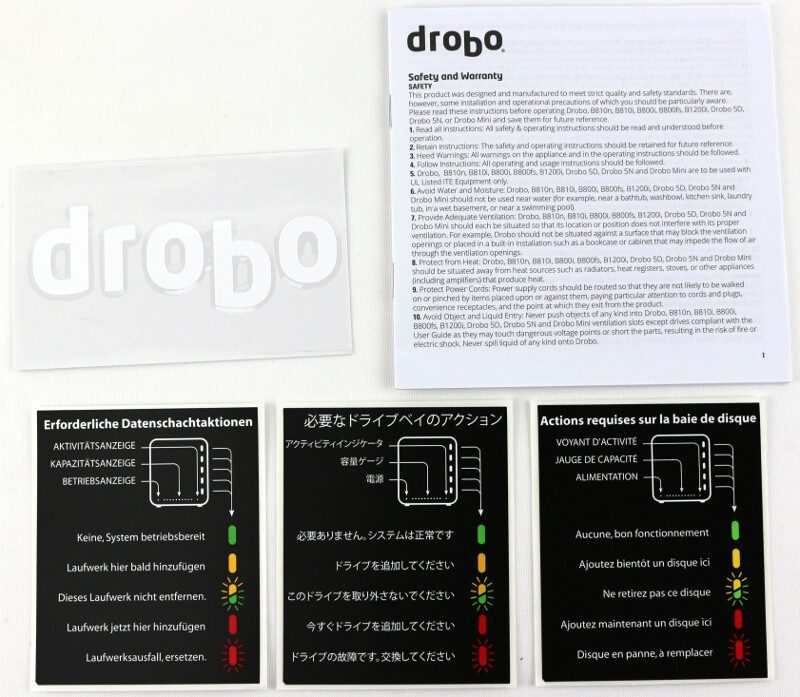
You also get a Drobo sticker and warranty guide as well as stickers in other languages to place inside the drive cover. The English one is already in place, but you might want to replace it with a different language.
A closer look
The first thing to look a bit more at is the front cover that is held in place magnetically. The drive LEDs shine through this cover and on the inside we have the sticker that shows what each LED means and whether we need to pay attention to it or not. This is also the place where you can put one of the other included stickers that we saw on the previous page.
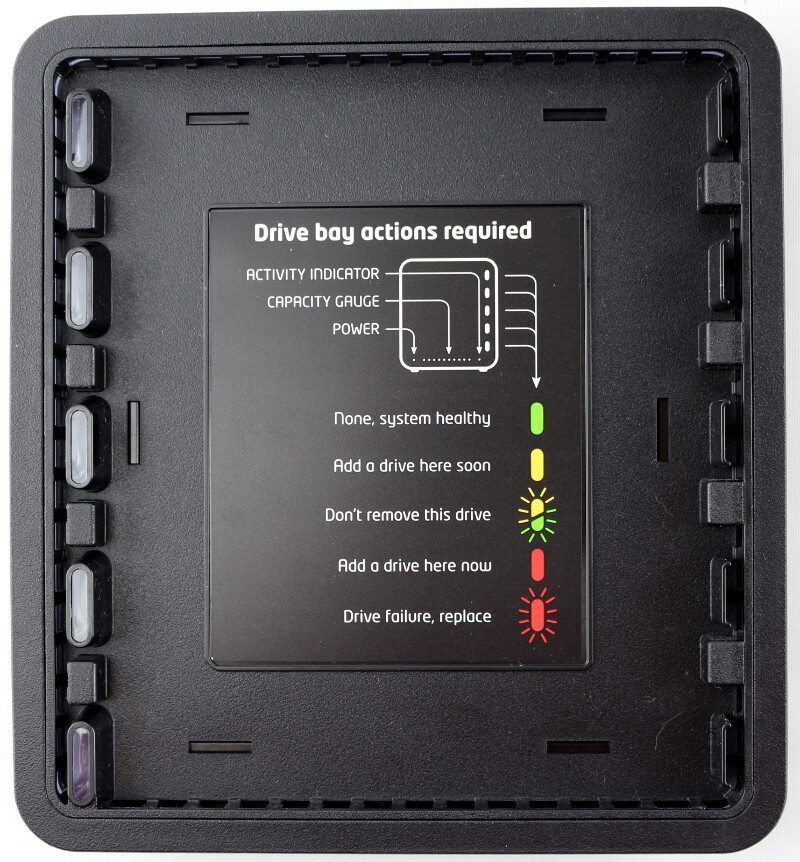
The drive LEDs are multi-coloured and switch between colours depending on the state of the drives and setup. When they’re green, all is running well. When they’re something else, the system is busy doing something with them, like rebuilding, or you need to pay attention to something (warning). At the bottom below the drives is another row of LEDs that work as capacity meter, allowing you a quick and easy view of how much space you have left and when you need to upgrade the drives to larger ones.
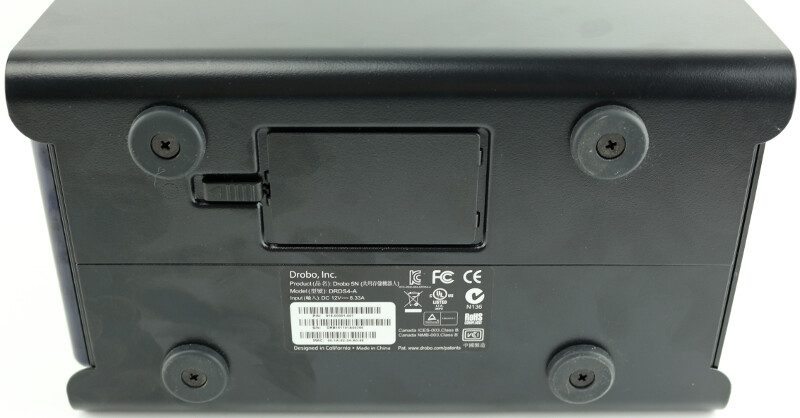
The bottom of the Drobo 5N features four large rubber feet that make sure that the device stays where you place it and that it doesn’t transfer possible vibrations from the disks to the rest of the desk or shelve where you’ve placed it. We can also see the accelerator drive slot here and that one is easily opened by sliding the button to the side.
Opening the accelerator bay reveals a warning that we should remember to shut down the system before we insert a drive here. The whole thing is completely tool-less just as the drive bays are and that’s a big bonus. You don’t need any tools at any time for the Drobo 5N.
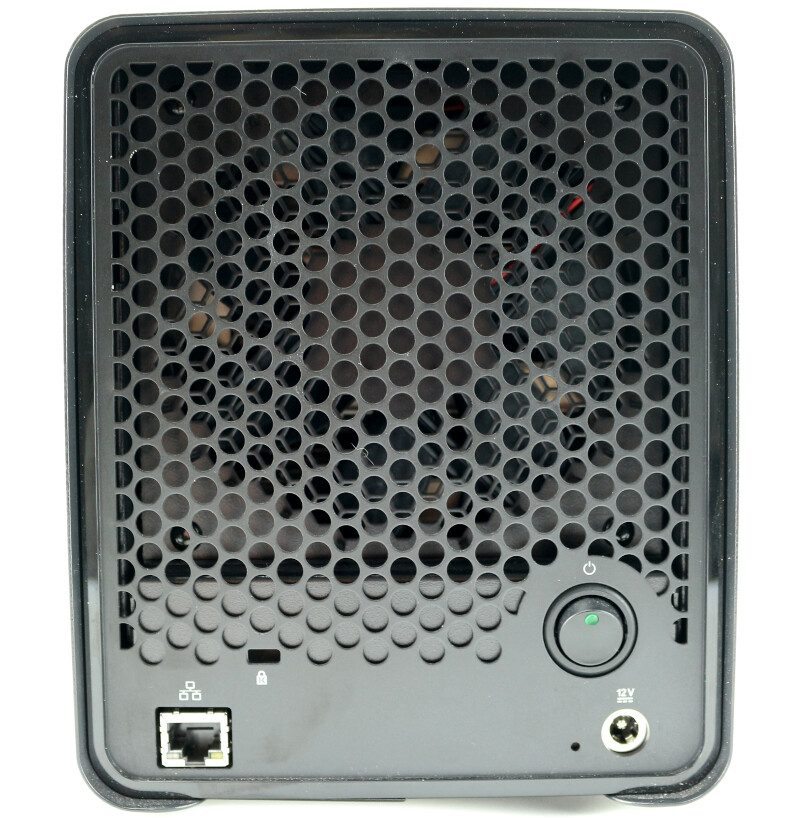
The rear doesn’t feature much and is kept as simple as the rest. At the bottom is the Gigabit Ethernet port next to a Kensington security slot on the one side and the power button and power connector on the other side. The power button is a soft-touch button, meaning that it flips back to the same position when pressed. It does however feature another LED to indicate whether it is running or not.
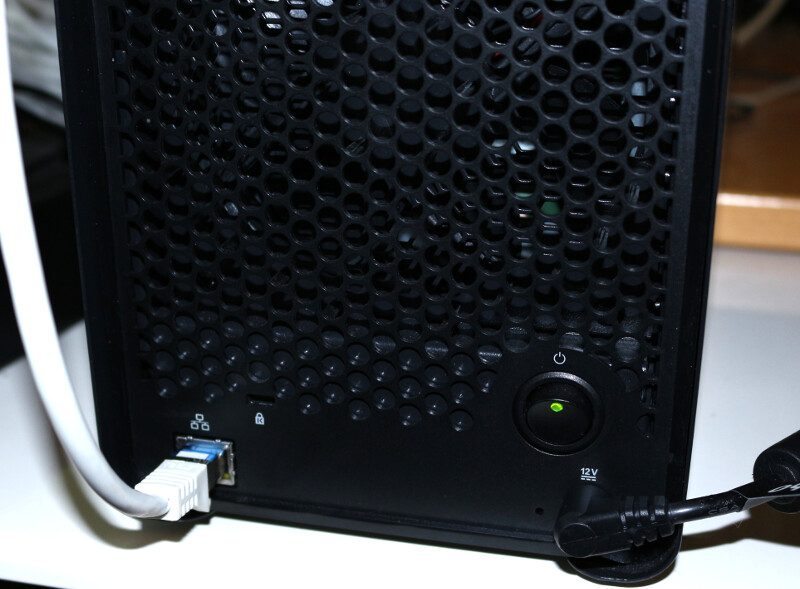
Above the connectors, we have a large fan that keeps the entire thing running cool.
System Specifications & Power Consumption
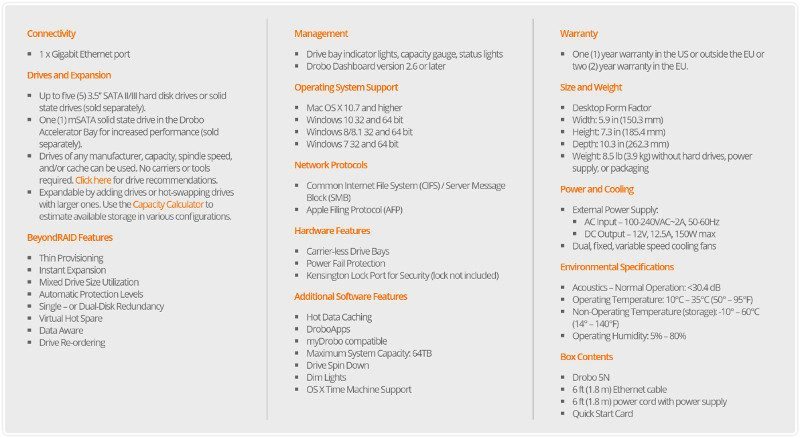
System Specifications
Dashboard
The dashboard for the Drobo NAS’ isn’t a web interface as we’re used to from most NAS’, instead, it’s an easy to use application that you install on your local system instead. This might be either a big bonus for you or a downside, it really comes down to preference and usage scenario.

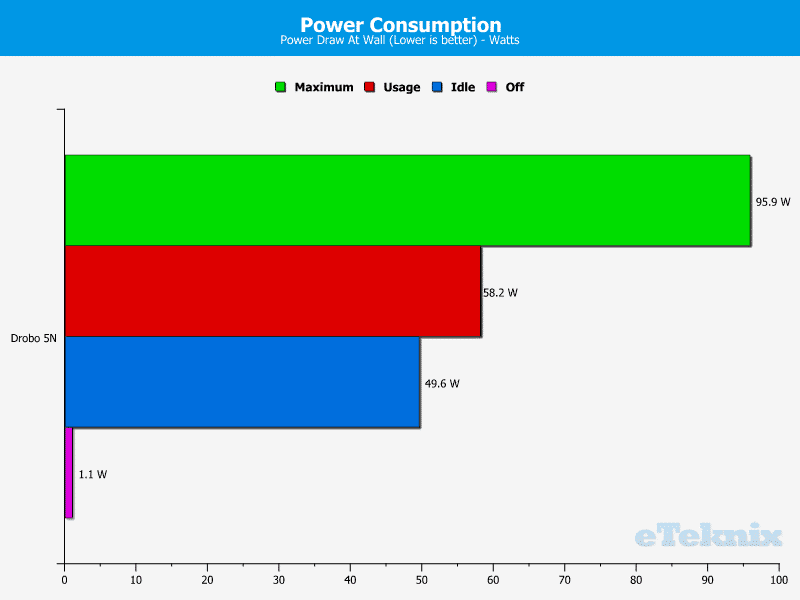
Power Consumption
The chart contains the actual power consumption measured at the PSU connection and while loaded with a maximum amount of drives. Peak, or maximum, power draw will occur during boot times.
Setup – Initialization and Basic Dashboard
One of the first advantages of Drobo NAS comes during the initialization, because there really isn’t any. Insert your drives, connect it to power and network, and turn it on. After a short boot time, it is ready for your usage.
Connecting to your new Drobo NAS is a little different than with other NAS devices that come with a web interface. Instead, we have the Drobo Dashboard app that we install on our normal computer and from where we can control the entire device. As is, you can already access quite a few information without being logged into the device, but you can’t change anything – of course.
The first page in the Drobo Dashboard will list all Drobo devices, both NAS and DAS, that can be detected by the current system. You can sort them by health, name, or product.
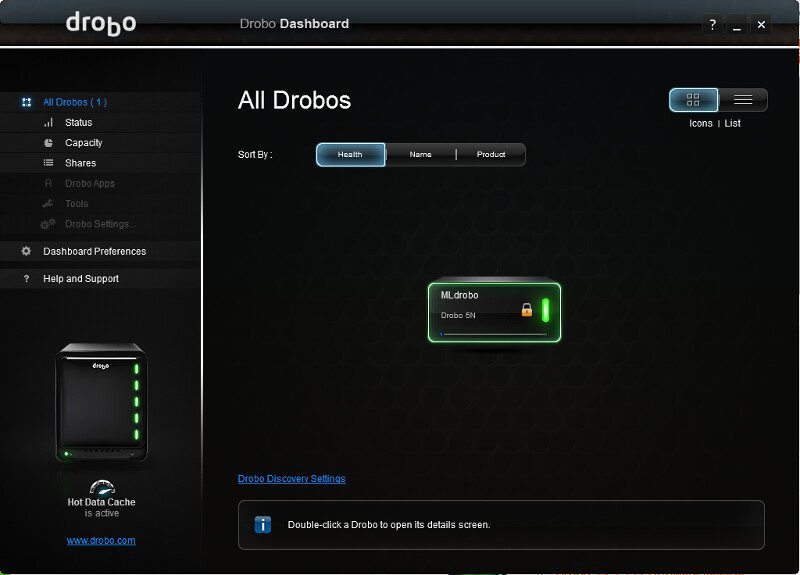
You can also switch between icon and list view where each has their own advantages in the information shown.
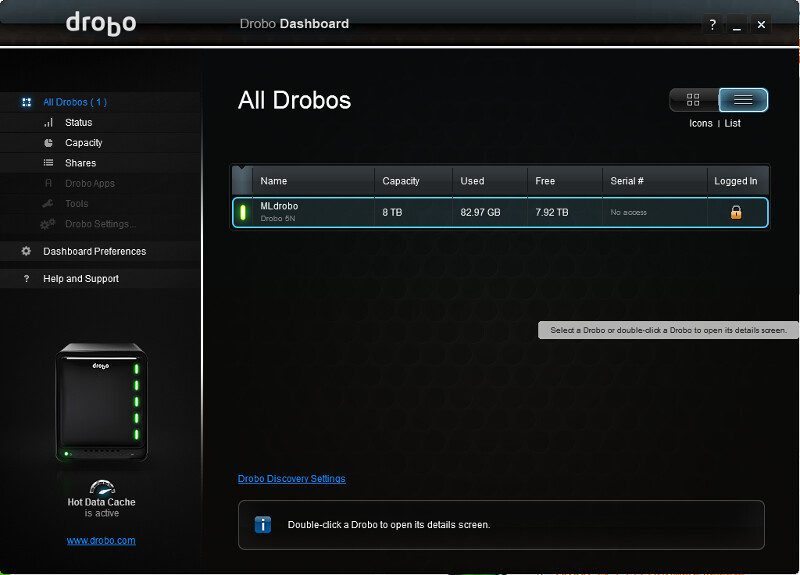
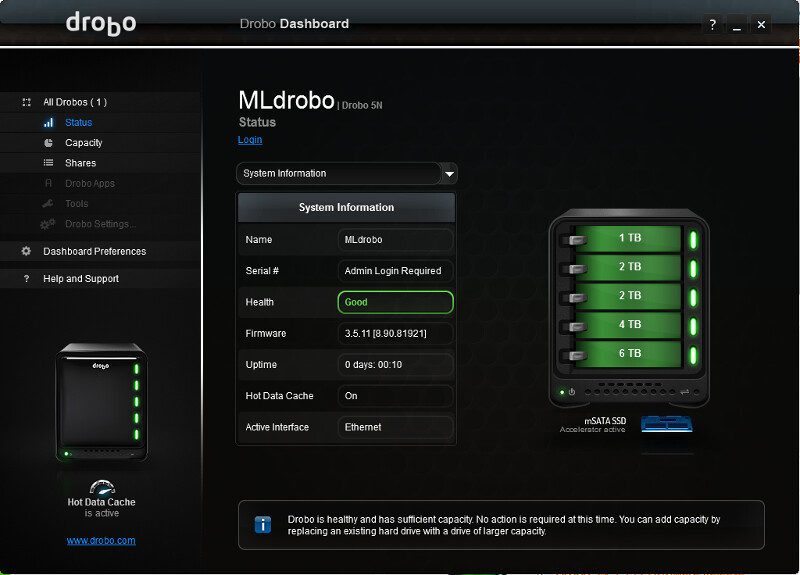
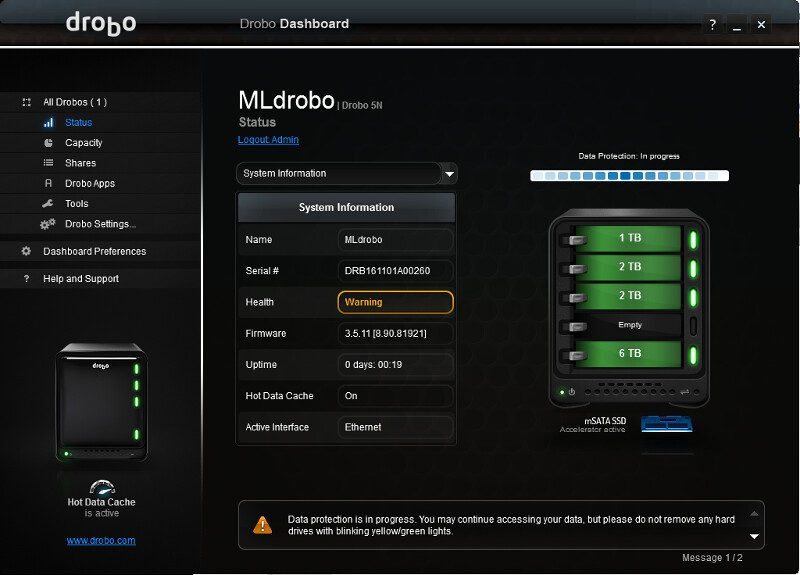
Selecting a device, in this case the Drobo 5N that I’m reviewing and the only one connected, will provide more details on the device. First, we have the system information itself. We can see the name, health status, uptime, and so forth. The serial number is hidden until we log in with our admin user. To the right, we also see the drive status that shows both the data drives and the accelerator drive if installed.
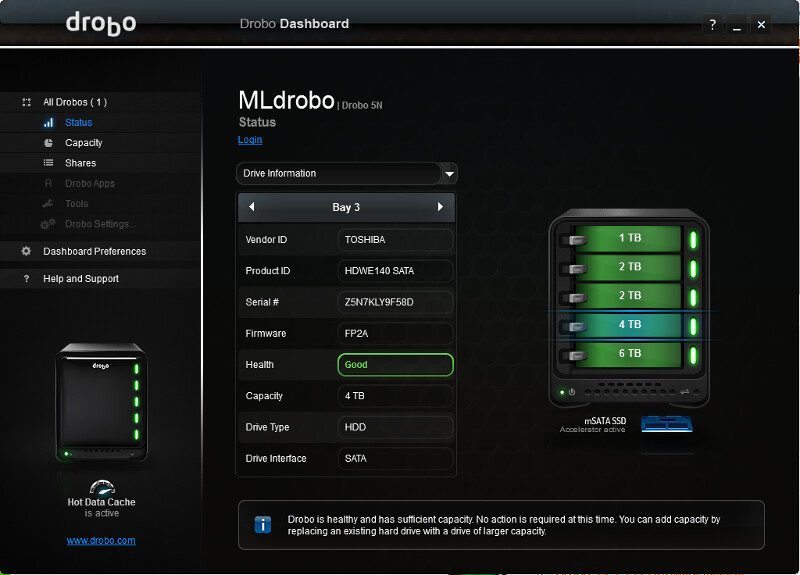
Next, we can take a closer look at the drive that we have installed. To the right, it’s clearly marked which drive we have selected while all the details are shown to the left. From health status to capacity and drive type.
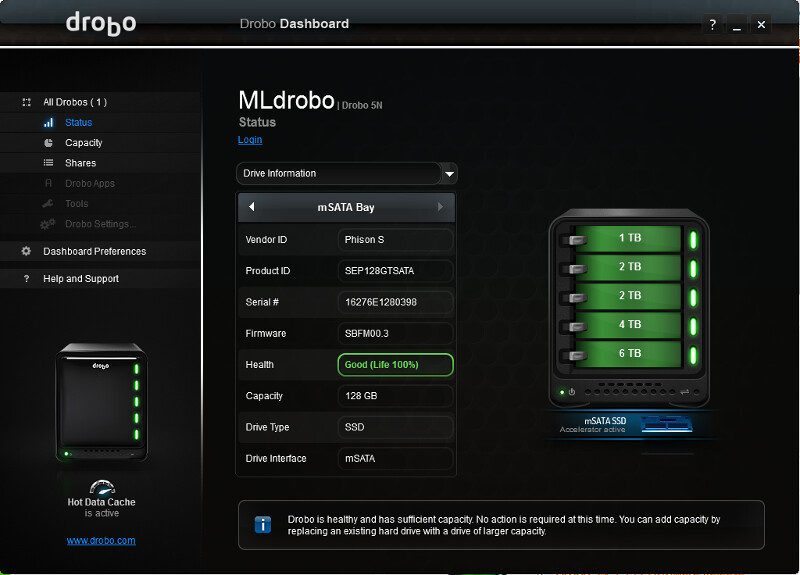
The same way as the data drives, we can check up on the mSATA accelerator drive that we have installed in the unit. The Drobo system will automatically cache hot files onto this and thereby speed up the access to frequently accessed files.
Last but not least, we can check up on our network connection. Since this is the only connection the Drobo has, we can only see this if connected – but we can check up on the details of this connection such as the connection speed, whether it’s full duplex and 1000 Mbps as it should be or some cable or switch on the way possible limited this for us. The IP, MAC address, and other connection addresses are also listed here.
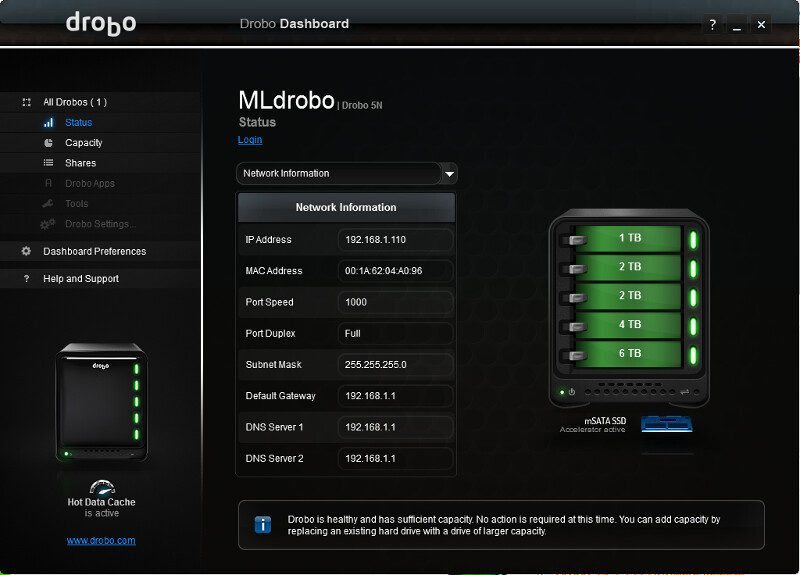
Next up, we have the capacity. We can view it as a pie chart which gives an easy view for some people on the usage. Our drive setup gives us a total of 8TB capacity in the current setup.
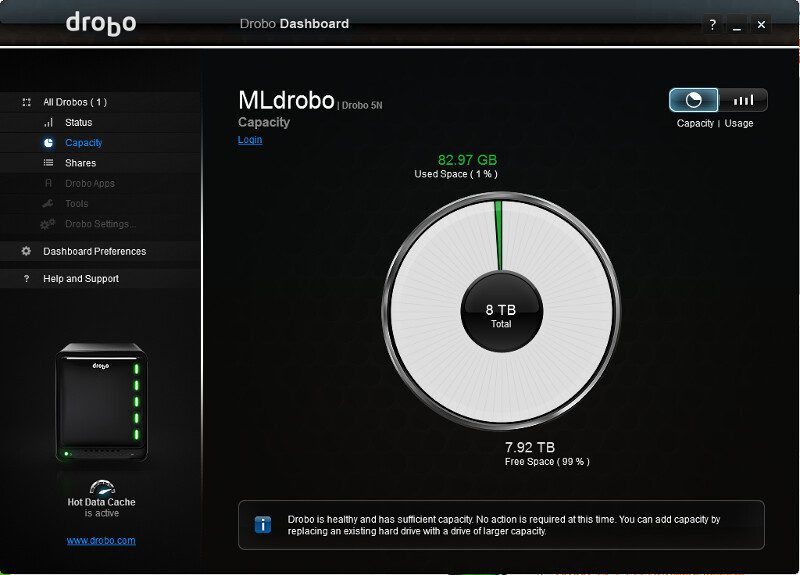
We can also move into the more detailed usage view on this page where it also tells us how our total RAW capacity of 15TB is utilized and how the setup is made. As a comparison to a normal RAID setup known from other devices and with these drive sizes, we get a lot more capacity available to us.

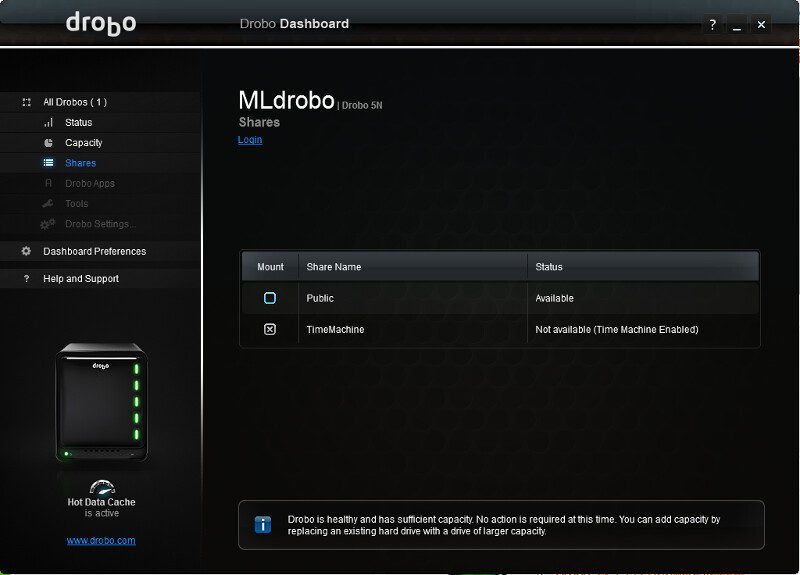
By default, we have two shares available: A public folder and one reserved for Mac OS users that want to use Time Machine backup option. This is currently disabled as Time Machine isn’t enabled yet.
The next three steps aren’t available until we log in with our admin user, so we’ll skip ahead for now and see what’s next without being logged in.
The dashboard preferences are for this app that we’re currently looking at. We can change the discovery settings on how Drobo devices should be detected, the update settings for the Dashboard app, as well as alert settings and email alerts.
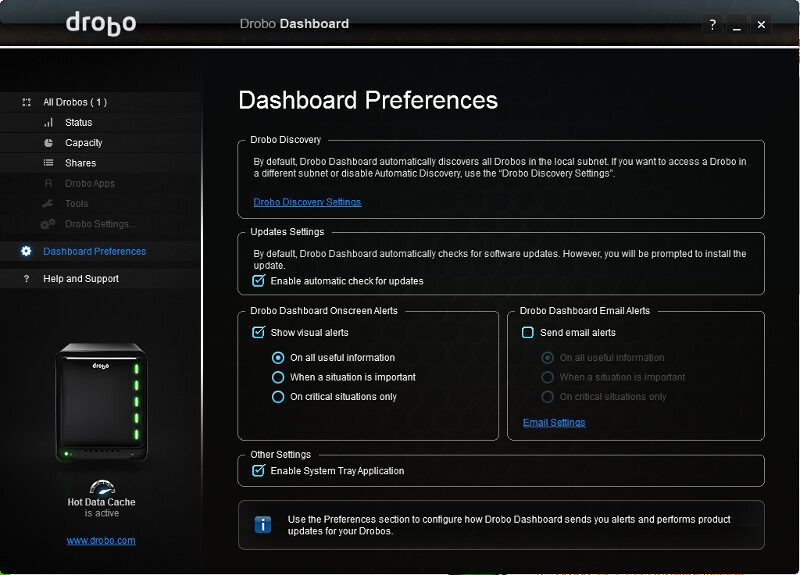
Especially the email alerts are useful as it will send out an email to the set address when something on the system requires your attention. A headless unit such as a NAS isn’t one that we log into every day once it is setup and running, and as such it’s an awesome extra security.

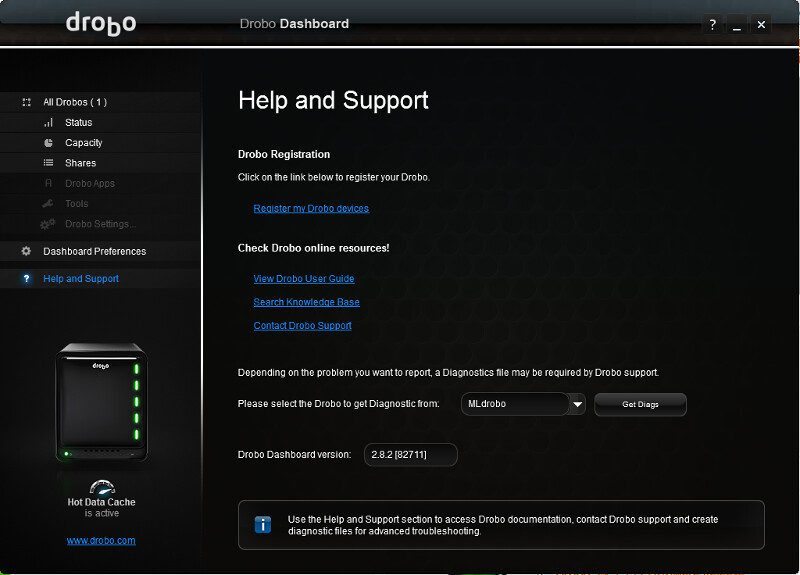
The last page is for when you need a bit extra help. You most likely never need this page, but if you run into trouble, that’s where you can go first. It provides links to register the system as well as access to the online resources such as the user guide, knowledge base, and contact to the Drobo support.
We can also download diagnostics from the system which then will be collected into a single file – which you can forward to your system admin or the support staff if something should go wrong.
Setup – Logged-in View and Settings
Okay, enough of how it looks when we aren’t logged in – it is time to take a look at the rest and all the things Drobo has to offer. After logging in with our admin user, the first page that we had a look at changes a bit. We see that login link disappears, the lock icon gets unlocked, and we see all the details including serial number.
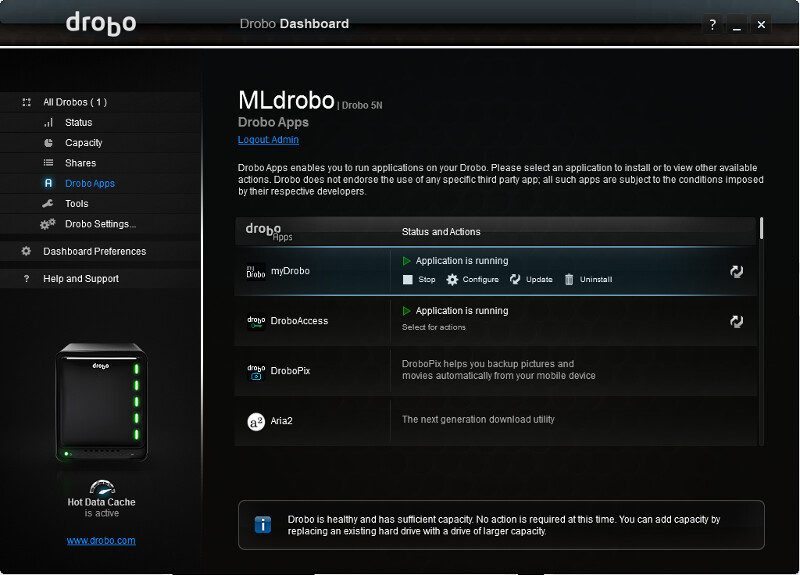
Further, you can install a lot of extra function in the form of Drobo apps. We have the basic Drobo features such as myDrobo and DroboAccess for easy connection to the system and DroboPix which allows us an easy backup of our pictures from our Android or iOS devices. Keep all the memories synced and backed up in a safe and private place. There are a lot more apps to choose from, but we’ll get to that later.
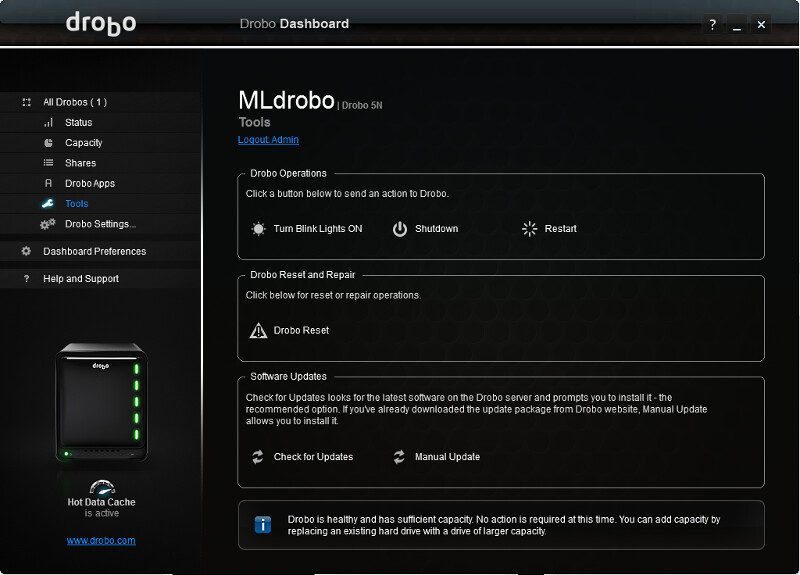
On the tool page we can tell the Drobo 5N to turn itself off or restart, should we need that. We can also turn the lights on or reset the device from here as well as manage updates. Updates can be installed manually or automatically.
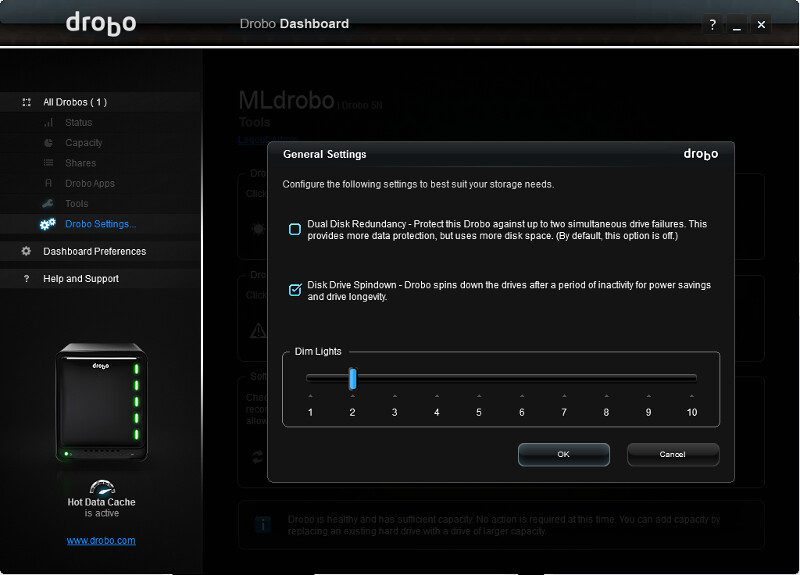
There aren’t many settings as such available, but those that are there are useful and they’re divided into four sub-groups. We can choose whether we want a single disk redundancy (default) or if we want to increase it to two. Two disk redundancy will give you less available space, but it will also give you a better safety against disk failure – whether one or two disks can fail without risk to your data.
The disk spindown is a feature that we can turn off, should we need to. In some rare cases, some apps will time out if they have to wait for a sleeping disk to spin up. Modern apps have no problem with this, but it’s a great feature to be able to turn off in order to stay compatible with legacy software too. The good thing about spindown is, that you’ll save a lot of power when the drives aren’t being actively used. Power is money, and money saved is something we all like.
The last function in the general settings is for the LED lights on the device. We can dim them in ten steps and set them to a level where they’re visible where we placed the system without them being annoyingly bright or distract you from the side.
Next up are the Network settings. We can change the name of the device and the workgroup it belongs to. We can also manually change the frame size up to 9000 from the default 1500 should our network be configured that way. Naturally, we’re also able to change how the NAS will get its IP address, by DHCP or manual settings.
Sadly we can’t change the DNS settings when it’s set to DHCP which is something that could be troublesome in rare instances. However, for 99.9% of cases, this shouldn’t be a problem.

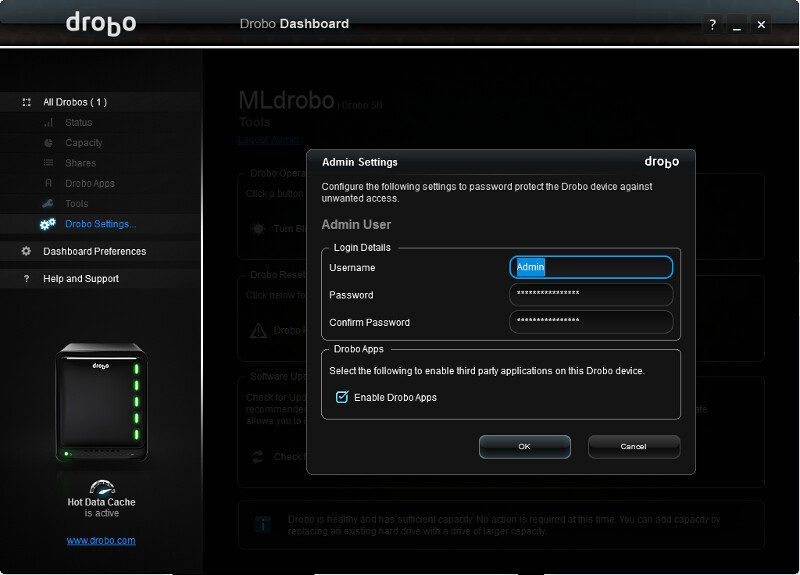
The admin settings don’t feature much. We can change the admin username away from the default Admin and change the password too. We can also disable the usage of third party apps in general on the system while still being able to access the official Drobo apps.
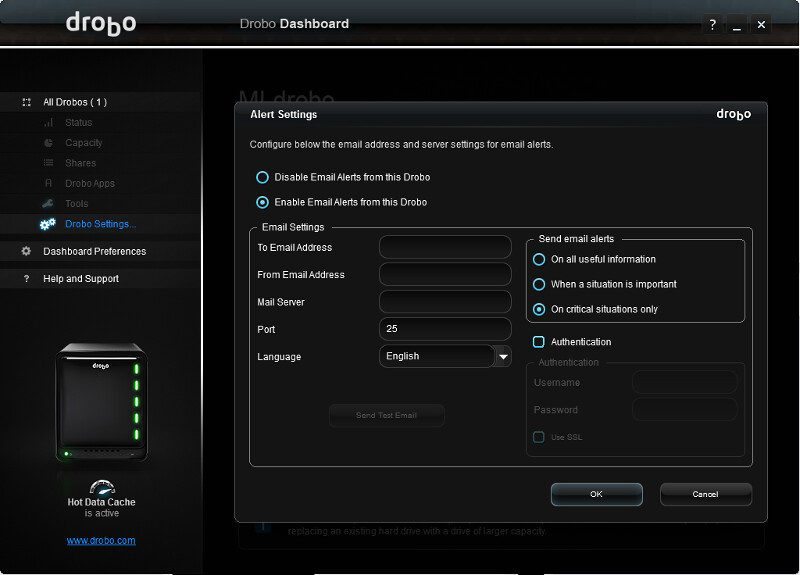
Last but not least within the settings, we have the alert settings where we can configure how the device is able to send out alert emails and what level of alerts we want to receive – from critical only to all useful information.
Above we saw that we can change the disk redundancy amount and we do so, the system will start to rebuild the array. While that is going on, we can’t replace any drives as the system is busy moving files around to ensure that your drive security is running. Not to worry though, it didn’t take much more than an hour to do so in my tests and then it was ready again.
The Dashboard app also shows us that this is in progress with the orange lid up drive icons, a warning msg under health, and a warning message at the bottom of the dashboard. The NAS itself will also switch its LEDs to orange, warning you that this is going on. Once it’s done, it will all turn to green again.

Setup – Users and Shares
Shared Folders
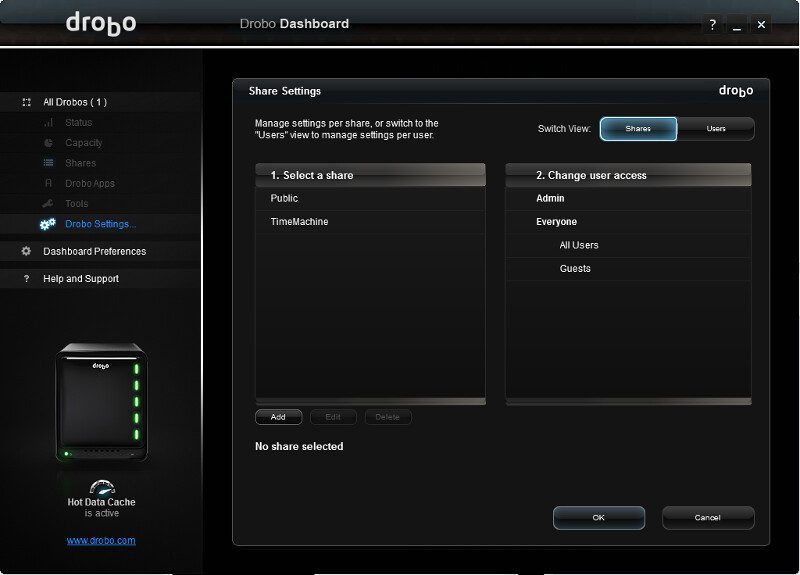
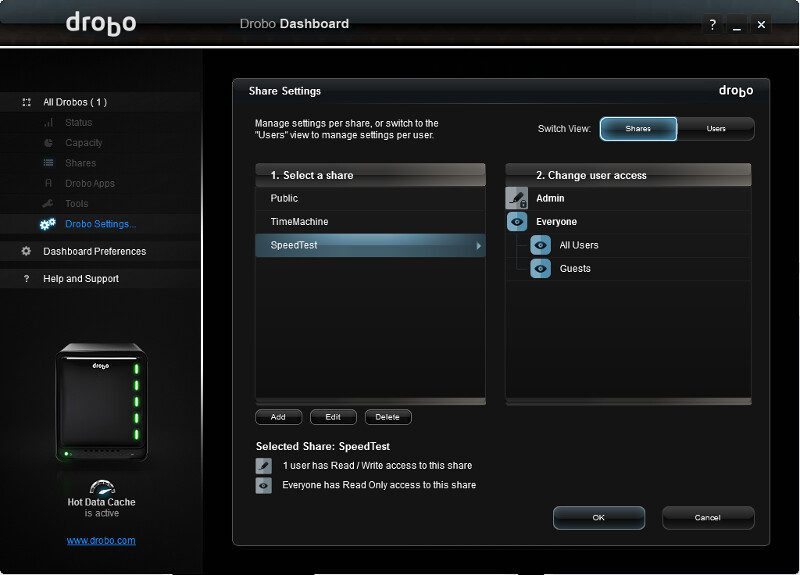
Creating and managing shared folders are easy on a Drobo NAS. One of the reasons that it is as simple as it is, is that you only got one volume to deal with and as such don’t need to worry about a lot of settings that you might need to pay attention to on other systems. Both shares and users are managed from a single sub-window as seen below.
Select an existing share to edit or delete it, or add a new one while simultaneously control the access rights for your created users.
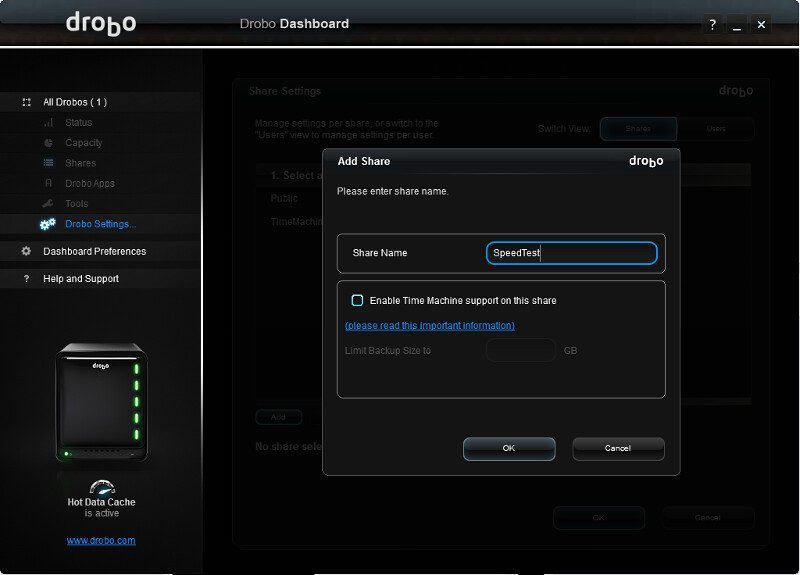
Creating a new shared folder is as easy as entering a name for it. You can also enable time machine for each share and limit the backups size for it.
We’ve created a new share now and selecting it will show us the access rights for the users. Changing the rights for a user is as simple as clicking the icon until you have the setting you want. No access, read and write, or just read. Admin users will naturally always have full access to all shares.
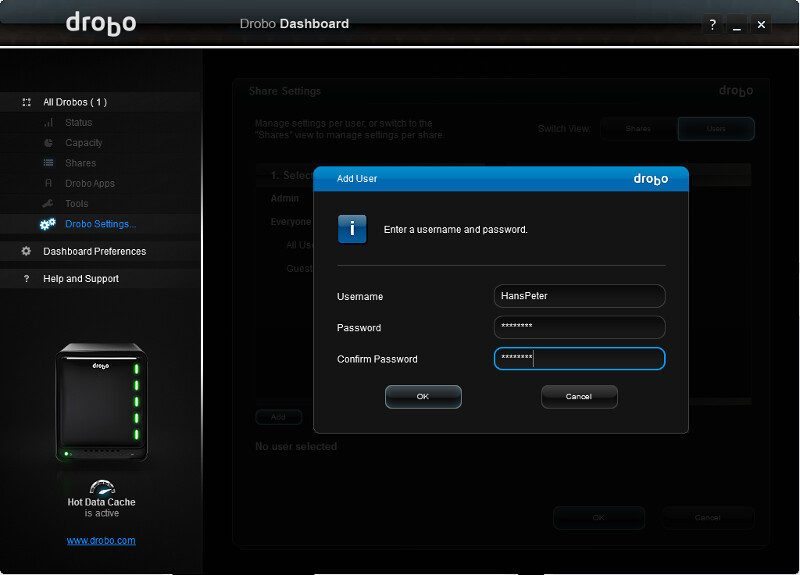
Creating new users is just as simple. Switch to the users tab and hit the Add button to get the prompt for this. Enter a username and a password and that’s it. The new user is created once you hit the OK button.
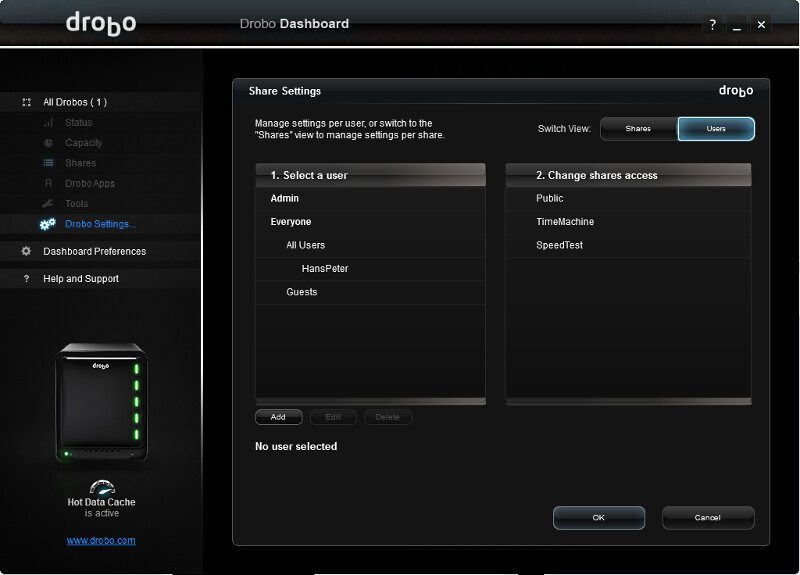
Having selected the users tabs switches the two treeview columns below around so you have users to the left and shares to the right – but it works the same way as when we had the shares selected – just in reverse.
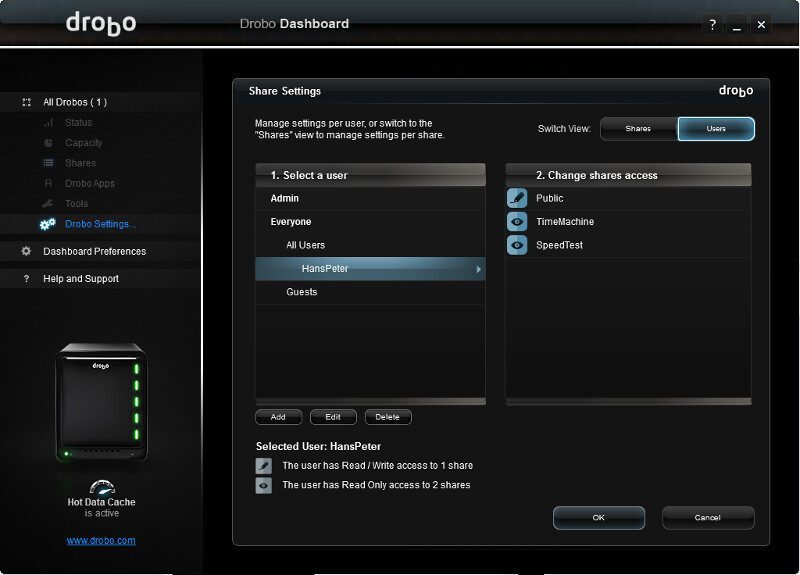
I’ve selected my newly generated user here and as we see, it shows us what folders that user has what rights to access.
Setup – A few more things and App Examples
There is one more thing to show here and that is how it looks when we pull a drive out of the system – which is one of the things that we easily can do with the Drobo. This might because we want to replace it with a different drive, a larger drive, or just want to remove it. The system will reflect this right away and start to rebuild the drive setup, repair it as you might say.
This is a bit different to the previously shown warning when we change the drive redundancy setup as the leftover drives still are green and thereby protect here instead of all them being under rebuild.
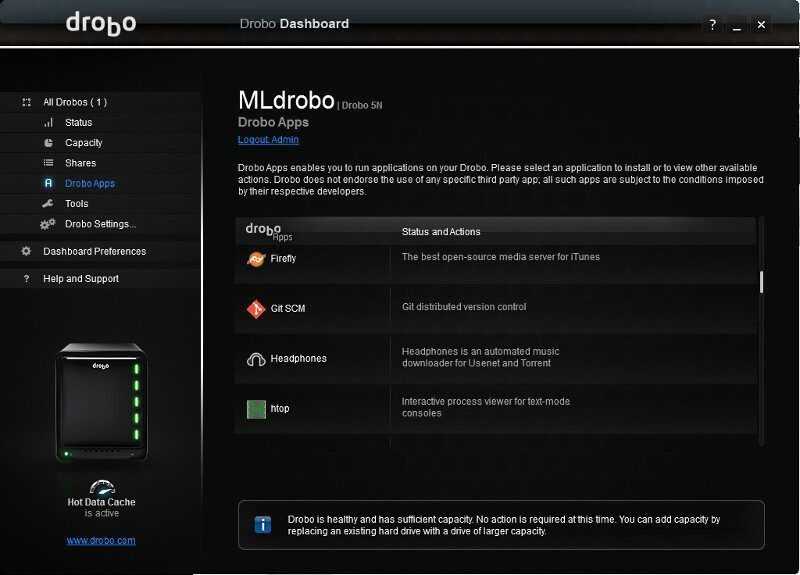
That was all when it comes the built-in basic features and functions. But as mentioned earlier, we can add a lot more functionality to the Drobo 5N NAS with extra apps, both from Drobo and third-party creators. There is quite a long list, but no grid view to look at them – so you have to scroll through the list to find what you’re looking for. There is something for almost any need, from Webserver functionality with MySQL over WordPress and CMS systems.
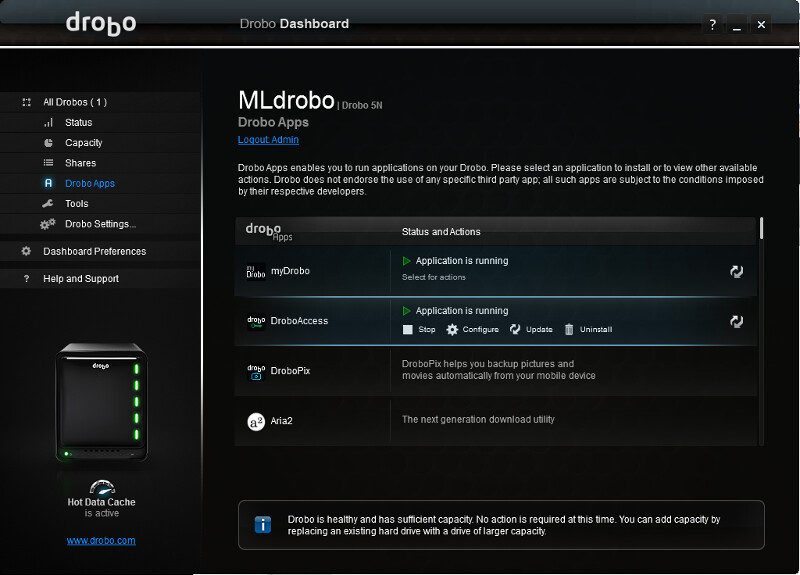
Firefly media server for iTunes and headphones automatic music downloader are among popular apps, but apps such as tpop are also present.
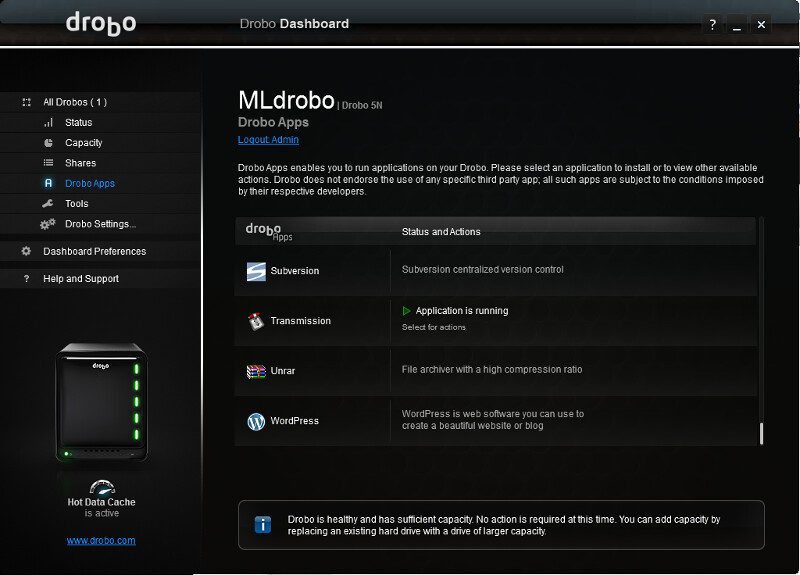
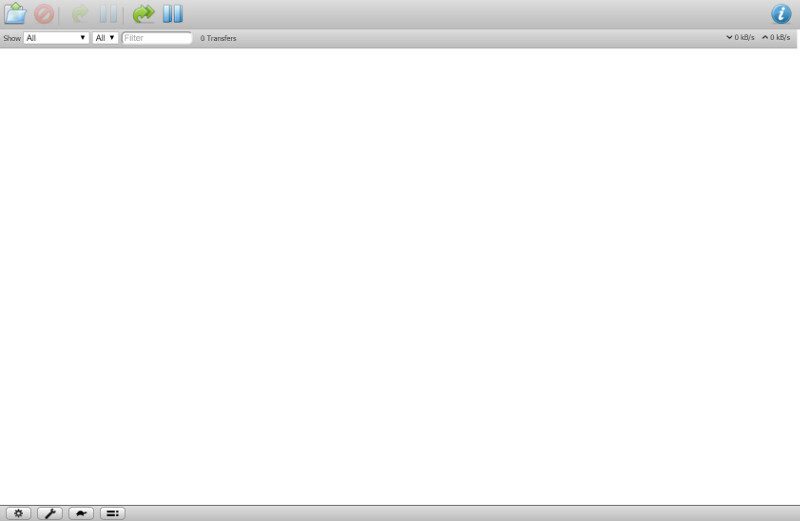
Transmission is probably one of the most popular download clients around and with good reason. It’s awesome and you’ll also find that on your Drobo along with such useful features as the Unrar file archiver function.
A main feature in a NAS, at least at home, is for media playback and Drobo features support for Plex Media Server.
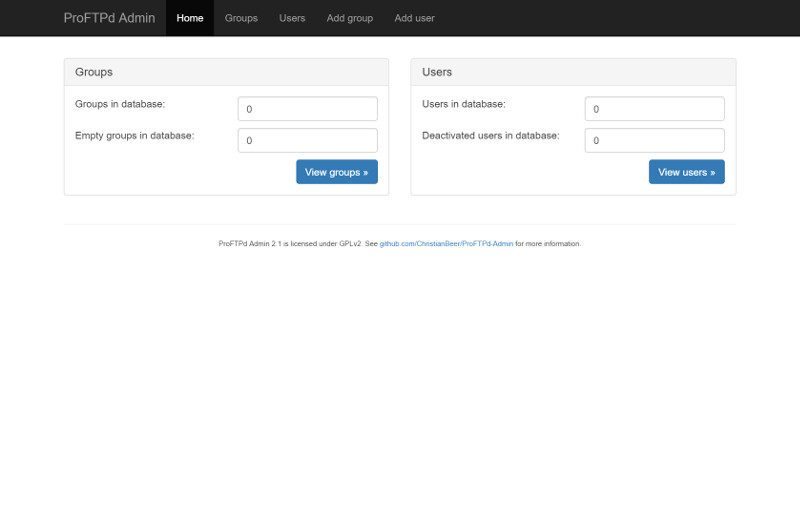
Some apps such as the ProFTP Daemon feature pre-launch settings as seen here or web-based interfaces such as the one shown above.
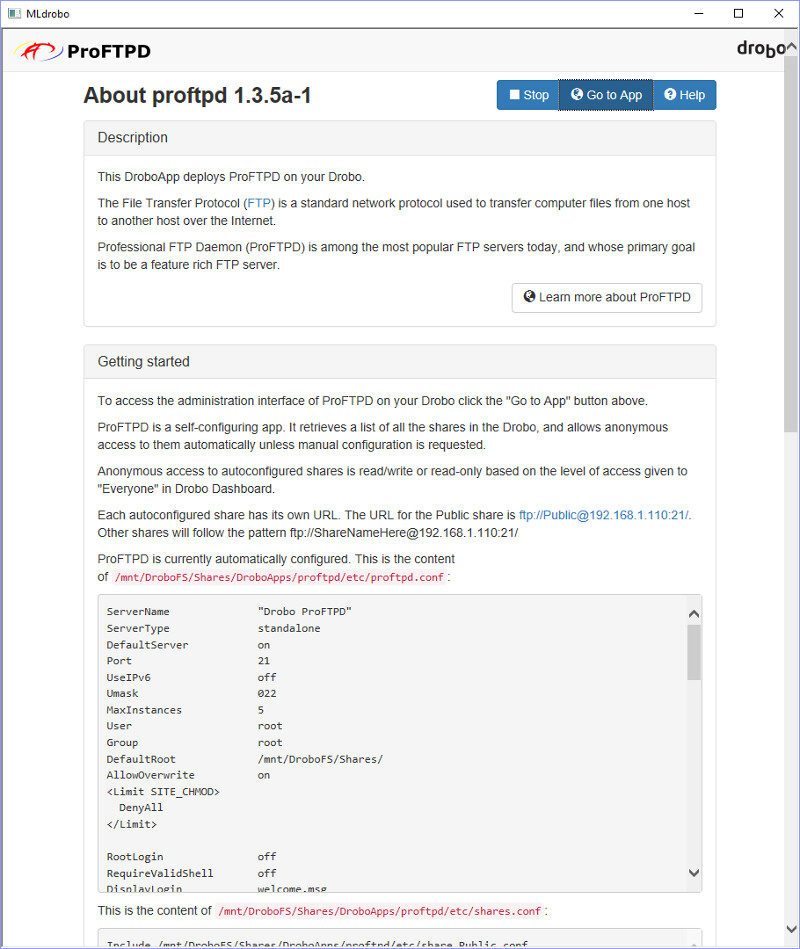
Or they feature both.
Here’s also a view of the well-known Transmission interface that a lot of you probably know very well.
I could show a lot more apps here, but they’re kind of optional and it all comes down to what you need. You can however find a list of them on the official Drobo page too, should you want to know everything before you purchase such a system.
Testing Method
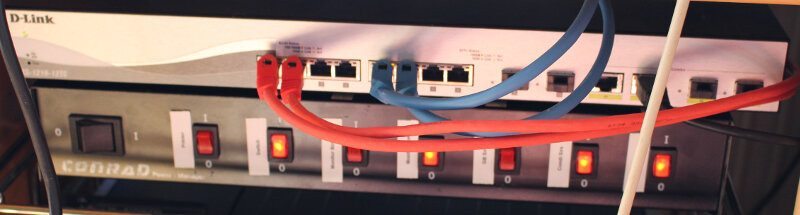
Most of the hardware for NAS testing isn’t an important factor when it comes to benchmarks, most of it comes down to the network infrastructure. I will be teaming the two Intel Gigabit Ethernet ports on my test bench and connect them to my managed switch. The same will be done with the available LAN ports on the NAS, which should give a great testing environment.
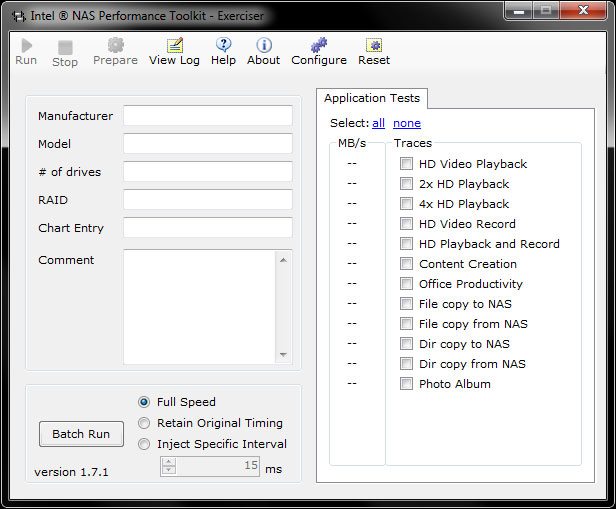
As part of the testing, the NAS is connected through a D-Link DXS-1210-12TC managed 10GBase switch and then to our test bench to give the best real world setup test that we can and the NAS itself will be packed with the supplied HDDs and mSATA module. Intel’s NASPT software does require us to drop the memory down to 2GB, as using any more would lead to data caching and skew the results.
I will be testing the NAS box performance under each of the drive setup options that it has available.
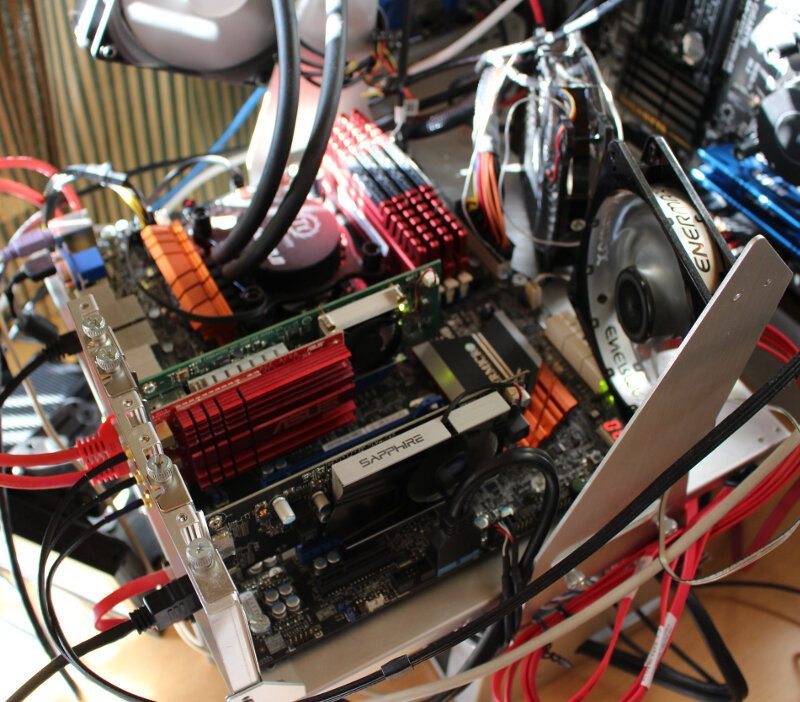
Test system:
- Supermicro C7Z97-OCE
- Intel Xeon E3-1230Lv3
- Exceleram EP3001A 2GB PC3-10666
- Kingston HyperX 240GB SSD
- Sapphire R7 240 2GB
- be quiet! Dark Power Pro 11 850W
- Thermaltake Water 3.0 Performer C
- Lian Li PC-T60
Disks in Product:
In today’s review, I’ll be using a mix of Toshiba HDDs from 1TB to 6TB capacity as well as a mSATA module that were supplied with this sample instead of my usual WD 6TB drives. This is simply to show the special capabilities of this particular system.


Network Setup:
We would like to thank our sponsors for supplying us with the components needed for the test system as well as drives.
Software used:
With a device of this sort having so many different applications, Intel’s NASPT software covers all the bases and also gives us a set of results that we will be able to utilize and give a benchmark against other similar systems in the future.
Intel NASPT (Network Attached Storage Performance Toolkit) performs its test by transferring varying sizes and quantities of data to and from the device based on twelve different scenarios.
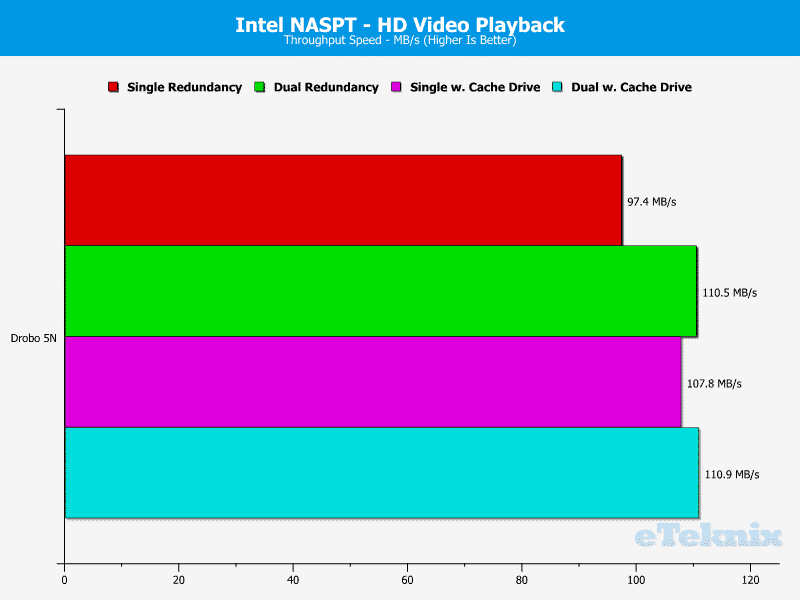
HD Video Playback
HD Video playback is a read test, where a single 2 Gb file is read in 256 kB blocks sequentially from the drive. This simulates where a 720p HD video is being watched across the network to a media player on the other end.
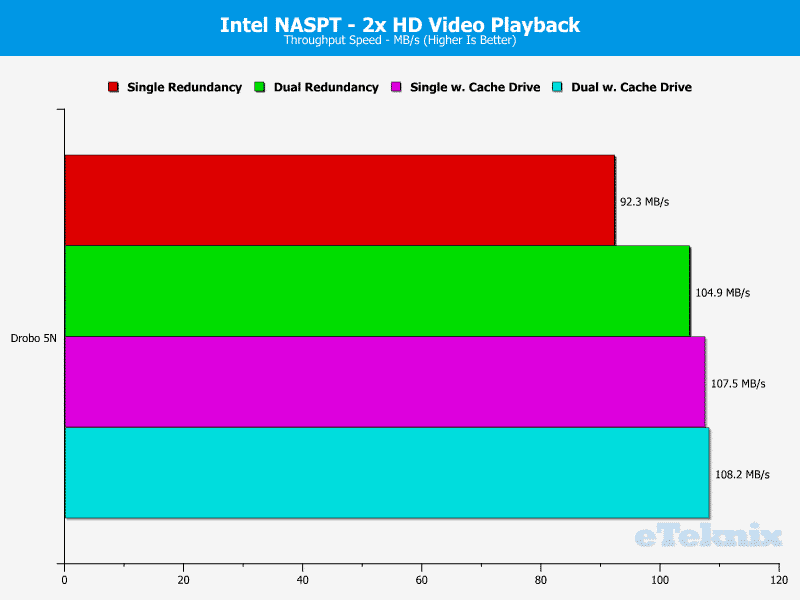
2x HD Video Playback
2x HD Video Playback works with exactly the same data set as the first HD Video test, however, this time, the same content is streamed twice from the NAS box simulating two simultaneous streams being made to external media players.
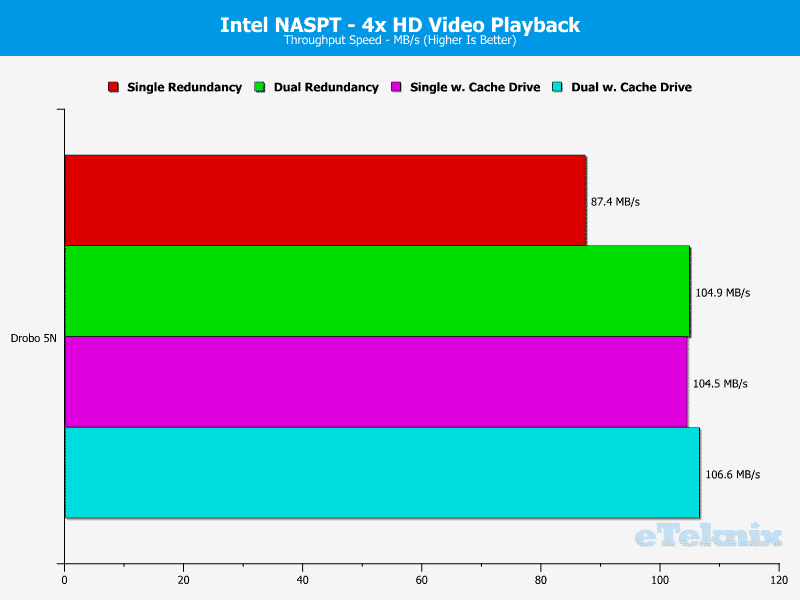
4x HD Video Playback
In the same way that the 2x Video Playback streams to the equivalent of 2 external media players at the same time, the test here doubles that again up to a simulated 4 media players.
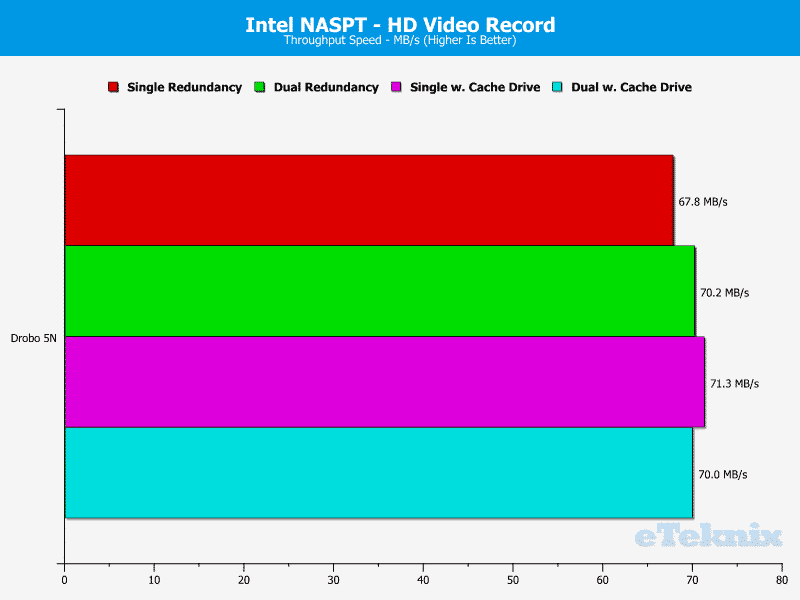
HD Video Record
The HD Video Record test is, as the name suggests, a write test to the NAS box. A single 2 GB file is written to the device in 256 kB blocks sequentially to the disk.
HD Playback & Record
The HD playback and record test now put the drive under the same single record and playback tests as before, but now at the same time. This will factor for the quick changes needed to switch between reading and writing two large blocks of data across the network to the device.

Content Creation
For content creation, Intel have simulated access to via video creation applications. This is made up of 98 files with 12 MB reads and 14 MB writes in varying sizes of blocks. The activity is predominantly non-sequential with the majority of access time made up of writing to the drives. There are quiet periods of read/write activity interrupted with busy periods to present a difficult workload on the drives.

Office Productivity
The office productivity simulation is very similar to the content creation, with a total of 607 files written to and read from the drive. A total of 1.4 GB of data is written to and read from the drive with a close balance between each made – the majority of write access is made up of 1 kB writes.

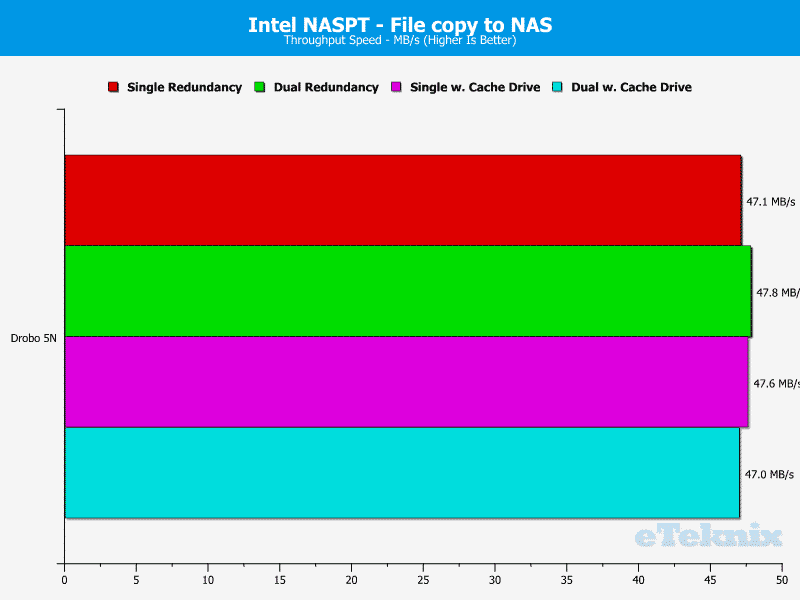
File Copy To NAS
This test quite simply put copies a single large file from the test system to the NAS box to show how well the system can sustain a single write speed. The 1.4 GB file is copied to the drive and written in 64 kB blocks.
File Copy From NAS
File copy from the NAS works in exactly the same way as the copy test, but it works in the opposite direction. The single 1.4 GB file is read off the NAS in 64 kB blocks.

Directory Copy To NAS
In the directory copy to NAS test, a directory tree representing that of a typical commercially available office suite is copied to the NAS to trace the bulk copy of a complex directory. A total of 2833 files making up 247 MB are moved, but the file sizes vary considerably with an average size of 41.4 kB. Due to the varying sizes of the files, only around 50% of the writes are sequential.

Directory Copy From NAS
In the same way that the file copy from NAS traces the same file back across to the test system, the directory copy from NAS does exactly the same but to the entire directory that it copied across previously.
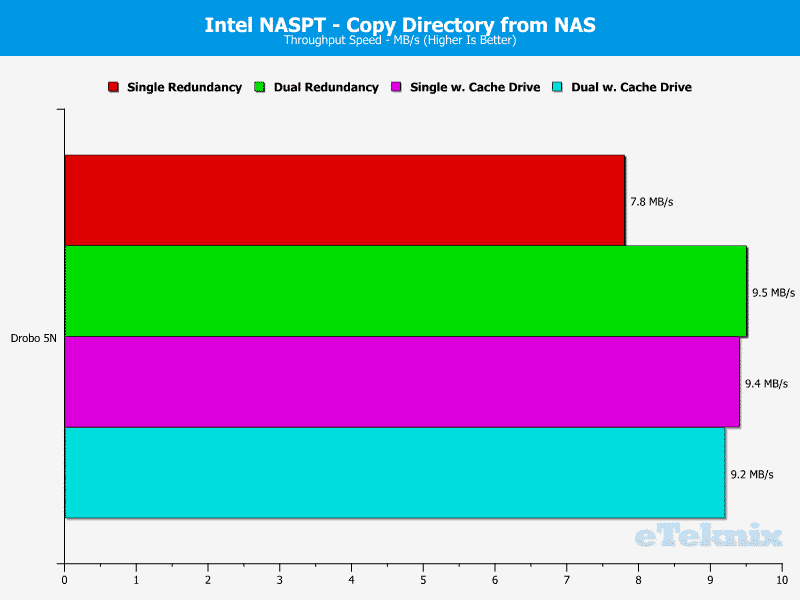
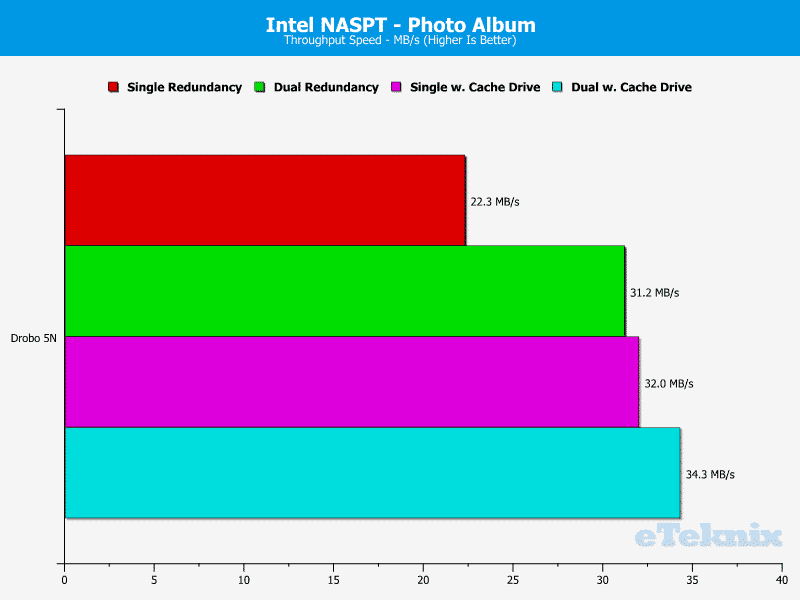
Photo Album
Last of all is a test based on a photo album. When a photo album is viewed on-screen, only the images that you see are loaded from the drive and so when you scroll through the album, the new images have to be fetched and read. The album here contains 169 photos with varying file sizes based on the size, quality, and detail in the image. Reading the files in a photo album puts an unusual read load upon the drive as the metadata is read, a thumbnail constructed and finally the image viewed.
Average Throughput
This page shows the average throughput from each of the previous 12 tests in one and it can serve as an easy comparison between products.

Final Thoughts
Pricing
At the time of writing, the Drobo 5N can be found at NewEgg for $489.00, at Scan Computers for £423.49, or through Geizhals starting at €488.90. For a limited time and as an introduction of the unit to the UK market, it can also be had for a promotional price of just £412.90 through BT Shop and Amazon.
Overview
So, it’s time to dig into it and summarize my impressions of the Drobo 5N and we might as well start with the design and build quality. The Drobo 5N is a beautiful NAS thanks to its simplistic design. The rounded corners and otherwise glossy black design give the unit an overall great appearance. The glossy design does however have the downside that fingerprints easily show on the device. The front cover gives it the final touches while hiding the drives away from view. The magnetic seal on the front cover also makes it quick to remove when drives need to be replaced. Drobo also incorporated the LEDs great into the design, and there are quite a few of them from the multi-coloured LEDs for each drive bay to the bottom capacity meter. A generally well-designed unit that will fit great into offices as well as living rooms.
The Drobo features a completely tool-less design which is another bonus. Whether it’s for the data drives or the hot data caching drive, they can all be inserted or replaced without the need for any tools, drive trays or similar features. An awesome feature, but it does pretty much limit it to the use of 3.5-inch drives. Then again, that’s what most people will use in a device like this anyway, so it isn’t really a problem in most cases.
Connection wise, the Drobo is a bit on the light side compared to other systems in this category. We only get a single Gigabit Ethernet connection and that’s it. There are no extra USB ports either to allow for direct attachment of backup drives, external drives, or thumbs drives. This isn’t really a deal breaker, but I would have loved to see at least one USB 3.0 port for such a function. On the other hand, it keeps things simple and with fewer ports that need to be taken into consideration, fewer things can go wrong.
But enough about looks, it’s time to talk features. The BeyondRAID feature is probably the strongest selling point in this system and I really like it. Compared to traditional RAID setups, it allows you to mix and match drives with different specifications and capacity as much as you want without sacrificing unnecessary capacity or redundancy. You can configure it with either one or two drives redundancy in case of drive failure. It is also a quite fast setup that performed better in our benchmarks than I would have expected with the mixed drives that I used for this test.
The setup, configuration, and management isn’t done via a web interface like most other NAS’ devices, instead, you get a local app to install on a normal system, either Windows or Mac OS, that allows you to perform all these tasks. This does limit it a bit, but it might also make it easier for more novice users. Those are also the two systems that are supported for local connection through CIFS/Samba and Apple Filing Protocol. Linux users can also access it through their support for CIFS, but they don’t get the dashboard app. You can expand the basic functionality quite a bit through official Drobo apps as well as third-party apps and there are quite a few available to suit almost every need – from website setup over media streaming to automatic download tools.
Another really awesome feature that we shouldn’t forget in the Drobo 5N is the built-in mini-UPS that protects you from accidental power loss – and it works. It features a built-in battery that allows the system to shut down safely and without losing active data in the event of a power loss. It’s a great feature and it also works when you just unplug the power cord during usage – as I did a few times to simulate it.
Overall, the Drobo 5N would be a great solution for people that aren’t as tech-savvy but still want to benefit from all the features a centralized storage solution can provide while still offering more advanced features and app expansions more advanced users might be looking for. Kind of a plug-and-play NAS.
Pros:
- BeyondRAID with instant expansion and mixed drive utilization
- Single or Dual disk redundancy function
- Built-in mini-UPS
- Hot Data Caching option with an mSATA SSD
- Beautiful and smart design
- Tool-less installation
Cons:
- SMB/CIFS and AFP only
- No USB ports for external storage access.
“The Drobo 5N could be considered a plug-and-play NAS that comes with some great features such as drive mix-and-match and power-loss protection.”

Thank You, Drobo for providing us with this review sample.