Gigabyte X99-UD4P (LGA 2011-3) Motherboard Review
Rikki Wright / 10 years ago
Introduction, Specifications and Packaging

X99, the mother of the prosumer chipsets. It’s what everyone wants, fewer can afford and fewer can fully utilise; this is the ultimate top trump card and rightly so. Gigabyte is currently the leading manufacturer of motherboards, while also offering one of the largest X99 motherboard ranges of all the manufacturers.
It seems Gigabyte are giving a spruce up to some of their best-selling X99 motherboards by giving them the overclocked treatment. They’ve doubled the contact area of every pin and increased the quality of the pins in aid to increase bandwidth. Along with this, they’ve added this onto their renowned Ultra Durable motherboard, which uses some of the best capacitors available. Let’s see if all this pays off in today’s review.
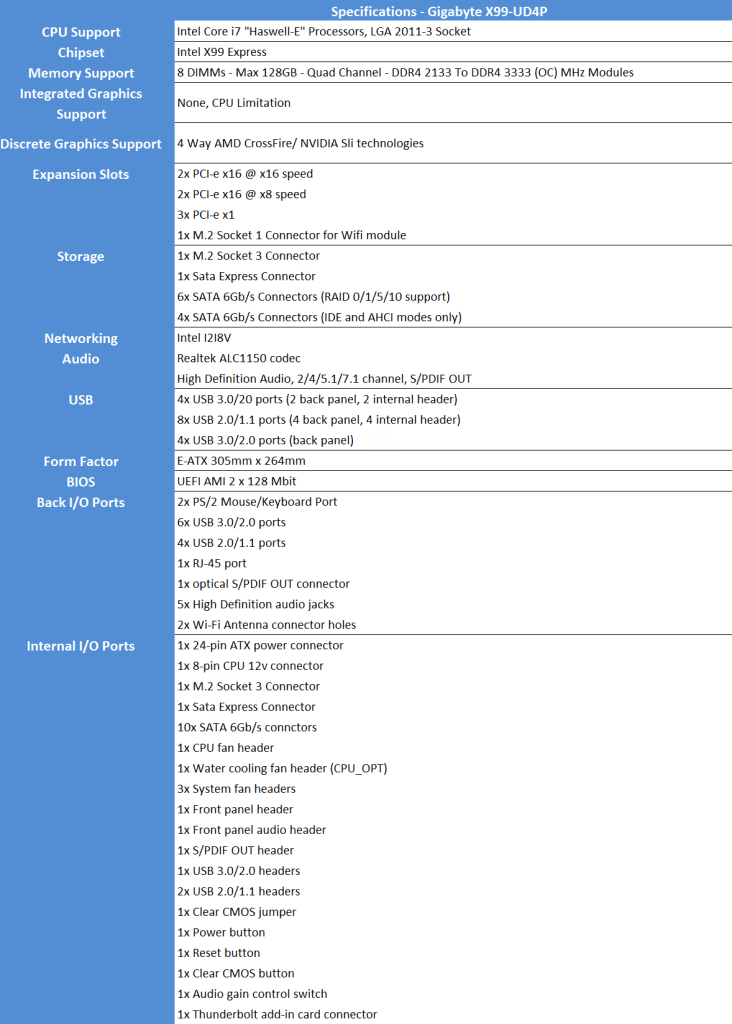
Key Features
Manufacturers nowadays need to find innovative ways to stand out from the crowd, Gigabyte is no exception and has brought a huge array of features to this motherboard.
- Support for APP Center
- Available applications in APP Center may differ by motherboard model. Supported functions of each application may also differ depending on motherboard specifications.
- @BIOS
- Ambient LED
- EasyTune
- EZ Setup
- Fast Boot
- Cloud Station
- ON/OFF Charge
- Smart TimeLock
- Smart Recovery 2
- System Information Viewer
- USB Blocker
- V-Tuner
- Support for Q-Flash
- Support for Smart Switch
- Support for Xpress Install
For more information on these functions, please visit the Gigabyte X99-UD4P product page.
Packaging and Accessories
Following true Gigabyte style, very similar boxing to most of their motherboard range now, very solid plastic box, black colouring with the series colour highlights (Ultra Durable Yellow for this model).

Inside, we see an absolute treasure trove of accessories, 4x SATA cables, 1x split power cable, 1x LED I/O shield, 1x single x-fire bridge, 1x single SLI bridge, 1x dual SLI bridge, 1x tri-SLI bridge, 1x quad SLI bridge and the usual manuals and driver disk.

A Closer Look & Layout Analysis
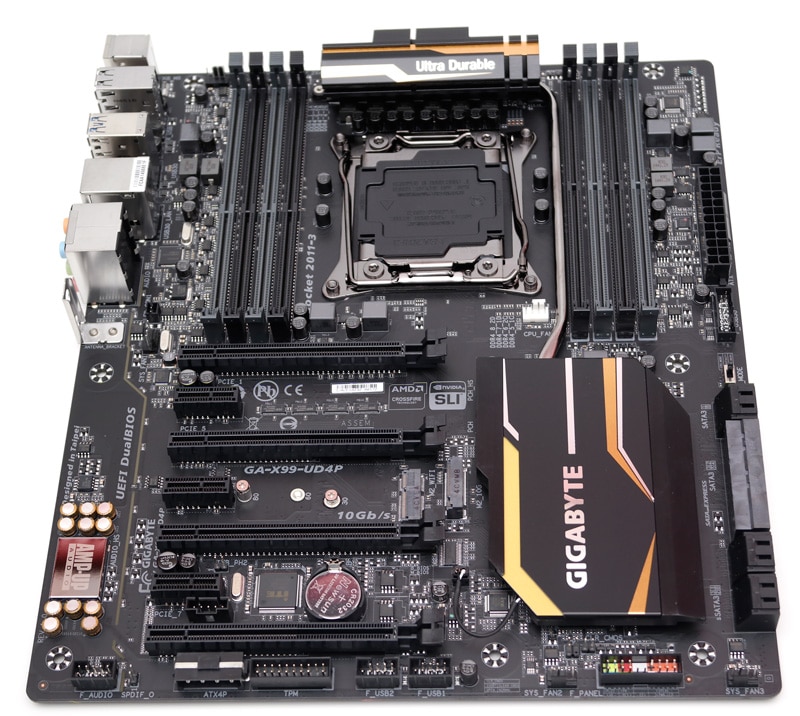
The first look at the X99-UD4P board reminds me of the original X99-UD4 board; looking good.
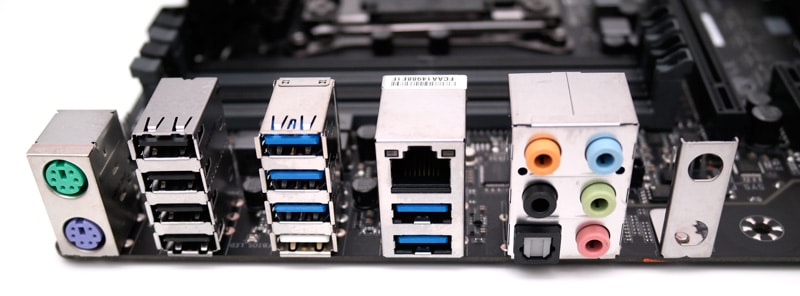
The I/O side of the board presents us with an impressive range of connections. Firstly, 2 separate PS/2 ports, then 4x USB 2.0 ports (black), 5x USB 3.0 ports (Blue), 1x USB 3.0 port enabled for Q-flash and the recommended port for keyboards/ mice for initial boot. You will also find 1x gigabit LAN port, 5x HD audio jacks, 1x S/PDIF optical port and 2 empty Wifi antenna holes.
From there, we move on down to the audio portion of the board, hosting Realtek ALC1150 and AMP-UP codec and its dedicated caps.

Along the bottom, we see all the typical headers for front USB, audio, buttons and an addition PCI power connection in the form of a male molex connector.


Working our way back up the other side of the motherboard, we have our relatively small bank of SATA connectors. The lower of the grey section hosts SATA express, which is capable of up to 10Gb/s transfers. To the far right, we see a CPU switch, which is a hardwired OC switch which auto analyses the best CPU clock for the CPU/ RAM motherboard combination.

Straight opposite the I/O ports, we then have the typical headers, 24-pin ATX power and USB 3.0 header. It’s a shame there aren’t any on-board buttons or debug LED, would finish this off nicely.

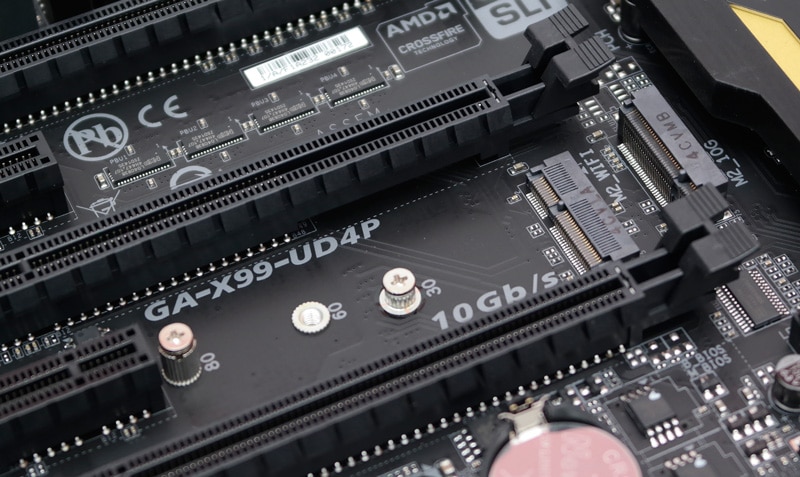
Slapped straight in the middle of the PCI slot bank, we have dual M.2 ports, one low and one raised. The lower is designed for a WiFi card and the raised for a typical M.2 SSD. The placement sort of limits your range of usable M.2 SSD cards, but up to 80mm is the main consumer size.
So with this motherboard, Gigabyte has introduced a slightly tinkered heatsink design, featuring LEDs; a full video demonstration is on the Software Overview page.

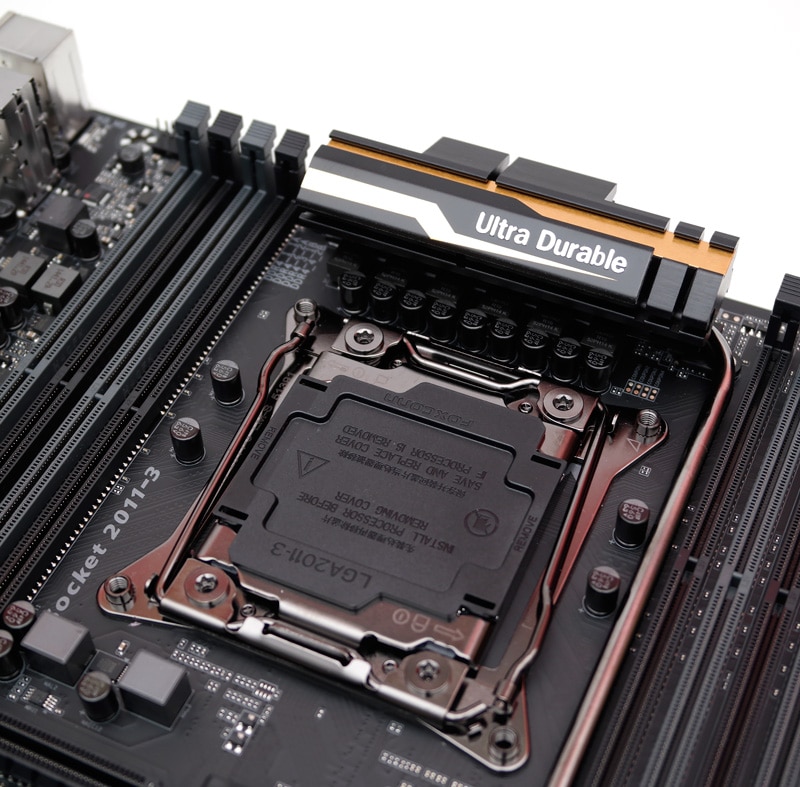
This board features the standard 8-DIMM slots supporting up to 128GB of 3333MHz memory. The CPU and DIMM slot pins are upgraded gold-plated pins, better connection and less strain on the pins.
The Test System and Test Software
Before we delve into any testing we would like to take this opportunity to review our test system.
Test System
- Motherboard: varies by review
- CPU: Intel Core i7 5960X
- GPU: Sapphire R9 290 Tri-X graphics card
- RAM: Cruicial 32GB 2133MHz DDR4
- Cooling: Thermaltake Water 3.0 AIO with Gelid GC-Extreme
- Case: Lian Li T80 Test Bench
- Storage Drives: Main storage: Crucial M550 512GB, Test Devices: SanDisk Extreme Pro 240GB SSD, Plextor 256GB M6e M.2 SSD and Patriot SuperSonic Magnum 256GB USB 3.0 Flash Drive
- PSU: Be Quiet Power Zone 1000W
- Operating System: Windows 8.1 64-bit
- Networking: ASUS RT-AC68U router
Test Software
- SiSoft Sandra Engineer – available here
- WPrime – available here
- Cinebench – available here
- 3DMark – available here
- Bioshock Infinite – available here
- Tomb Raider – available here
- AIDA 64 Engineer – available here
- Latencymon – available here
- Rightmark Audio Analyser – available here
- LAN Speed Test Lite – available here
- Passmark – available here
BIOS and Overclocking
Gigabyte is known for the UEFI BIOS, starting off as a laggy, almost legacy style interface to a now fluid and easy to use GUI. With this motherboard, they offer their latest UEFI and legacy BIOS versions. I personally prefer the more advanced features of the legacy BIOS, I find it easier to use. The Gigabyte BIOS types have been covered extensively, so I will only briefly explain things here.
Upon entering the BIOS you are greeted by the Gigabyte Startup Guide screen. From here you can adjust some easy to fix features.
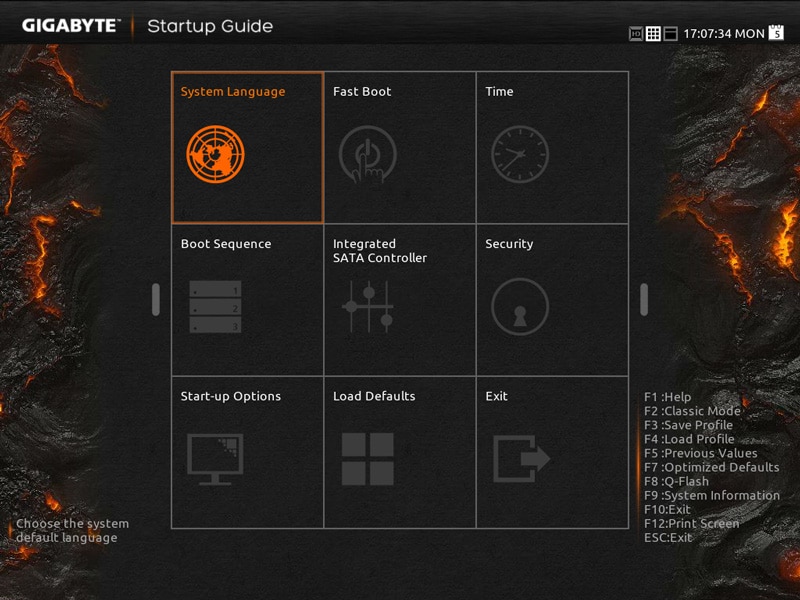
One of the features I liked was the easy to use, but still in-depth smart tweak; this allows you to overclock the CPU and memory and adjust voltages fairly easily.
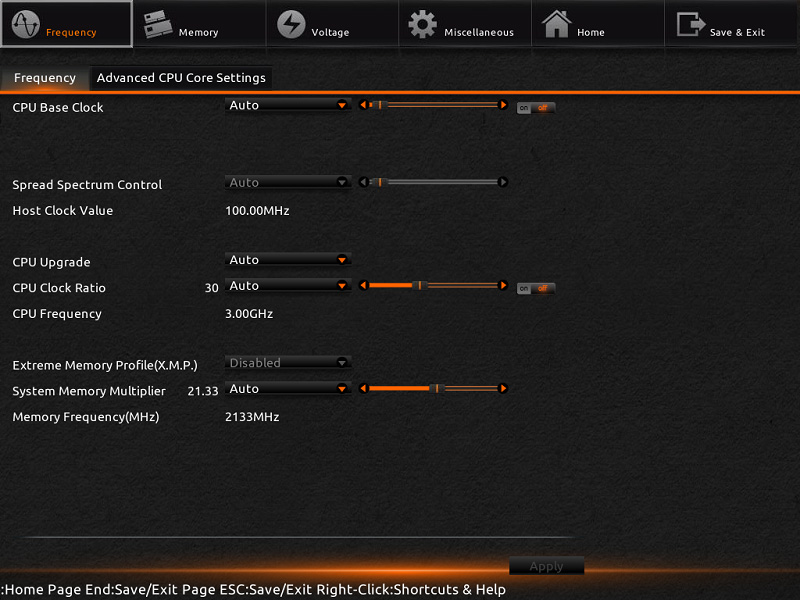
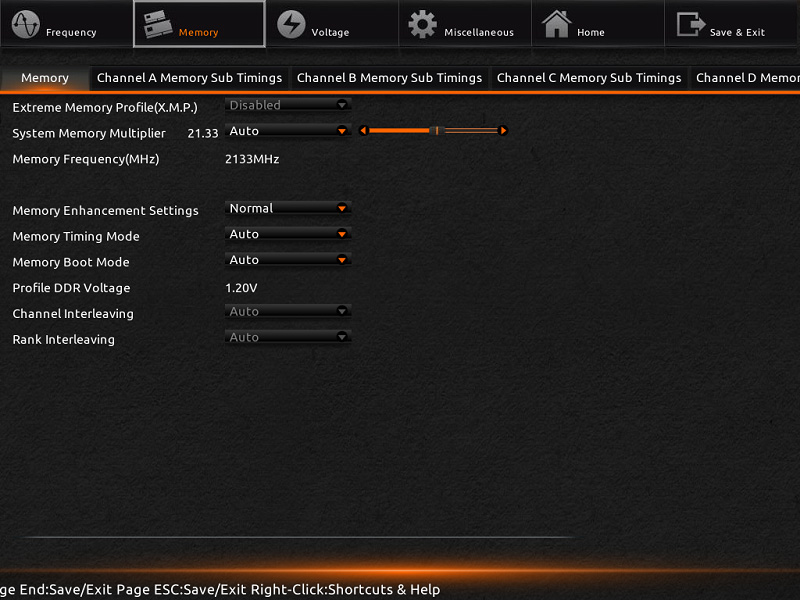
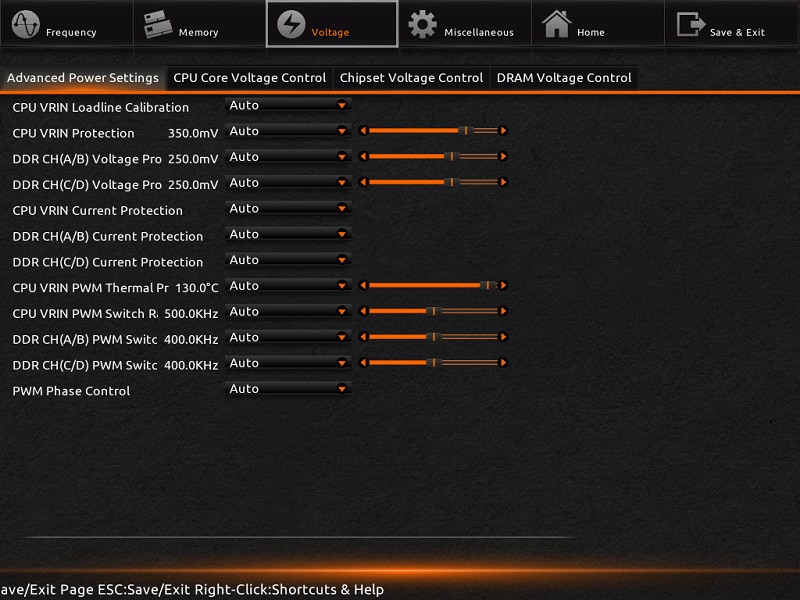
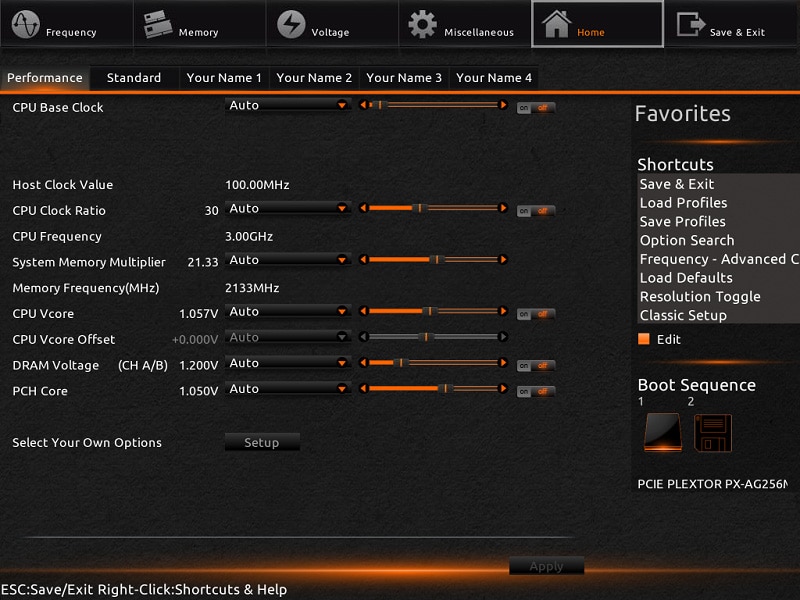
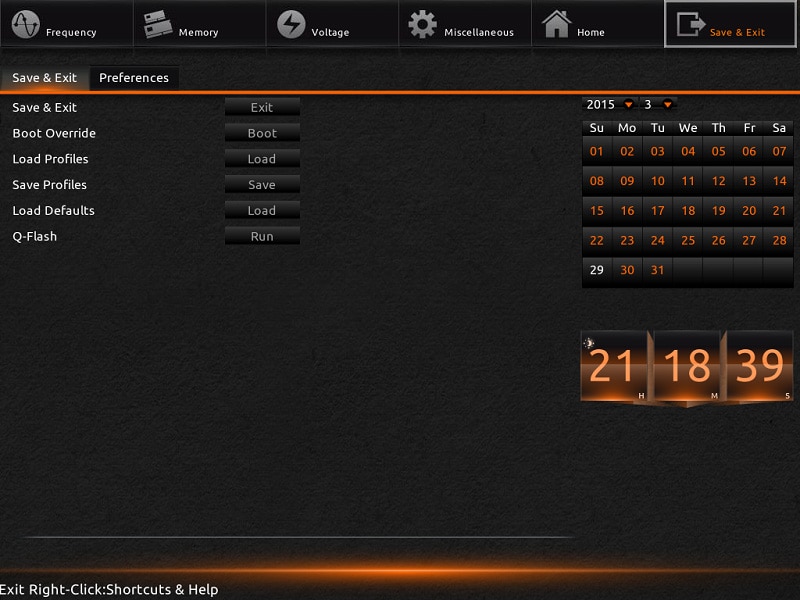
The other option to that is the updated legacy BIOS. This has every feature you could want in a BIOS, but I’ll stick to the main page as each legacy BIOS is 99% the same.
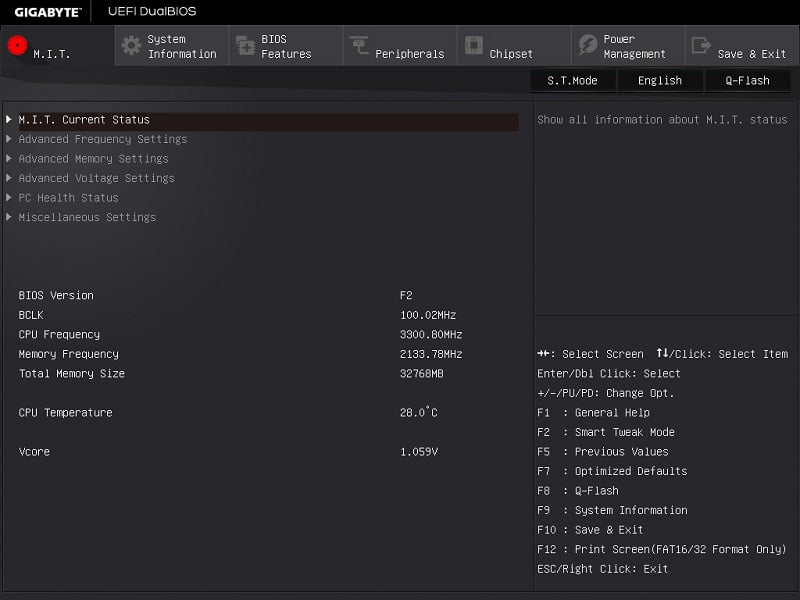
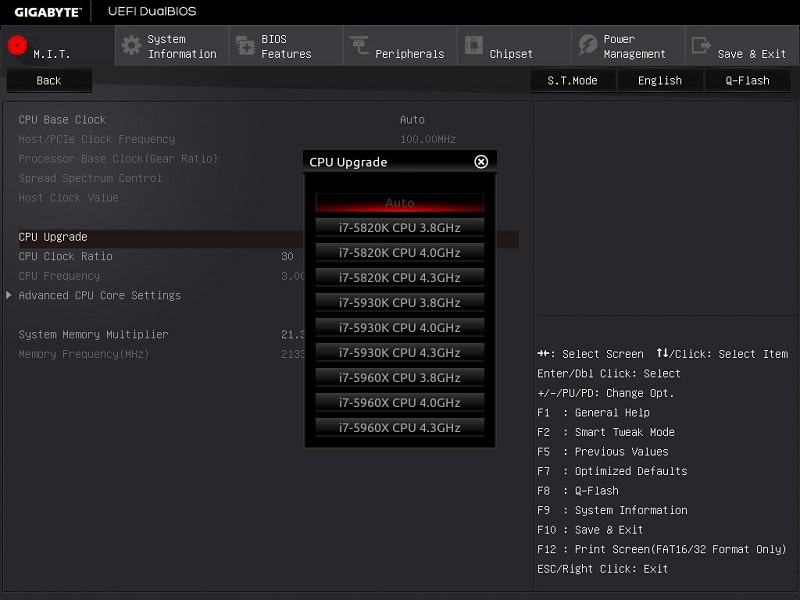
One of the features that caught my eye here is the ‘CPU upgrade’. I’ve never seen a feature like this, so being curious and clicking it, it opened a small list of compatible CPU’s and some conservative overclocks. I don’t see why the 5820K and 5930K are possible options here as the BIOS already knows I’m using a 5960X. You might get some bad experiences from novices clicking a CPU that isn’t theirs.
Overclocking
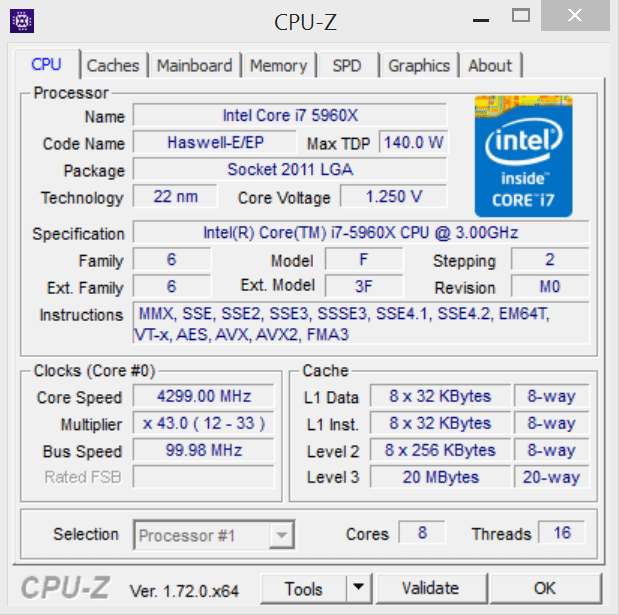
Now our i7-5960X can normally achieve an overclock of 4.4GHz on Gigabyte motherboards; however, this motherboard crashes without voltage increases. In the end, I stuck with a healthy 4.3GHz.
Software Overview
So the manufacturer’s point of difference is not only the components it uses, but also what it can offer the user during day to day use. Gigabyte, like others, offer many different programs for you to choose from once set up which can help to make your life a little easier. Usually these programs are useless, offering bloatware or some pretty pointless programs that you wouldn’t normally download. Gigabyte used to be the same, but have now changed their tune and offering useful programs from updating the BIOS which can be tricky, to updating all of the installed motherboard relevant drivers at once.
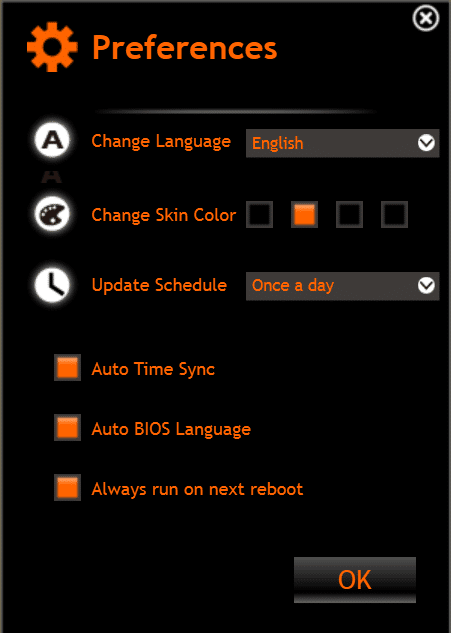
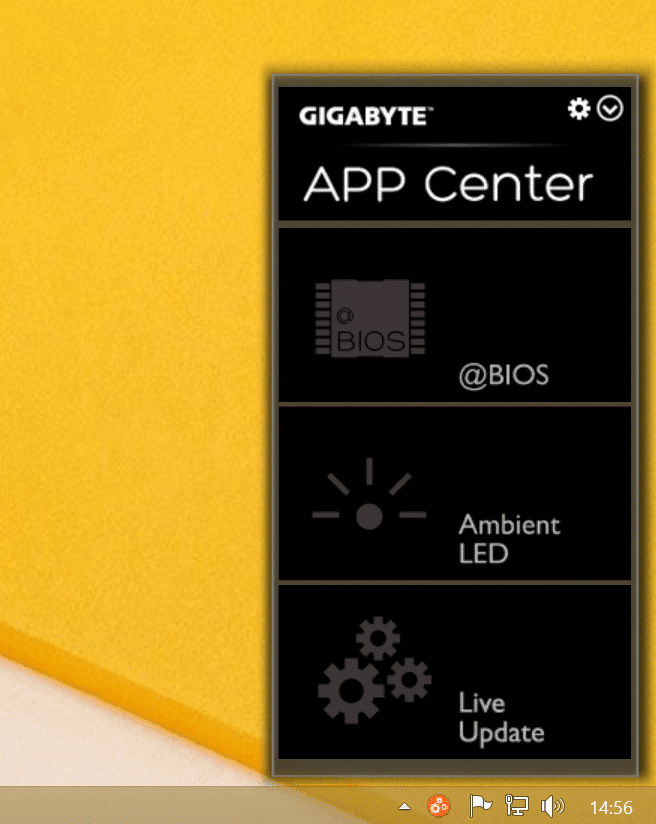
App Center is Gigabyte’s ‘hub’ for all of its programs. From here you can choose to update or install apps or go into Preferences to change your settings.

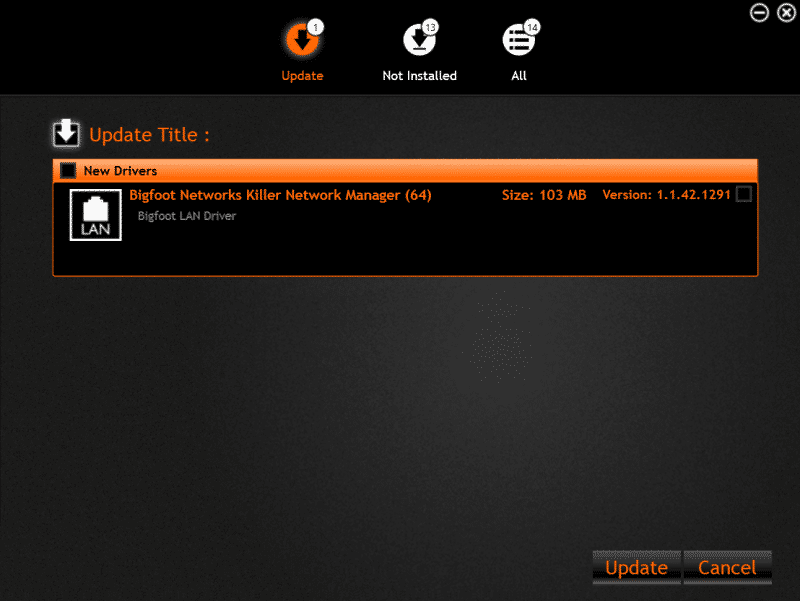
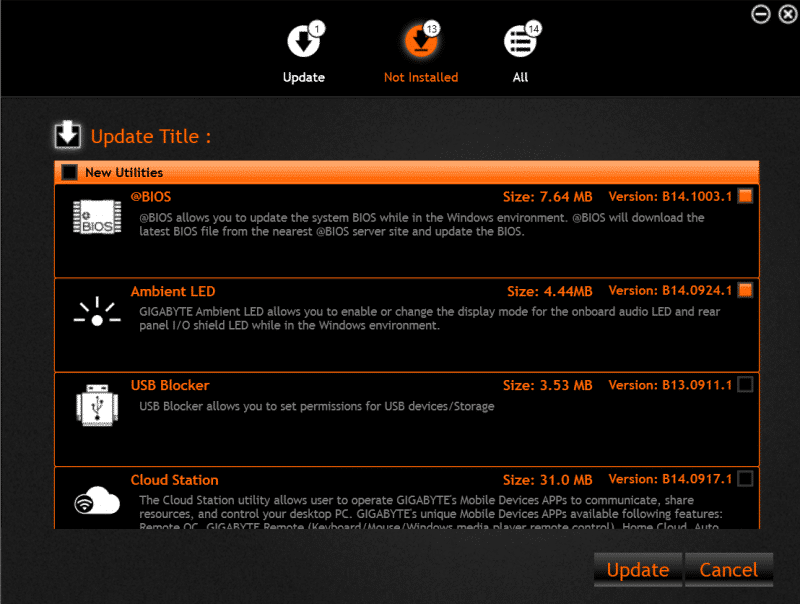
When updating the drivers and installing new apps, you are greeted by these pages. A very simple point and click update system, no trawling through download links to find what you want.
Once new apps are installed, they appear in the App Center panel, from which you can open as you please.
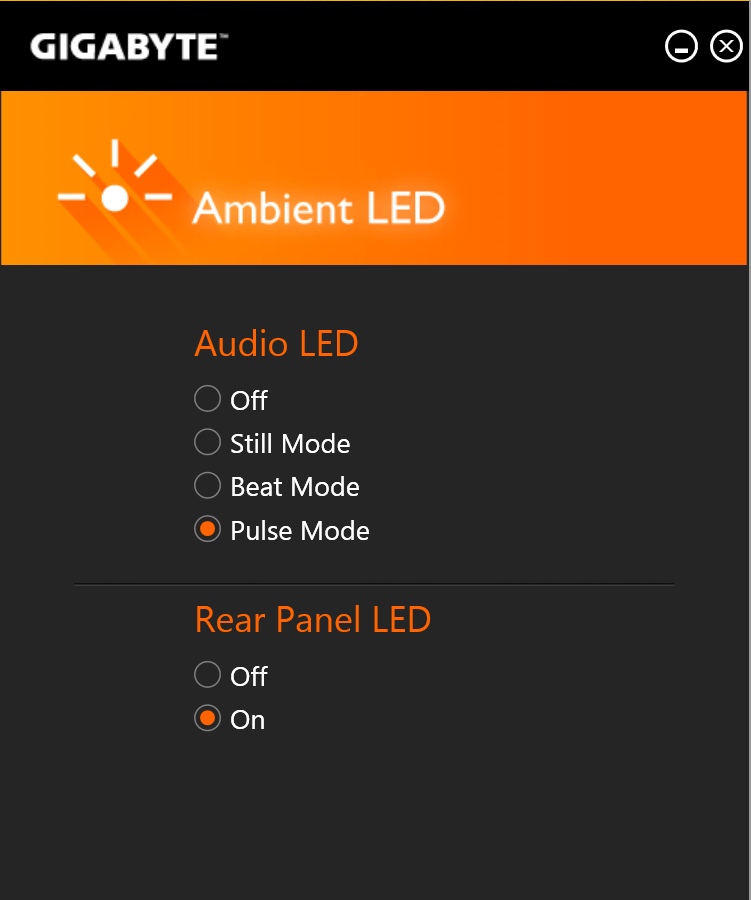
Ambient LED controls the onboard LED’s of the motherboard, the most notable is the PCB integrated LED strip, which has a really cool, but annoying feature where it Pulses to the beat of the music.
https://youtu.be/DLhrkuL0B0s
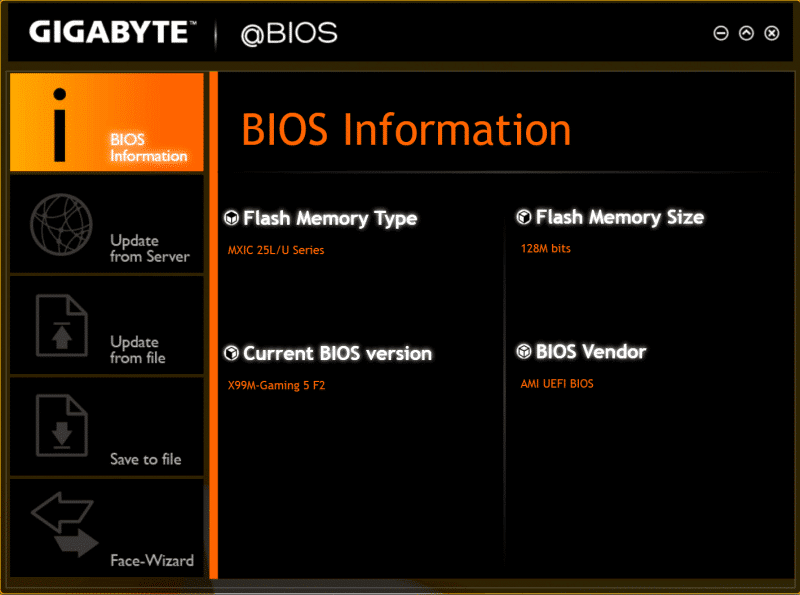
@BIOS, Gigabytes ol’ faithful comes to be a part of the new software; this is an amazingly handy tool that allows you to update the BIOS with ease.
CPU Performance
Cinebench
CINEBENCH is a real-world cross-platform test suite that evaluates your computer’s CPU performance. Cinebench R15 is a totally free utility and is available for download here.
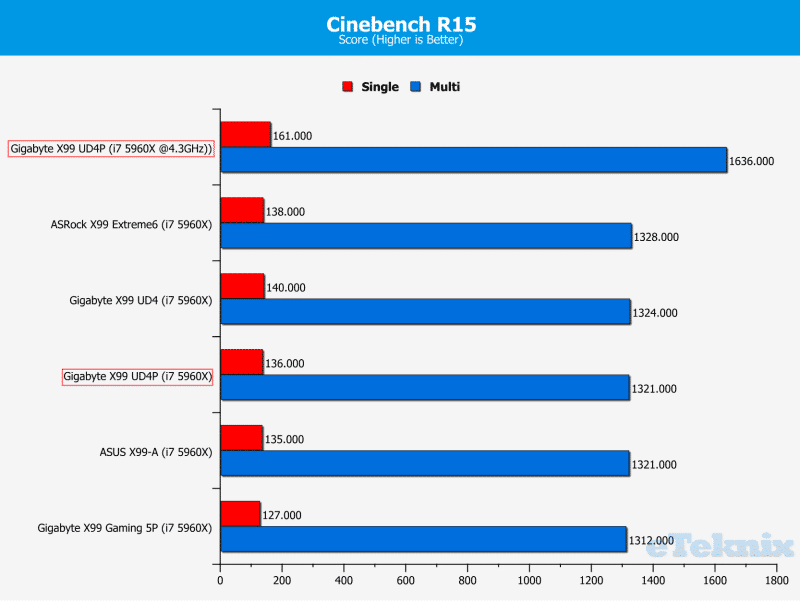
Nothing spectacular here, even though at stock it is in the middle of the board, it’s less than 1% in it between it and the top stock motherboard score.
WPrime
wPrime is a leading multithreaded benchmark for x86 processors that tests your processor performance by calculating square roots with a recursive call of Newton’s method for estimating functions. wPrime is a free utility that is available for download here.
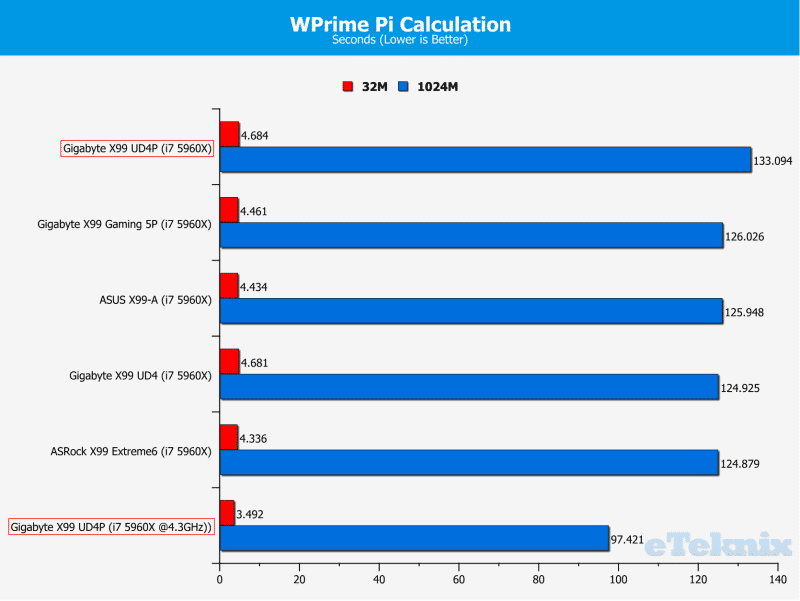
Similar story again, knock for knock with the competition with the overclock dominating.
SiSoft Sandra
The SiSoft Sandra Dhrystone and Whetstone benchmarks are widely used measures of compute power and performance for a wide array of real world usage scenarios. You can find out more details on these tests here or download SiSoft Sandra here.
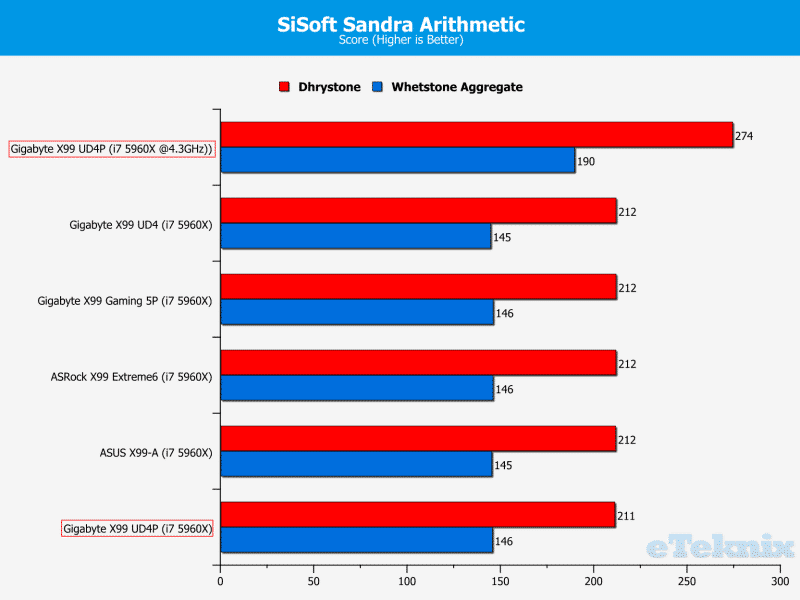
So little in it here for the stock CPU scores, it really shows that these boards have given enough breathing room for that processor to stretch its legs without hindering.
GPU Performance
3DMark
3DMark Firestrike is Futuremark’s latest creation for testing the GPU performance of high-end gaming PCs using Direct X 11 graphics. You can download a free basic version of 3DMark here.
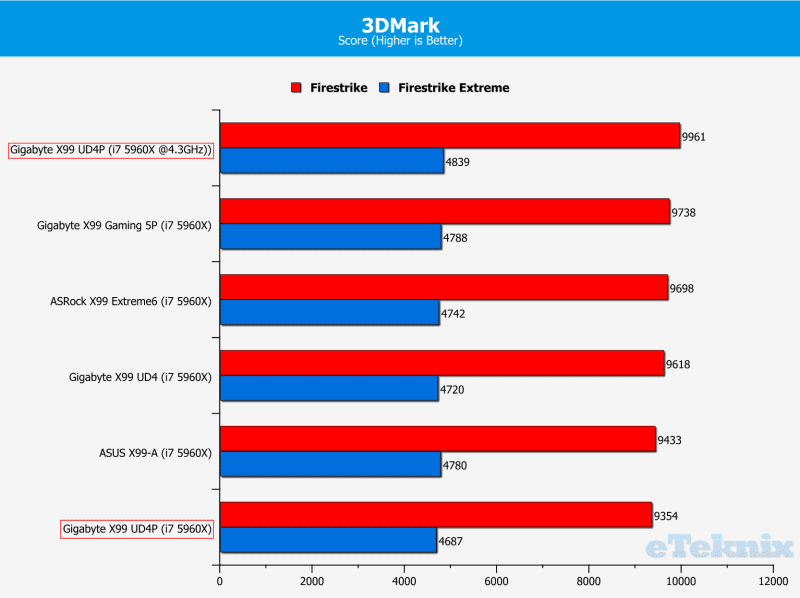
Again, showing how little there is in it here, all these boards giving the graphics card enough bandwidth to give its full potential.
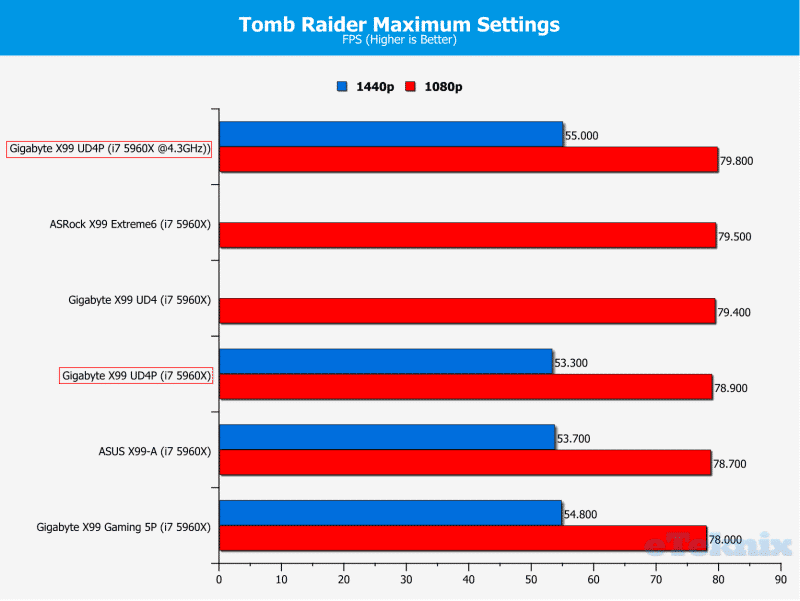
Tomb Raider
Tomb Raider is a popular action-adventure video game published by Square Enix based on the Tomb Raider franchise. The game was released in 2013 and as of March 2014 had sold 6 million copies.
Bioshock Infinite
Bioshock Infinite is a first person shooter developed by Irrational Games that is the third instalment of the Bioshock series. The game is the last to be produced by Irrational Games before they announced their closure in February 2014. The game has sold over 4 million copies since its 2013 release.
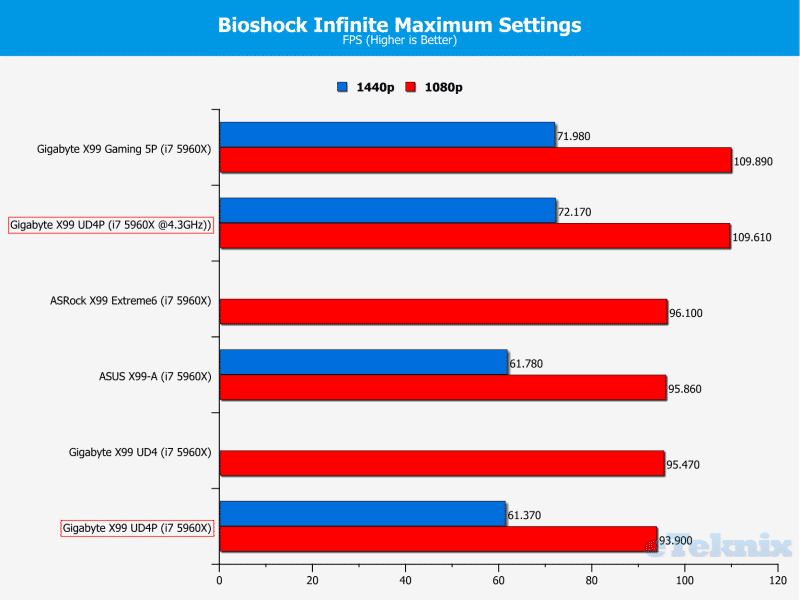
Again, very little performance difference here, however, Bioshock has given another strange result for the 1080p benchmark, but maybe the higher quality coated pins are giving a higher bandwidth for better performance at 1080p and 1440p.
Memory Performance
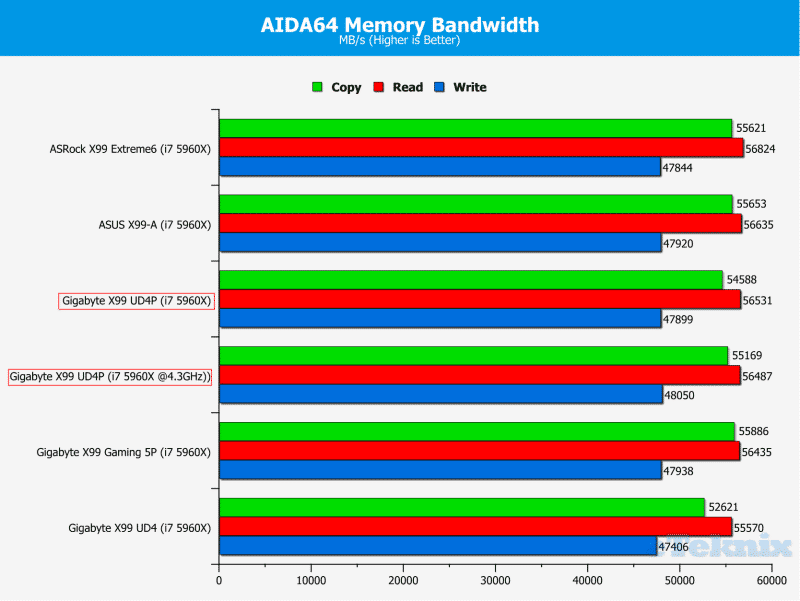
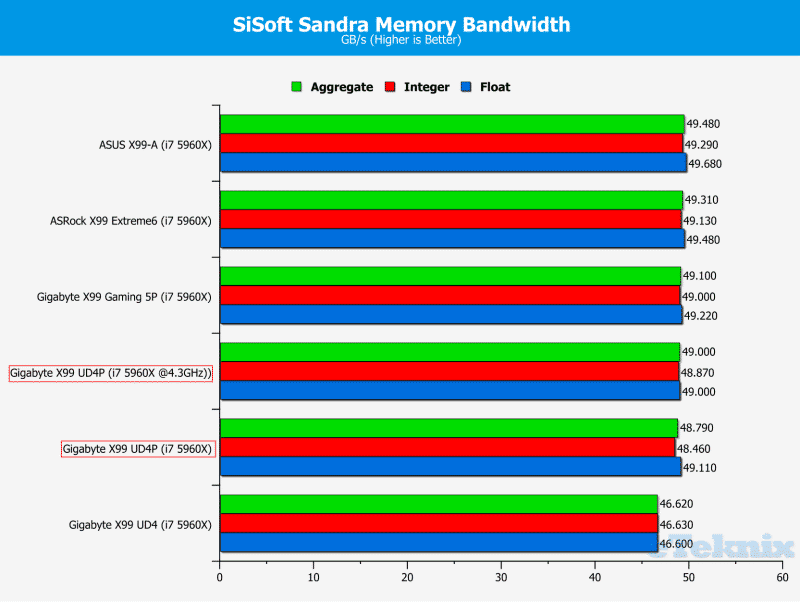
For our memory tests we use the built-in memory benchmarks in AIDA64 Engineer and SiSoft Sandra. For more details on each of the benchmarks please see here and here respectively.
AIDA64 Engineer
SiSoft Sandra
Combined Latency Test
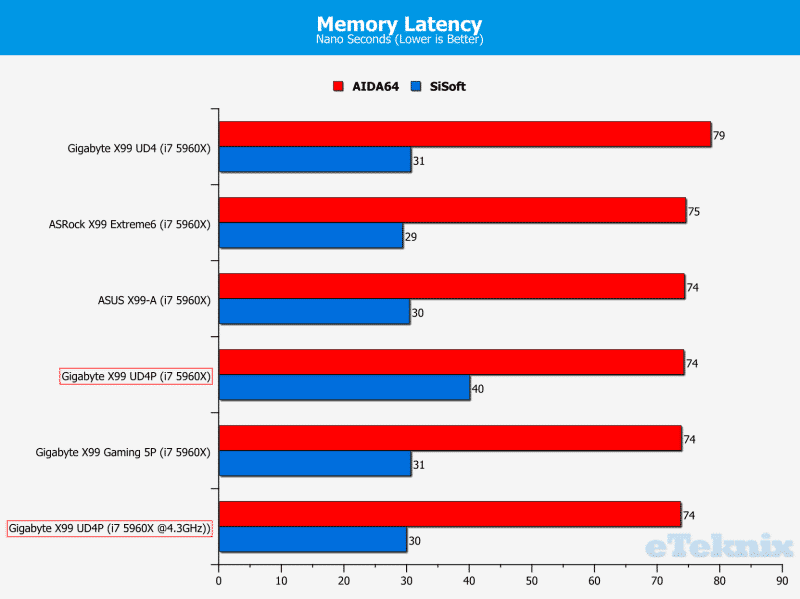
Small blip for the SiSoft latency test, but this was consistent for 3 tests. Results put this motherboard on par in the AIDA64 test.
SATA, M.2 and USB Performance
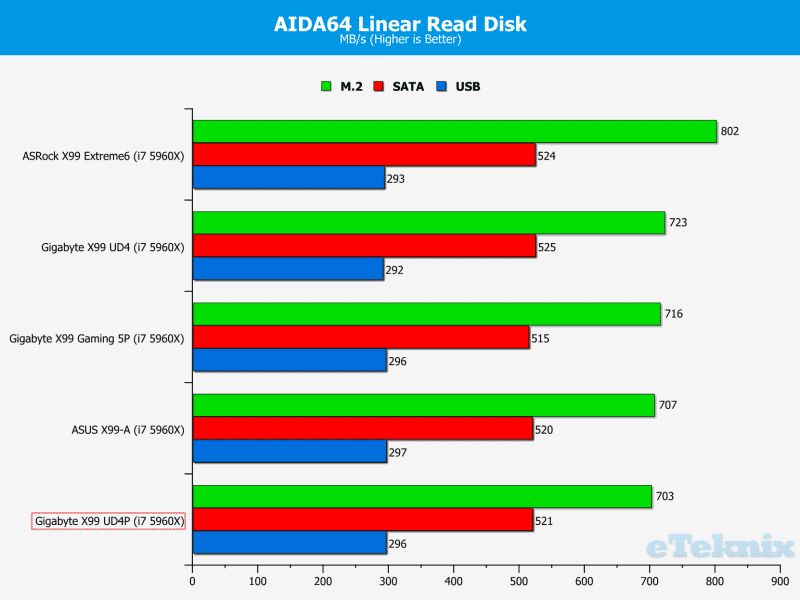
To test the storage performance in our motherboard reviews we use AIDA’s Disk Benchmark utility built into their AIDA64 Engineer Edition software package and run linear read and write tests. We run each of the benchmark tests on a SATA III, USB 3.0 and M.2 device. For SATA III testing we use a SanDisk Extreme Pro 240GB, for USB 3.0 testing we use the Supersonic Magnum 256 GB USB 3.0 flash drive and for M.2 testing we use Plextor’s 256GB M.2 M6e SSD. The drives are always formatted before use.
Linear Read
Linear Write
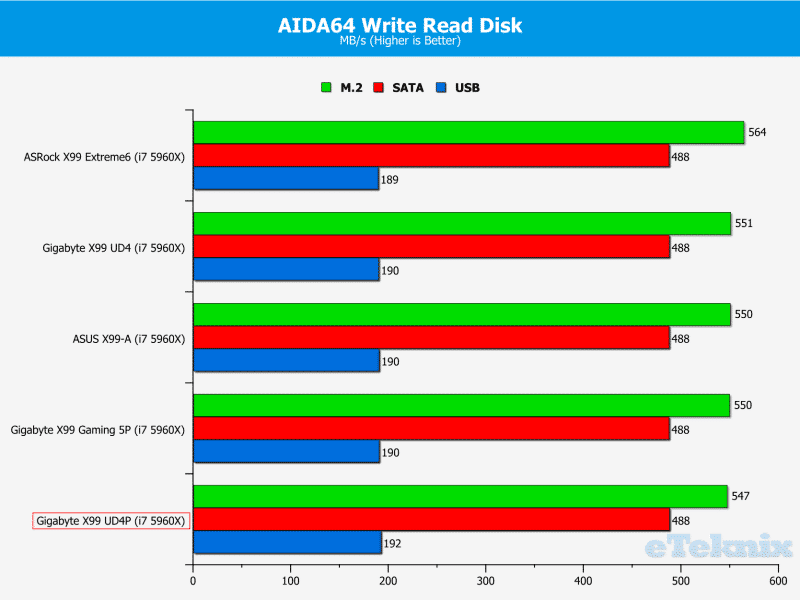
So little performance difference between the top and bottom; 15% for the M.2 read test.
Networking Performance
For our networking tests we connect the test system up to our Intel Gigabit enabled ASUS Rampage IV Extreme X79 motherboard test system through the ASUS RT-AC68U router and run our tests. We opted for this over a direct point-to-point connection because we wanted to simulate real world performance. For our WiFi tests we do the same except we connect the test system to the ASUS RT-AC68U router via WiFi at a distance of 2 metres from the router.
LAN Speed Test Lite
LAN Speed Test was designed from the ground up to be a simple but powerful tool for measuring file transfer, hard drive, USB Drive, and Local Area Network (LAN) speeds (wired & wireless). It does this by building a file in memory, then transfers it both ways (without effects of windows file caching) while keeping track of the time. Download the free Lan Speed Test Lite utility from here.
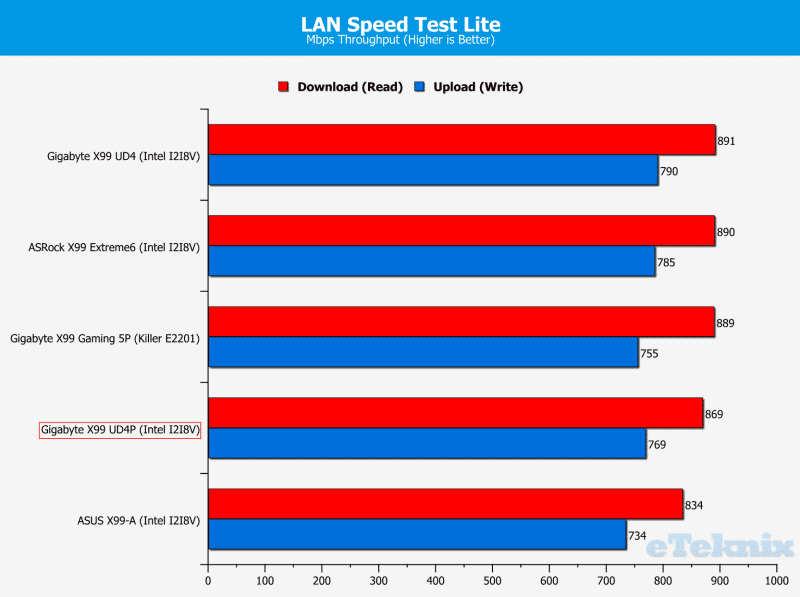
Very average results here, well within a negligible margin.
Passmark Performance Test 8
The PassMark Advanced Network Test (which is part of PerformanceTest) is designed to test the data transfer rate between two computers both of which must be running PerformanceTest. One of the computers must act as the server and will sit waiting for a connection. The other computer acts as a client. It connects to the server machine and sends data to it for the duration of the test. You can download a trial version of PerformanceTest from here.
Ethernet
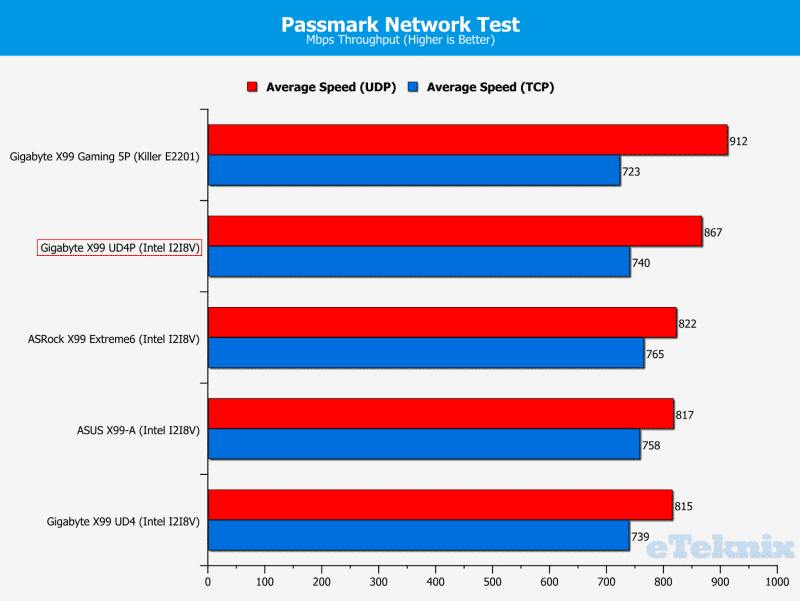
Massive increase compared to the original X99-UD4 board for UDP, but on par for the TCP test.
Audio Performance
RightMark Audio Analyser (RMAA)
RMAA suite is designed for testing quality of analog and digital paths of any audio device. The results are obtained by playing and recording test signals passed through the tested audio path by means of frequency analysis algorithms. A more common mark is also provided for those unfamiliar with measured technical parameters. Available here. We run the RMAA test using a 3.5mm to 3.5mm cable connecting the line out to the line in to test the quality of the motherboard audio codec not any external audio devices. We run the complete playback and recording test at default settings and then get RMAA to interpret the results giving the below outputs. We sync the playback and recording audio devices to the same setting as the test for accurate results.
16 Bit, 44KHz (DVD Quality)

16 Bit, 96KHz (Studio Quality)

24 Bit, 96KHz (Studio Quality)
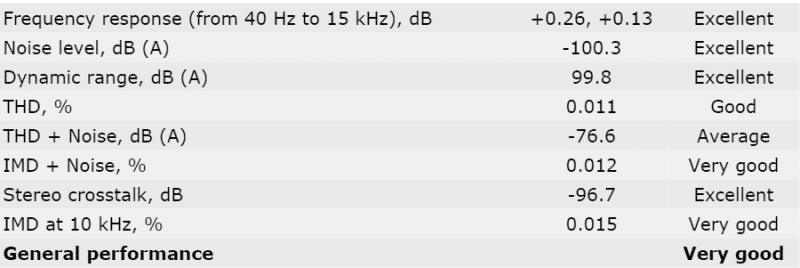
Some very strong scores here, with average being the lowest rating. It was strange that the more pressure I put the audio under, the better it performed.
DPC Audio Latency Analyser
DPC is a Windows tool that analyses the capabilities of a computer system to handle real-time data streams properly. It may help to find the cause for interruptions in real-time audio and video streams, also known as drop-outs.
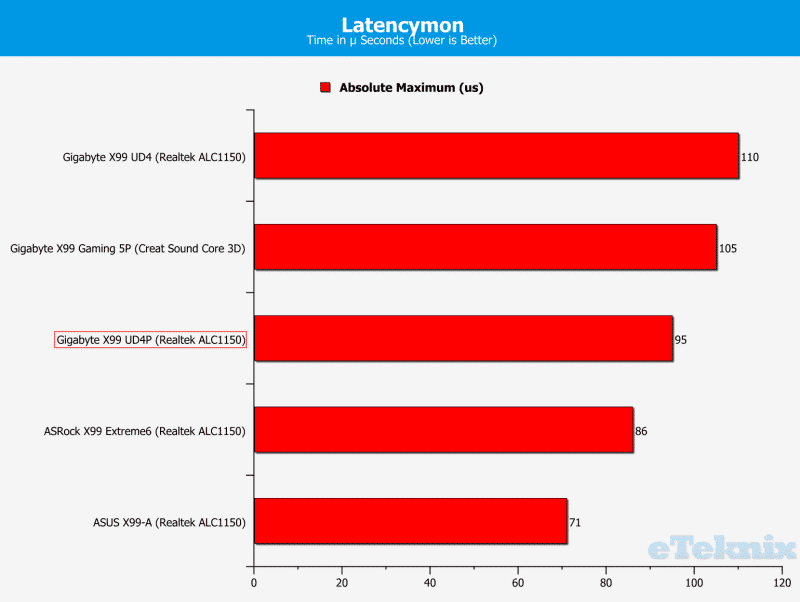
One of the poorer Realtek codec equipped motherboards, outshines the Creative Core 3D chip by 10%.
Power Consumption
Power Consumption
To measure power consumption we use a killawatt meter and measure the total system power draw at the wall. We run three different use-case scenarios for 5 minutes and take the average reading.
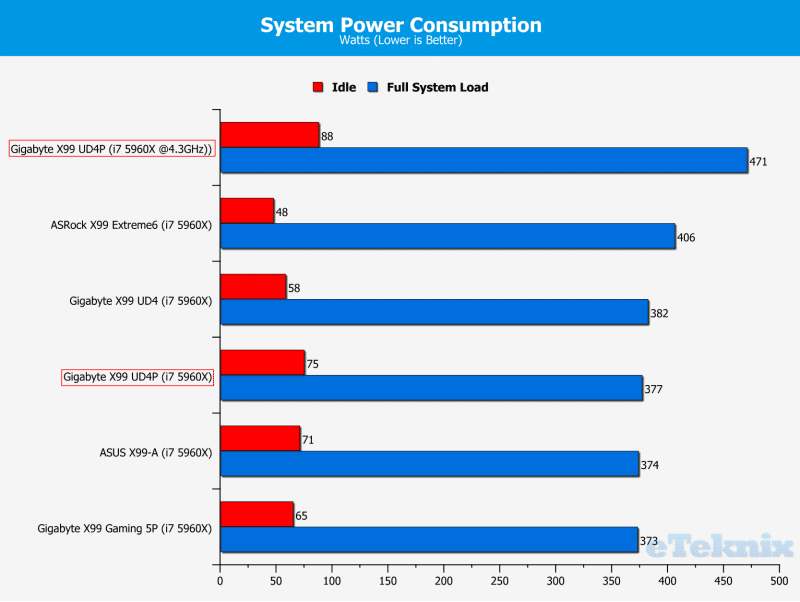
Not much in it at stock, just 4W more than the X99-Gaming-5P at full load, not bad.
Final Thoughts
Pricing
The Gigabyte X99-UD4P is available in the UK from Scan Computers for £192. Stock is currently unavailable in the US through a search of reputable US e-tailers. A little research shows this pricing is around 15% more than the standard X99-UD4 board and will be covered by Gigabyte’s 3-year warranty.
Summary
So today I’ve had the pleasure of testing the X99-Gaming-5P, which will be in an upcoming review, and the X99-UD4P motherboards; and being completely honest, I can’t tell the difference between them aesthetically apart from the colour. In a performance standpoint, the X99-UD4P is an excellent motherboard, with Gigabyte squeezing every last ounce of possible performance from it. The motherboards allow so much freedom for the CPU, GPU and RAM that the limitation is one or more of those components, rather than the motherboard. This new ‘P’ series will be replacing the current X99-UD4, so more bang for buck for the buyers.
Now I do like the LED accents given to these boards and the yellow/gold highlights are a little more unique, but it limits what graphics cards would look good, mainly the Sapphire Trixx series or maybe the MSi Lightning. Then again, if these are going to be more overclocker orientated, colours won’t be an issue as they’ll be thick in LN2. Performance wise, it’s slightly better than the original X99-UD4 board, which is a very good thing as it was a highly rated board originally at such a good price point.
Now there are only two things I don’t like about this motherboard; first is the lack of onboard power/ reset buttons and a debug LED. If it’s being aimed at overclockers, it’s going to be extremely likely that this board is going to be outside of a case; so onboard buttons would be ideal. Second is the size; I know Gigabyte has combined the height of an ATX motherboard with the width of an E-ATX motherboard, but this limits the potential audience to users with larger ATX cases. If you have say, the Corsair 500R, it would be a very tight fit due to the recessed motherboard tray. Other than that, this is an extremely well-equipped board, especially considering its it’s price.
Pros
- Good performance
- High quality audio
- Ambient LED is a nice feature
- Feature packed
- Great value for money compared to some similar specification boards
Cons
- Missing onboard DEBUG LED and buttons
- Limiting potential audience with E-ATX motherboard width
“For the overclocker or gamer on a budget, great compatibility for high-speed RAM and huge bandwidth for top spec processors and graphics cards to help cope with the newest demanding games and other applications. This is a serious motherboard and well worth the money.”

Gigabyte X99-UD4P (LGA 2011-3) Motherboard Review
Thank you to Gigabyte for providing this review sample.


