ASUS Z170-A (LGA 1151) Motherboard Review
A Closer Look & Layout Analysis
Taking our first detailed look at the motherboard, it feels very; busy; Around the CPU socket, normally the chokes are nestled under the heatsinks to conceal them away from view. The I/O cover is absolutely huge on this and makes that part of the motherboard look bigger than it actually needs to be. Something that caught me off guard here is the addition of a PCI lane; the only possible reason for this addition is to ease some upgraders if they have PCI compatible products such as a sound or networking card.

Taking a look at the CPU socket itself. It resembles the sockets of previous years thanks to a great pin design; this motherboard can accept cooling solutions from the 1150 range of motherboards.

The chipset heatsink is very stylish with small cutouts in the cover showing the heatsink below; The blue outlines are a great addition of colour.

Looking at the I/O options. the layout is slightly unconventional and I’m struggling to find the reason behind the placement of the PS/2 port. Going left to right: 2x USB 2.0, 1x HDMI, 1x DisplayPort, 1x DVI, 1x VGA, 1x PS/2, 2x USB 3.0, 1x Gigabit LAN, 2x USB 3.1 (1x Type A, 1x Type C), S/PDIF out and 5 HD audio jacks.

Moving down the side of the board, the I/O cover stops, the white design continues to the base in an almost circuit board dashed style. This motherboard features Crystal Sound 3 features which make the most out of the Realtek RTL892 codec.

The Crystal Sound codec has a nice metal cover, similar to that of the SupremeFX covers on the ASUS RoG motherboards.

For a relatively low branded motherboard, when considering that the A brand is the lowest compared to the S, Pro and Deluxe; this motherboard has heaps of connectivity; 3x PCIe x1 lanes, 3x PCIe x16 lanes and 1x PCI lane.

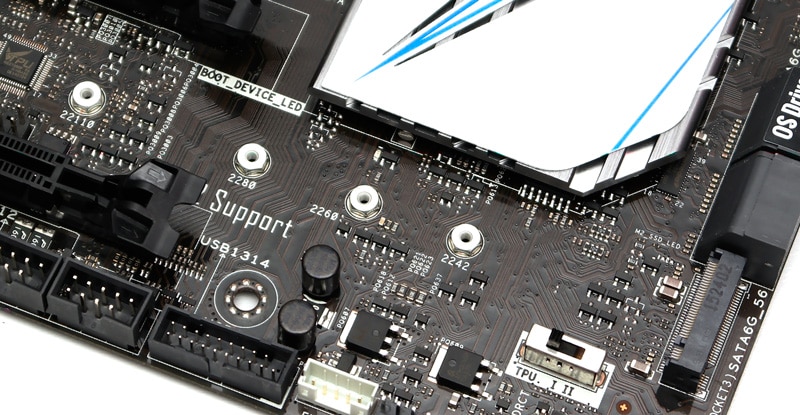
Nestled under the chipset heatsink is the M.2 port. Thanks to a great design, the SSD can be as long as 110mm and fit just between the last two PCIe lanes.

To the bottom of the board, the usual headers such as HD audio, USB 2.0 and Thunderbolt. Nestled in the middle is a small power button for when you need to test with as few connections as possible.

Moving over and the usual headers continue. Something unique to ASUS is the TPU switch, previously this was just a switch On and OFF, but now this has two settings (three if you include OFF). First is air cooling settings and second is water cooling settings, this switch optimizes the CPU performance to which cooling solution you have fitted. I would use this with a warning, these settings would be optimised to a general “middle ground” cooling setup, if you are using a close to stock cooling solution, your temperatures may increase significantly.

Turning up the right-hand side of the board, we see the first and only M.2 Port, 6x SATA 6Gb/s ports and 1x SATA Express. Despite the move to digital media and cloud storage, this motherboard is likely aimed at the low-end of the market. If so, some users may still be using blu-ray drives and similar which can take up multiple SATA ports depending on the amount of drives used.

Opposite the I/O ports, we find the 4 DDR4 DIMMS, 24 pin power connection, USB 3.0 header and MemOK button for memory testing.

One feature that I like about this motherboard is the introduction of the W-PUMP (Water pump) header. Have you ever had the issue of the CPU fan not recognised on your previous motherboard, despite having the water pump plugged in. Well, this new header is specifically designed for that purpose; no more POST errors from this motherboard.


send me this board i have the corsair white 760t case it would be a perfect match 🙂
Amazing board with rock solid WiFi up to 20 GBps even though they only state 13 and very easy to over clock your CPU. Ensure you have the latest Bios though especially with Windows 10 64 bit as the earlier versions had stability issues. One of the best boards I have owned.