Cyberpunk 2077 – A Simple Edit May Give Performance Gains

If our community is anything to go by, then it seems pretty clear that people are having somewhat mixed opinions and results when it comes to how Cyberpunk 2077 performs on their PC. And no, we’re not talking about bugs or glitches here, we’re referring to the game’s actual general performance and framerate. – Following a report via PCGamesN, however, a relatively quick edit to the games configuration file may potentially yield some exceptionally impressive results. Albeit, largely because of what was possible a huge error on CD Projekt Red’s part!

Cyberpunk 2077
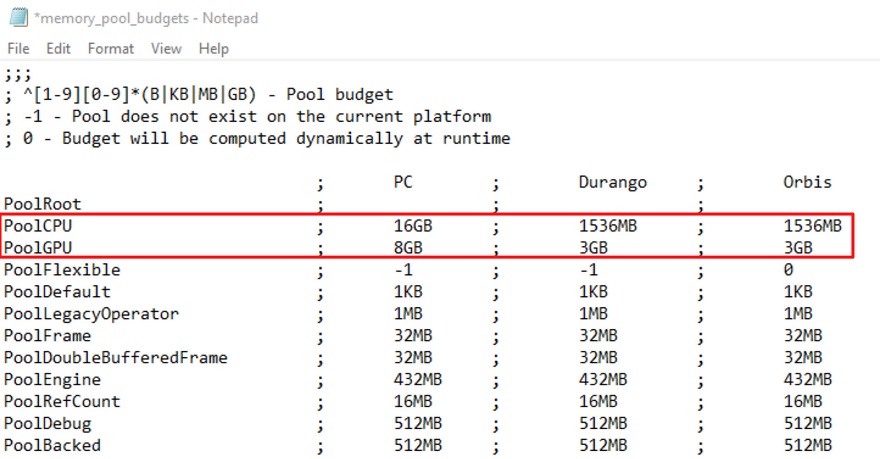
In something that may represent a pretty significant oversight in the games configuration file, it has been found that the default RAM and VRAM values (for the PC version) have been set to the exact same level associated with both the PS4 and Xbox One versions. In other words, while it will certainly begin to gobble up more memory eventually, it only starts by taking 1.5GB of RAM and 3GB of VRAM as the initial ‘pool’.
Now, given my own system has 32GB of RAM and 11GB of VRAM, this clearly is not getting the best potential out of my components. There is, however, a way you can ‘correct’ this!
Through a quick edit of the game’s configuration file, you should be able to, at least in theory, quite notably boost the game’s performance by simply giving it more in the ‘pool’ value.

How Do I Do This?
Firstly, we should note that tinkering in your games files is not recommended if you don’t, generally speaking, know what you’re doing. In addition, it’s unclear whether applying this ‘fix’ will impact the success of any future updates. And, it should be noted that we fully expect CDPR to release a ‘hotfix’ correcting this specific error in the very near future.
So, with that little disclaimer out of the way, what do you do?
- Ensure 100% that the game is not running before you attempt this
- Find the ‘memory_pool_budgets.csv’ file. – This will be located within the game’s main install directory although exactly where depends on your launcher (Steam/GOG etc.)
- Create a back-up of this file and keep it safe (just in case something doesn’t work correctly)
- Open the file using the ‘Notepad’ tool
- Find the numbers specifically associated with the ‘PC’ chart. – Do not touch the numbers under ‘Durango’ or ‘Orbis’
- Within the file, look for the ‘PoolCPU’ value and change the number (in the PC list) to half of the RAM actually installed in your system. Do NOT allocate the full amount as this may cause problems
- Next, find the ‘PoolGPU’ value and set this to the full amount of VRAM your graphics card provides.
- If you don’t know what either of the above amounts are, type ‘DXDIAG’ in your Windows 10 search bar and run the application. A little poking should find the numbers you need!
- Once done, save the file and try booting the game
If this ‘fix’ doesn’t work, or you don’t see any notable improvements, it might be in your best interest to use that back-up file and simply replace the version you edited. Given that this is, by and large, a pretty quick solution, however, and totally free, it’s well worth a try!
At this point though, we only wish the game had an actual benchmarking tool so we can categorically say what kind of results this yields (if any). So, in that regard, I’m afraid you’re going to have to make your own mind up!
What do you think? – Let us know in the comments!


