How to change drive letters in Windows 7
Within some point of owning a computer there may be times when you want things just right. For me, this is every time I’m situated in front of my screen and I blame my OCD for it as it results in me wanting things symmetrical or in some kind of order or even grouping items together.
Grouping things together is always nice as it generally adds some kind of order to a mess and I like to see my desktop as one perfect example of an organized mess, whereas my storage drive actually has some kind of decorum to it with everything in its place.
This all sounds like a simple, normal process and nothing out of the ordinary, but my OCD really kicks in when I need to have physical drives including SSDs and hard drives utilising adjacent drive letters towards the start of the alphabet, whilst any optical drives come next and finally finishing off with everything else that requires a drive letter. This comes down to USB flash drives, my iPhone, camcorder and any other USB devices and with the amount I have, I honestly believe I could fill My Computer with half of the alphabet.
Now Windows wouldn’t be Windows if it didn’t play some nasty tricks on you, and if you (like me) do suffer with Obsessive-compulsive disorder you will honestly feel as if Microsoft are playing a dirty game with you. Especially when they decide to give your drives and devices that require drive letters; randomly picked ones and in various orders.
Before you have a nervous breakdown and start to panic, there is an easy solution and we’re quite surprised that more people didn’t know about this. This of course is the option of changing your drive letters to something more you.
We’ve created a simple guide for you to follow if you do need to change a drive letter at some point for whichever reason and we hope that the pictures & step by step instructions aid you in doing this simple task within Windows 7.
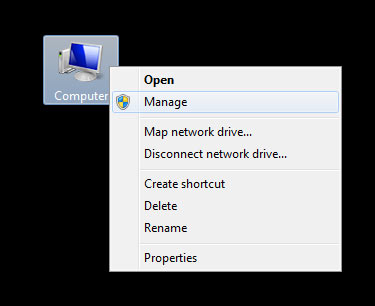
It’s a simple process that includes right clicking on the Computer icon on your desktop and choosing the Manage option from the menu.
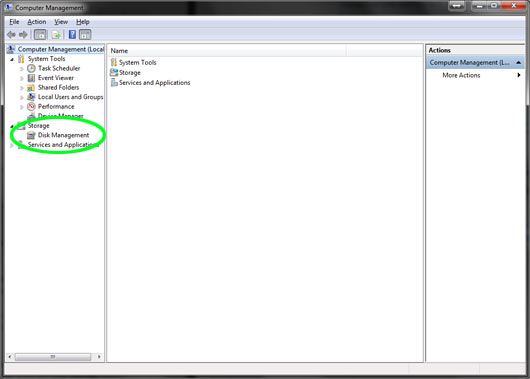
The Computer Management window will appear and will show you a column of various options including Disk Management of which you will need to select.
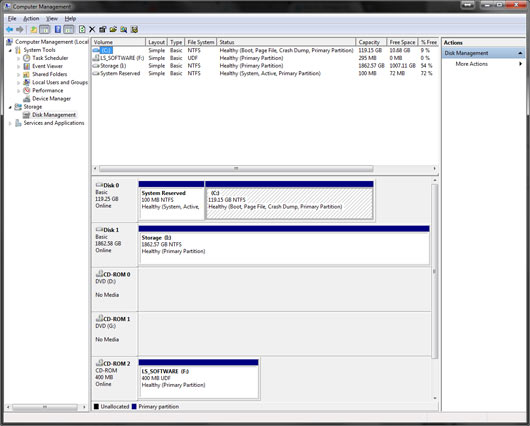
Once Disk Management has been selected, you will see all of your various volumes and what disks your partitions are based on.
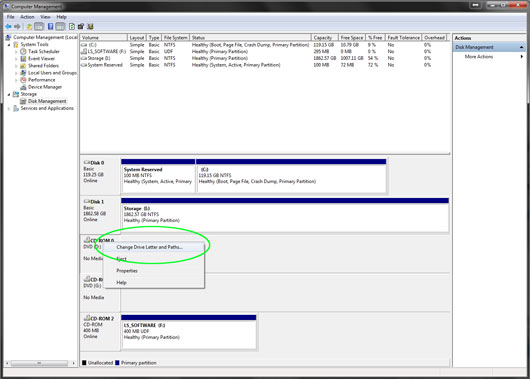
You can continue then to right click on the partition or disk (depending on type of drive) and choose Change Drive Letter and Paths.
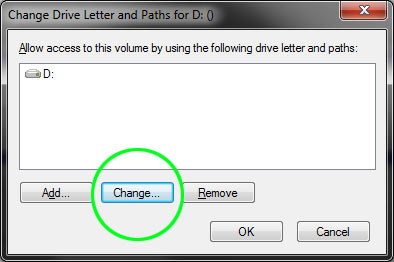
Once you have done that, you will be greeted with a dialog box showing what drive letter is currently used for your devices. Simply click on the Change button to pick a new drive letter.
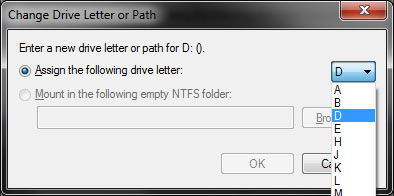
Another dialog window will open, where you can continue to pick your new drive letter from the dropdown list and press OK. If you can’t see the specific drive letter you require, it may be in use by another drive or device.
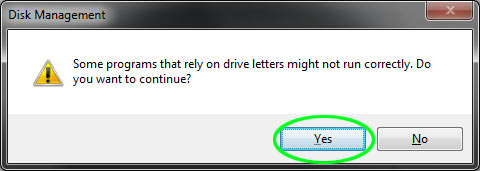
You may find that a warning will be displayed telling you that some programs may not run correctly if they rely on drive letters and gives you the choice to continue. If you are sure, you can continue to click Yes.
Once you’ve clicked on Yes, you will notice that the drive letter has been changed to reflect your choices and you can continue to close Disk Management.


